It's not possible to sublimate onto dark surfaces or cotton fabrics directly which is why Siser EasySubli has become a popular choice for those who don't want to be limited.
With a Sawgrass sublimation printer you can print directly onto EasySubli and then cut around the image, but Siser EasySubli - which is basically sublimation HTV - can't be fed into an Epson printer and printed on directly which means you have to take several extra steps.
I'm going to say right up front I don't recommend this method. It's time consuming and cumbersome and if you are doing this on the regular, there are far better processes and printers available that will increase your production and give you a better quality.
With that said, follow this advanced Silhouette tutorial for details on how to use EasySubli with an Epson sublimation printer.
Open the design in Silhouette Studio. I'm using this full color image from So Fontsy. To avoid any white edges when you print and cut your design you'll want to create a bleed. How you create a bleed depends on the design itself specifically the color of the edge.
IMPORTANT: Make sure the cut line that's created for the bleed, using the offset tool, does not have a line weight to it or it will print.
Once your design is ready, open the Page Setup panel and adjust the Media Size to Printer so it matches the 8.5 x 11" sheets of EasySubli. Check the boxes to Show Print Border and Show Cut border. Make sure your design is safely within both.
Now it's time to print on a sheet of sublimation paper.
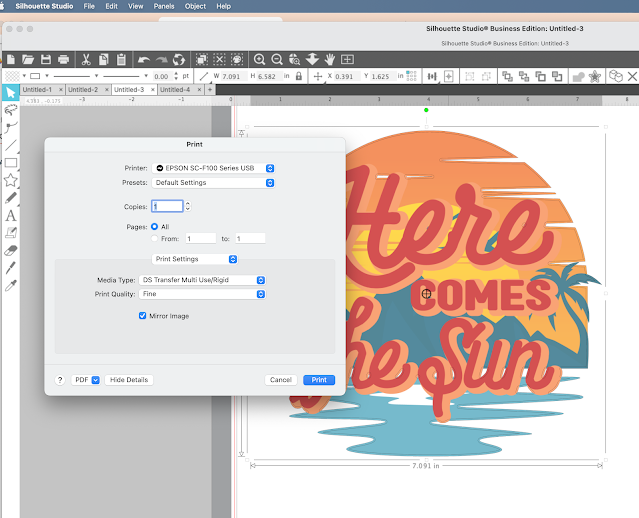
How to Print to Epson Sublimation Printer from Silhouette Studio
With an Epson Sublimation Printer - whether that's an F570 (my favorite wide format true sublimation printer) or a compact Epson F170 which is a true sublimation printer or a converted Epson printer - you'll need to print on sublimation paper first. The EasySubli will jam printer every time. That means we'll need to print on sublimation paper then - in a separate step - press the sublimation transfer onto the EasySubli.
How to Cut Siser EasySubli with a Silhouette CAMEO 4
We need to cut the same design (not reversed) out of the EasySubli. Place a sheet of EasySubli with the rough side up on your Silhouette cutting mat and load into the Silhouette CAMEO machine.
In Silhouette Studio move to the Send panel and make sure only the internal bleed line is set to cut. select. Heat Transfer, Smooth as the material and increase the force to 26.
Now send the design to cut out of EasySubli. When it's done cutting, weed away the excess.
What you have now is a printed sublimation transfer printed in reverse and the shape of the same design cut out of EasySubli - not reversed.
Set your heat press to about 350 for 5 seconds.
How to Use EasySubli with an Epson Sublimation Printer
While that's warming up take a sheet of the EasySubli mask and place it over the EasySubli cut sheet so you can peel the transfer the EasySubli design onto the shirt.
Place the EasySubli HTV directly onto the shirt.
Press at 320 degrees for about 10 seconds then peel off the mask. You can reuse the mask sheet if you saved the backing.
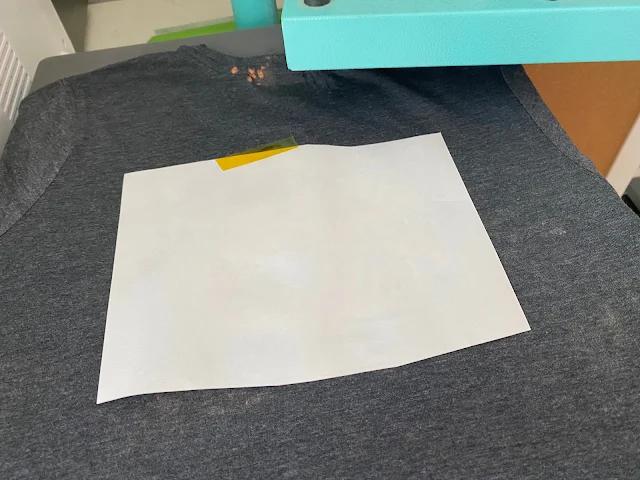
Use some high temperature tape to keep the sublimation paper in place. Use your heat press to press again for 60 seconds at 350.
When the time is up, remove the sublimation paper and you'll see the sublimation image is now directly on the EasySubli.
You'll want to wait at least 24 hour to launder.
As you can tell this is a long, multi step process. It's fine for one-off situations, but as I said before I would not recommend this for anyone who needs full color images on darks or cottons regularly or in volume.
There are many other better options including:
- Using a Sawgrass sublimation printer which will allow you to print and cut directly on the EasySubli
- Using a White Toner Printer that can create no cut, no weed transfers for darks or lights
- Using a Roland BN-20 EcoSolvent print and cutter to print heat transfers which can be applied to both darks or lights
Note: This post may contain affiliate links. By clicking on them and purchasing products through my links, I receive a small commission. That's what helps fund Silhouette School so I can keep buying new Silhouette-related products to show you how to get the most out of your machine!
Get Silhouette School lessons delivered to your email inbox! Select Once Daily or Weekly.


.png)


No comments
Thanks for leaving a comment! We get several hundred comments a day. While we appreciate every single one of them it's nearly impossible to respond back to all of them, all the time. So... if you could help me by treating these comments like a forum where readers help readers.
In addition, don't forget to look for specific answers by using the Search Box on the blog. If you're still not having any luck, feel free to email me with your question.