If you're a Silhouette CAMEO 5 beginner, don't delay learning how to do you first print and cut.
Printing and cutting opens up the ability to really expand what your Silhouette can do, including making stickers. In this beginner print and cut tutorial I'll walk you through every step so grab your Online Labels Sticker paper and sticker designs and let's go!
Power on your Silhouette CAMEO 5 and connect to your computer before launching Silhouette Studio.
In Silhouette Studio move to the Send panel and click the Machine List icon at the very bottom of the Send panel. All of your machine connections will display there. You'll want to pick the one for the CAMEO 5.
At the top of the Send panel select the material you are cutting. We're going to make some print cut stickers and I always use and recommend Online Labels sticker paper. The white sticker sheets cut great with the Sticker Paper, White settings. If you get a compatibility error, you can go through this process to fix it.
When you're ready, move back to the Design area to get ready to set up your print and cut page.
Start by going to File > Print Page Setup where you'll want to select your printer and page size. In this case I'm using my Epson 2800 with 8.5x11" sticker paper.
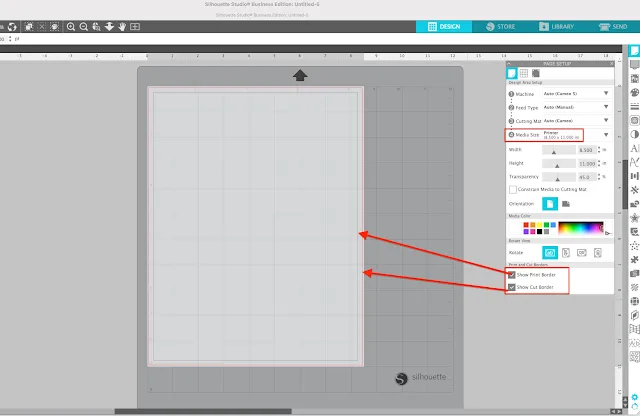
Return to the Design area and click the Page Setup tool at the very top of the right sidebar. The first three settings should all go to the "Auto" setting since you already told the software you are going to cut with the CAMEO 5.
Under Page Size pick "Printer." You'll also want to check the boxes for Show Print Border and Show Cut Border.
How to Open Images in Silhouette Studio
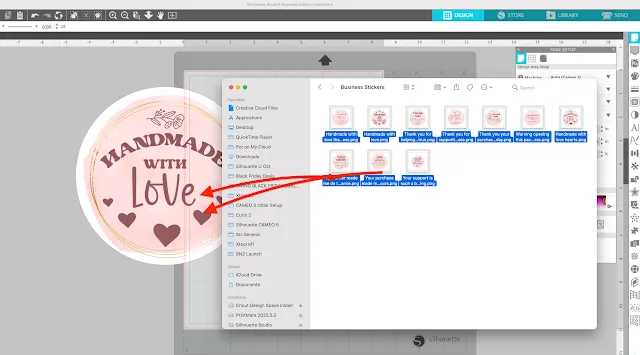
Now you can get ready to import your sticker designs. I'm using small business stickers from this set on So Fontsy. Once downloaded onto the computer and unzipped you can simply drag and drop them into Silhouette Studio.
If the images come in very large select the design by clicking on it and pulling in one corner to scale up or down.
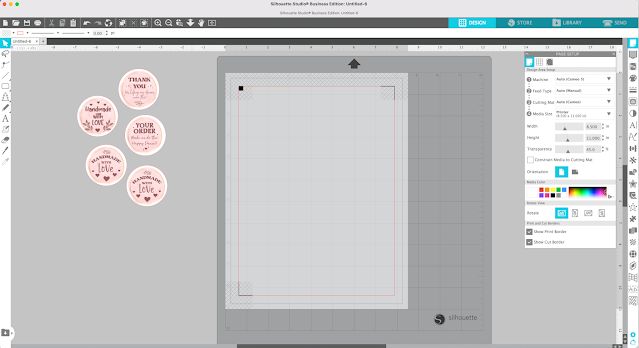
Repeat until all of your designs are in the work area.
How to Print and Cut with Silhouette CAMEO 5
In order for the Silhouette CAMEO 5 to know where to cut you'll need to add registration marks. You can do this by simply clicking "M" on your keyboard.
Three marks will be added to your work area. These marks need to be printed with the designs.
Move all of your sticker designs onto the work area. Make sure no designs are touching the hashed areas around the registration marks and that nothing is outside the printing or cutting borders.
When you're ready move back to the Send panel. If you only want the outside edge of the sticker to cut, select all stickers and click "Cut Edge."
Printing from Silhouette Studio
Now you're ready to print. From here or from the Design area, you can click the Printer icon (or go to File > Print).
Place a sheet of Online Labels sticker paper into your printer and then send to print. Both the sticker designs and the registration marks will print.
Cutting Stickers with Silhouette CAMEO 5
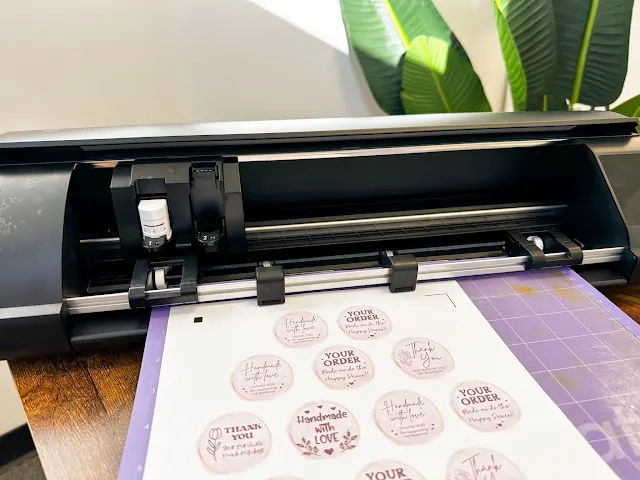
When the printing is done, place the printed sticker sheet on a cutting mat and load the mat into the CAMEO 5.
The CAMEO 5 will first look for each registration mark. It will then reset the AutoBlade, if you're using it, before cutting.
Once the cutting is complete test to make sure you can lift off your stickers easily before unloading the cutting mat.


.png)


No comments
Thanks for leaving a comment! We get several hundred comments a day. While we appreciate every single one of them it's nearly impossible to respond back to all of them, all the time. So... if you could help me by treating these comments like a forum where readers help readers.
In addition, don't forget to look for specific answers by using the Search Box on the blog. If you're still not having any luck, feel free to email me with your question.