You can print vinyl name stickers, designed in Silhouette Studio or another program, with a Roland BN-20A which is an ecosolvent print and cut machine.
One of the benefits about printing vinyl stickers with an ecosolvent printer is the ink is waterproof, and scratch and fade resistant. This makes it ideal for things like water bottles that will be handled a lot.
If you haven't already designed the personalized vinyl sticker, the first part of this tutorial will take you step by step through the design process in Silhouette Studio..then pick it up here to print and cut on your 20" Roland BN-20A.
Once the vinyl name sticker design is ready there are a few more steps needed so that the Roland knows exactly what to print and where to cut. There are a number of ways you can do this but the fastest and least expensive is to use a combination of Silhouette Studio Business Edition and Affinity Designer.
Unfortunately Silhouette Studio can't name a stroke color and Affinity can't trace to create cut lines..but together they can do it all...and for a one time fee as opposed to other options like Illustrator which is a monthly cost.
Creating Contour Cut Lines in Silhouette Studio
Still working in Silhouette Studio, change the line color of the name itself to transparent.
Select the offset line and change it to a different color other than red. Whatever color you choose increase the line weight to 0.25.
To export the design as an SVG file which Affinity can read, select the entire design and go to File > Save Selection > Save to Hard Drive > set file type to SVG.
Now you want to open the file in Affinity Designer for one step: to set the contour cut line so that Roland Versaworks can recognize it.
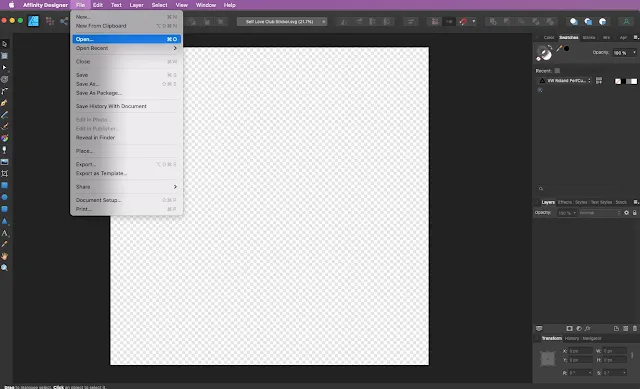
Launch Affinity Designer and go to File > Open and open the SVG.
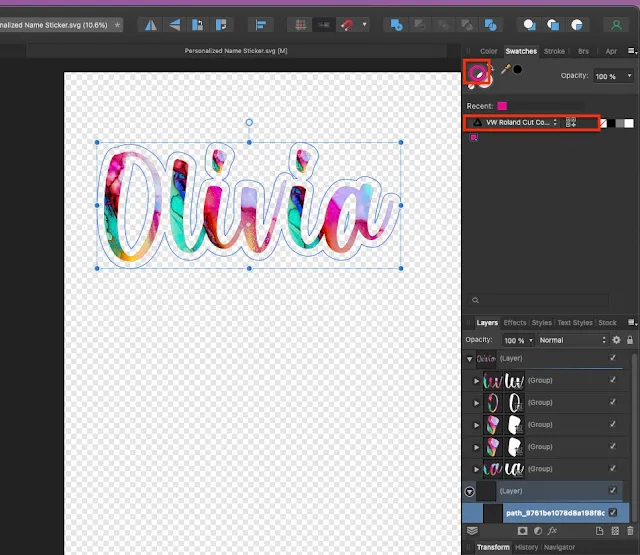
In the layers panel expand the design and select the path layer.
From the swatches menu make sure you have the Roland Cut Contour Swatch menu open. If you haven't yet installed it, you can follow this tutorial to add the cut contour swatches for the first time.
Select the stroke and then click the magenta color. When the offset path is changed to this color Versaworks will recognize it as a cut line.
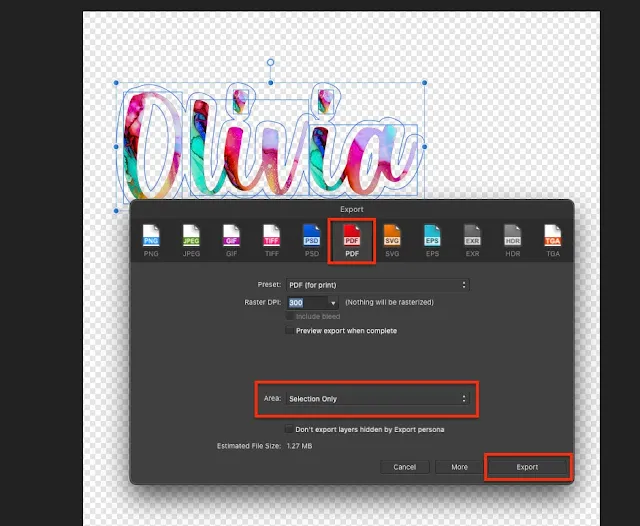
Select all layers and go to File > Export > Export Selection Only > PDF.
Once the file is in the queue right click it and select "Settings."
From the Layout tab adjust the scale if necessary. From the Quality tab select the either adhesive vinyl or glossy vinyl with gray glue (which is what I'm using). Select our print quality. I almost always print in Draft as it saves a lot of time without sacrificing much quality. Select your color profile. I recommend True Rich Color 3.
From the Cut Control tab make sure you are set to Print and Cut. If you need to adjust your cut settings at all this is where you'd want to do it.
Click "OK" to save all of your selections. Return to the queue and right click the file name again and click "Print." This will first rip and then print the vinyl name sticker.
For vinyl stickers like this you want to use a solvent vinyl like Roland's Printable Glossy or Matte vinyl.
Use transfer tape to place the vinyl name sticker on the surface whether that's a laptop, water bottle or even gift wrap!
Get Silhouette School lessons delivered to your email inbox! Select Once Daily or Weekly.


.png)


No comments
Thanks for leaving a comment! We get several hundred comments a day. While we appreciate every single one of them it's nearly impossible to respond back to all of them, all the time. So... if you could help me by treating these comments like a forum where readers help readers.
In addition, don't forget to look for specific answers by using the Search Box on the blog. If you're still not having any luck, feel free to email me with your question.