However, if you don't fix this issue - most often affecting the bottom left registration mark - you'll almost always have print and cuts that are not aligned. Read on for how to fix Silhouette registration marks that are not fully printing.
When your printer doesn't fully print the Silhouette print and cut registration marks, the Silhouette CAMEO or Portrait can't fully read the mark. That results is a registration error and/or a print and cut that's misaligned.
To ensure your printer prints that bottom left mark you need to make sure it's fully within the printable space. It's when it falls outside that space that the mark isn't fully printed.
There are usually two main reasons the registration mark is outside of the printable space:
- The page setup size is wrong (above)
- You tried to create more printable area and inadvertently moved the mark too low in trying to create more space
How to Setup the Page Size Correctly for Print and Cut
You can make sure the registration marks are all within the printable area by first making sure your print page settings and the Page Setup media size are in sync.
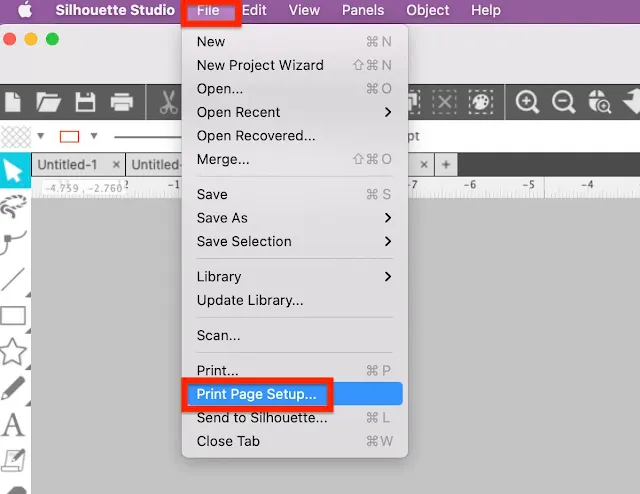
From the Design area of Silhouette Studio go to File > Print Page Setup.
Select the printer you are going to print to AND select the exact page size. You can see I am printing to my Epson 2800 inkjet printer.
You ALWAYS want to do this step first. The printer page settings may look slightly different between a MAC and PC.
After you set the page size from your printer settings, return to Silhouette Studio and open the Page Setup panel.
Change the Media Size to "Printer." If you have your printer settings correct, selecting "Printer" will ensure the two are synced.
Do NOT manually type in the page size and do not pick any of the other selections.
If you haven't already, from the Page Setup panel still, check the box for "Show Print Border". This puts a gray box in the work area that EVERYTHING you want to print, including the registration marks, needs to stay inside.
Turn on the registration marks by clicking "M" or by going to the registration marks tab in the Page Setup panel. Make sure you have the marks in the default position.
If you DO not do the first step and then go and pick your page size in Silhouette Studio, you can see that the registration mark at the bottom, falls below my print border (gray line) when I select A4 as the page size. This means the mark won't fully print.
Picking a Different Page Size
If you wanted to print on A4 size paper (or any other page size) then you must select the A4 paper size in your printer settings first. Again you'd still want to select "Printer" in the Silhouette Studio Page setup though after going through the steps above.
If any of the marks are not printing you should be able to clearly see why in Silhouette Studio by identifying which marks are outside of the print border.
If you realize you have a registration mark that's outside of the safe print area, you'll need to fix that by taking the above steps or you can move the marks. Learn how to move the position of print and cut registration marks in Silhouette Studio by following this tutorial.
Note: This post may contain affiliate links. By clicking on them and purchasing products through my links, I receive a small commission. That's what helps fund Silhouette School so I can keep buying new Silhouette-related products to show you how to get the most out of your machine!
Get Silhouette School lessons delivered to your email inbox! Select Once Daily or Weekly.


.png)


No comments
Thanks for leaving a comment! We get several hundred comments a day. While we appreciate every single one of them it's nearly impossible to respond back to all of them, all the time. So... if you could help me by treating these comments like a forum where readers help readers.
In addition, don't forget to look for specific answers by using the Search Box on the blog. If you're still not having any luck, feel free to email me with your question.