What's even better is this can be done in the free version of Silhouette Studio. Read on for the full tutorial on how to trace a silhouette of a person in Silhouette Studio.
Launch Silhouette Studio and go to the Design tab to start a new design area.
From the Page Setup panel make sure your Machine is set to auto, the mat is set to auto and the page size is set to 12x12.
Go to File > Merge and select the photo you want to trace from your computer. To create the best silhouette, try to use a profile or side view of the person's face. You don't need a photo with any type of special background or lighting.
How to Crop a Photo in Silhouette Studio
Once the photo is in Silhouette Studio you may want to crop it down so you're only dealing with the part of the picture you want to turn into a silhouette.
You can do this by double clicking the photo to get the edit points on each corner. Select the edit points on two of the corners at a time and then use the arrow keys on your computer to crop in whatever direction you want.
How to Trace a Photo to Create Silhouette Art in Silhouette Studio
When you're ready to create the silhouette of a person it's best not to use the tracing tool. There is very likely too much background and too little contrast to get the desired silhouette effect.
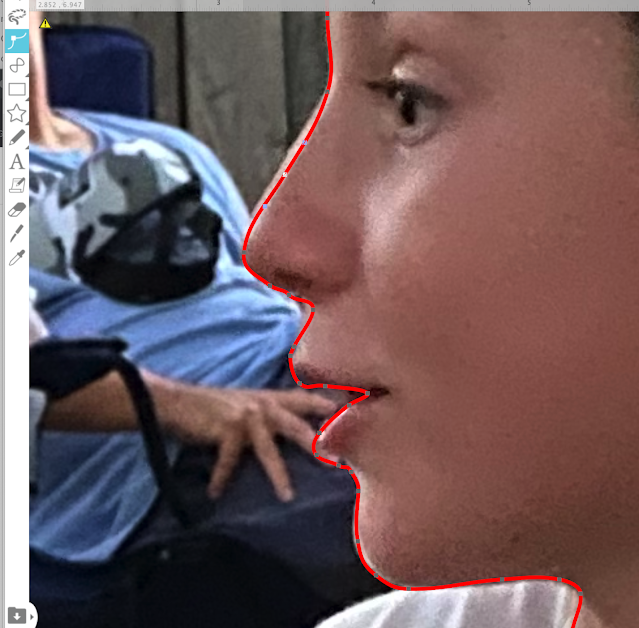
Instead, you can create a much more refined silhouette of a person by using the Draw a Curve Line tool from the left sidebar. This tool will allow you to drop edit points around the edge of the person's face.
Use your mouse to start dropping points close to the face. I usually start around the nose.
You want to drop points close together to pick up as many details as possible. Don't worry if it's not perfect on your first trip around the face - you will refine them in the next step.
Once you get back to the starting point the two edit points will snap together creating an outline.
Now you want to zoom in really close so you can fine tune the position of each edit point. Adjust as necessary but the key is to make sure every edit point is right along the edge of the person's face so you create an accurate silhouette.
To adjust an edit point click on it with your mouse and move it or use the arrow keys on your keyboard to move it.
Once you are satisfied with the position of every edit point you can move the photo away leaving just the silhouette shape behind.
This can be used as a cut file or for printing, etching or drawing.
I've used this technique to trace silhouettes of faces for years in Silhouette Studio and always found it to be the best way.
Note: This post may contain affiliate links. By clicking on them and purchasing products through my links, I receive a small commission. That's what helps fund Silhouette School so I can keep buying new Silhouette-related products to show you how to get the most out of your machine!
Get Silhouette School lessons delivered to your email inbox! Select Once Daily or Weekly.


.png)


I've been wanting how to know this for a very long time. Thank you so much!!
ReplyDelete