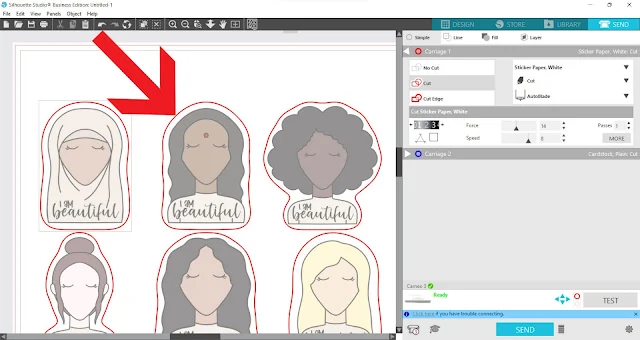
When making stickers there are some times when you want to make them with a white border around them, and then there are other times when you want to make stickers without a white border.
In this tutorial, we'll show you how to remove the white border around PNG sticker designs in Silhouette Studio.
The sticker PNG files we're using from So Fontsy's August SVG and Font Bundle include the white border around them.
But, if you wanted to cut out these stickers without a white border around them, then it's actually very easy to remove that offset.
In Silhouette Studio open the sticker PNG files that include the white border.
Open the Trace panel from the right sidebar. Click "Select Trace Area" and draw a box around the stickers to select your trace area.
Because this is a high-quality PNG file, Silhouette Studio can trace it really cleanly. I didn't need to adjust any trace settings.
Click Trace and Detach.
What this does is it now allows you to click and drag away just the white area from around the sticker! Delete that outer white border.
You can now see in the Send Panel how the cut lines are right around the outside edge of the image.
If you're interested in learning more about what the difference is between kiss cut stickers and die cut stickers, check out the following blog post on the So Fontsy blog.
And don't forget you can grab the stickers we used in this post in the August 2022 SVG and Font Bundle at So Fontsy.
Get Silhouette School lessons delivered to your email inbox! Select Once Daily or Weekly.


.png)


No comments
Thanks for leaving a comment! We get several hundred comments a day. While we appreciate every single one of them it's nearly impossible to respond back to all of them, all the time. So... if you could help me by treating these comments like a forum where readers help readers.
In addition, don't forget to look for specific answers by using the Search Box on the blog. If you're still not having any luck, feel free to email me with your question.