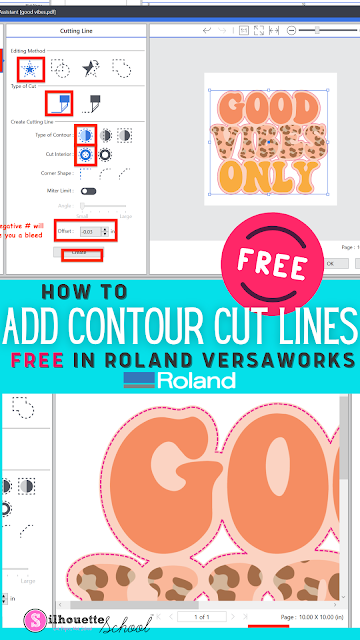
Roland quietly added a new feature in Roland Versaworks 6.13 (and higher) that allows users to create contour cut lines on an SVG directly in Versaworks and without any paid software program. There's just one caveat - the PDF has to come into Versaworks with vector data. Don't worry if you have no idea what that means I'm going to explain...every step and you won't be paying a cent to add Roland Contour Cut Lines to your SVG files!
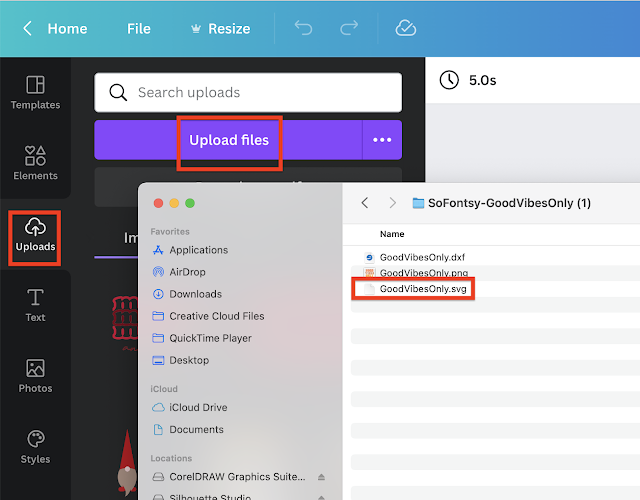
Have your SVG design downloaded on your computer. I'm using this Good Vibes Only design from So Fontsy. You can use code GAMECHANGER to get this file for free to practice creating your own contour cut lines.
It's important that you use an SVG as SVGs are vector files and that's what we need here. A PNG or JPEG will not work.
Using Free Canva to Create PDFs with Vector Data for Roland Versaworks
You're going to start by creating a free Canva account. Just enter your email address and create the account. You can use the free Canva plan for this although I have Canva Pro and absolutely recommend it!
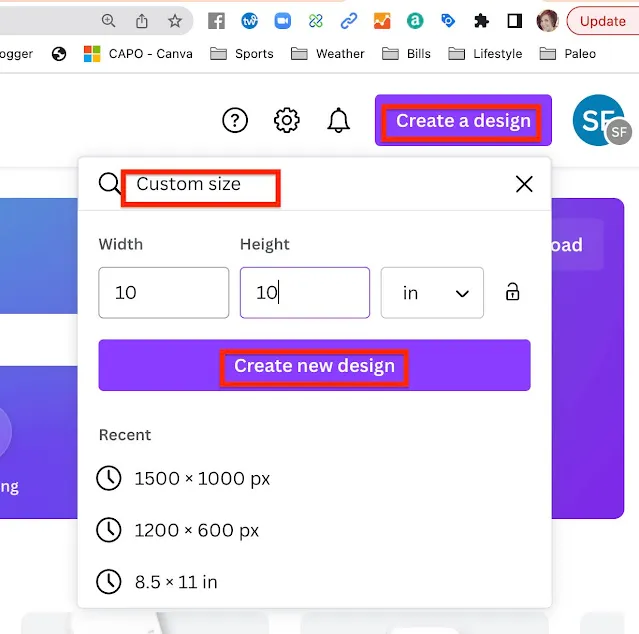
In Canva go to Home > Create a Design > Custom Size.
I would suggest you enter dimensions slightly larger than you want your final printed design to be then click "Create New Design."
On the left sidebar click "Uploads" > Upload Files and select the SVG file on your computer.
When the preview of the SVG file loads in Canva double click it and it will open on the canvas mat.
Size the SVG to fill the space.
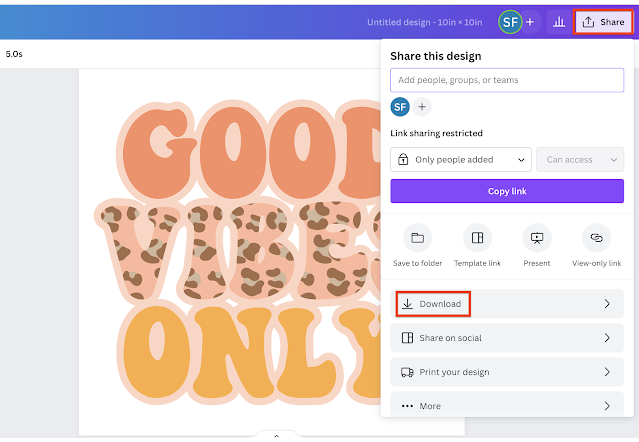
Go to Share > Download.
Select the saving file type as "PDF Print" or "PDF for Printing". (The color profile option will only show if you have the upgraded paid version of Canva Pro.)
How to Create Contour Cut Lines in Roland Versaworks for Free
With the PDF on your desktop now, launch Roland Versaworks.
Go to File > Add Job to Queue (select a queue) > navigate to the file to open.
Right click on the file name from the queue list and click "Job Assistant".
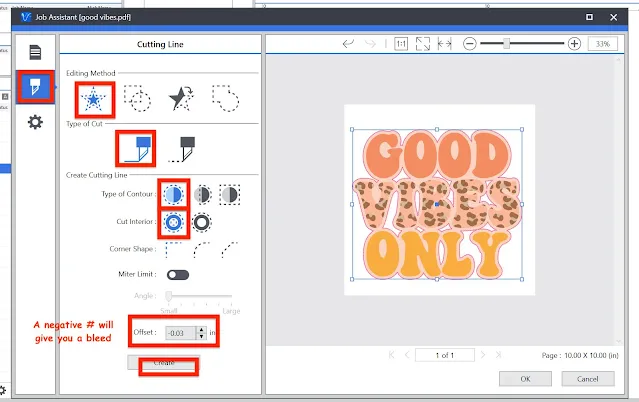
In this case I only want the contour cut line around the outermost layer. For example by selecting the outer peach colored layer only that will get the contour cut line.
The default settings will show up in blue but you can change them.
- If you want a perforated cut, you would select "Type of Cut" as the option with the dotted line.
- If I did not want the white areas between the "g-o and i" to cut, for example, I would change this by using the other "Cut Interior" option.
- If I wanted the cut line on the very edge I would leave "Offset" at 0.00. In order to get a bleed, you can see I put a negative number so my cut line is slightly inside the edge of the design.
After you click "Create" you can preview the position of the contour cut line.
Here's a close up of the cut line I created.
When you're ready for this to be changed in the queue click "Ok".
The file in the queue will NOT be updated...instead a new file will be created. You'll be able to tell the difference by the "A" indicating contour cut line data in the file's info.
You can now go ahead and change any other Settings, Rip, and print this design.
That's how you add Roland Versaworks Cut Lines for free without needing any other special software!
Note: This post may contain affiliate links. By clicking on them and purchasing products through my links, I receive a small commission. That's what helps fund Silhouette School so I can keep buying new Silhouette-related products to show you how to get the most out of your machine!
Get Silhouette School lessons delivered to your email inbox! Select Once Daily or Weekly.







.png)


No comments
Thanks for leaving a comment! We get several hundred comments a day. While we appreciate every single one of them it's nearly impossible to respond back to all of them, all the time. So... if you could help me by treating these comments like a forum where readers help readers.
In addition, don't forget to look for specific answers by using the Search Box on the blog. If you're still not having any luck, feel free to email me with your question.