If you're new to Roland BN-20 or BN-20A one of the most intimidating parts can be creating contour cut lines. Fortunately it's easy to add a VersaWorks contour cut lines in Affinity Designer using a cut line and SVG created in Silhouette Studio.
In fact pairing Affinity Designer and Silhouette Studio is my favorite and most recommended way to quickly and easily add Roland VersaWorks contour cut lines and perf cut lines so you can get on with printing and cutting.
This tutorial is part of a five part series on using Silhouette Studio to create contour cut lines including bleed lines and white borders. If you haven't started from the beginning of the series, I would highly suggest you do that to learn:
This tutorial assumes you have a firm understanding of the three critical steps before advancing...and that you have Silhouette Studio Business Edition and Affinity Designer.
Start by launching Affinity Designer and going to File > Open. Navigate to the SVG design to open it in the software.
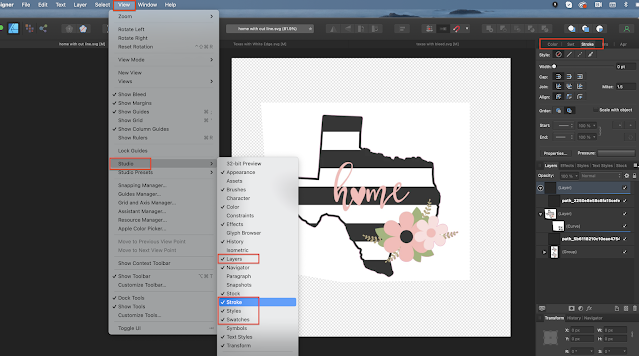
From the View Menu make sure "Show Right Studio" is checked along with at least: Layers, Swatches and Stroke.
When the image opens up in the work area, go to the Stroke menu on the right side.
Expand the Layers and then select ONLY the path layer.
You will see the cut line you created around the design highlight in blue and you can also confirm because the swatch color should be the same color that you created it in Silhouette Studio. In this case - green.
From the color swatch drop down, pick the Roland VersaWorks palette.
Note: If you haven't added the VersaWorks Contour Cut line color swatches to Affinity yet, follow this tutorial before going any further.
Click the Stroke icon at the top (hollow circle - mine is green).
Change it to the Cut Contour color swatch by clicking the Magenta Contour Cut line color.
When you deselect by clicking outside of the image, you'll see the contour cut line has turned pink.
You can do the same whether you made a bleed area or have the cut line right on the edge of the design
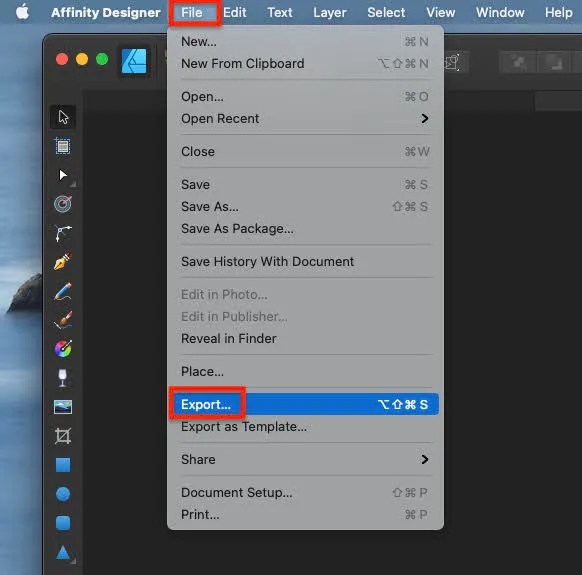
Now export the file as a PDF by going to File > Export.
Select PDF and click the "Export" button.
Now move over to Roland VersaWorks and go to File > Add Job to Queue.
Find the PDF on your computer and import into VersaWorks.

Note: This post may contain affiliate links. By clicking on them and purchasing products through my links, I receive a small commission. That's what helps fund Silhouette School so I can keep buying new Silhouette-related products to show you how to get the most out of your machine!
Get Silhouette School lessons delivered to your email inbox! Select Once Daily or Weekly.


.png)


No comments
Thanks for leaving a comment! We get several hundred comments a day. While we appreciate every single one of them it's nearly impossible to respond back to all of them, all the time. So... if you could help me by treating these comments like a forum where readers help readers.
In addition, don't forget to look for specific answers by using the Search Box on the blog. If you're still not having any luck, feel free to email me with your question.