There are many reasons you may want to put a solid white edge around a design in Silhouette Studio.
A white border on stickers gives a clean, polished, and professional look. Adding a white edge around your design in Silhouette Studio is fast and easy using the offset tool.
This post is part 2 of my Five Part Series on Creating and Working with Contour Cut Lines in Silhouette Studio. If you haven't followed Part 1: How to Create Cut Lines around your JPEG or PNG by Tracing you'll want to do that before you go any further.
If you'd rather NOT have a white edge on you design, but would instead like to create a full color bleed, check out Part 3 of this series.
Once the image is traced and a cut line is created, you can create a solid white border around the design using the Offset tool.
Note: If you are working with an SVG file, you do not need to trace the image before this next step.
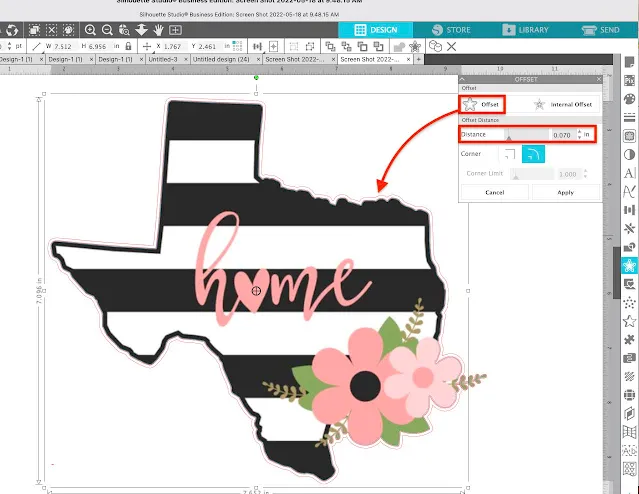
Select the existing cut line around the edge of your design and open the Offset panel from the right sidebar.
Click "Offset" and a contour cut line will be added outside the design.
Adjust the Offset distance if desired then click "Apply."
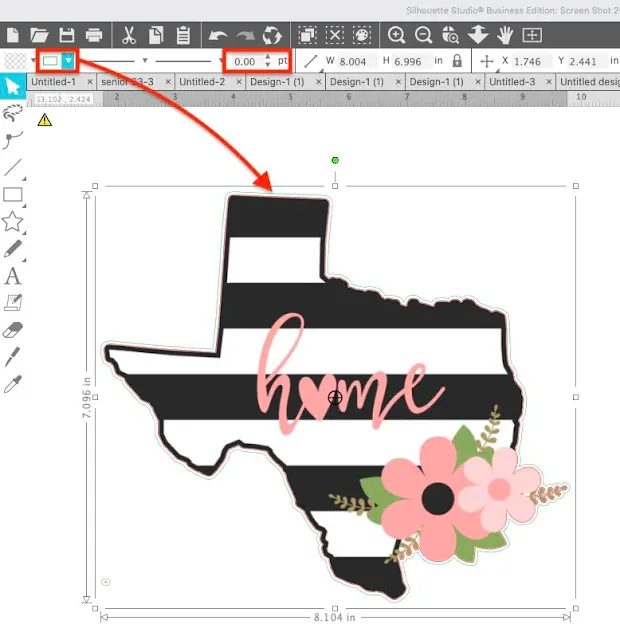
Change this cut line to a different color by using the line color picker in the Quick Access Toolbar. You can change the line color to any other color. Make sure the line weight is set to 00.00
Select the original red line and delete it. It's easiest to make sure you have the correct line selected, by opening the Select by Color tool on the top toolbar.
Select the red swatch and click Delete on your keyboard.
The original cut line has now been removed.
You can now print and cut this image on your Silhouette machine and the cut line will be outside the image creating the white border.
You can now use this setup to print and cut on Silhouette CAMEO - it's perfect for stickers - or export as an SVG by going to File > Save As > SVG and use in another program. NOTE: You will need Silhouette Studio Business Edition to export as an SVG file.
How to Use Silhouette Studio to Create VersaWorks Contour Cut Lines with White Border
Because you can export files from Silhouette Studio with the cut line, if you need to create a contour cut line with a white border - and open in another program such as Adobe Illustrator, Corel Draw or Affinity Designer you can do this.
Versaworks and Roland BN-20 and BN-20A users can take advantage of Silhouette Studio's ability to easily trace by creating a contour cut line that Roland BN-20A can both print and then cut around.
If you want a bleed area around your design to avoid getting any white when printing and cutting, check out Part 3 of the series first before exporting the SVG from Silhouette Studio for Illustrator or Affinity.
Note: This post may contain affiliate links. By clicking on them and purchasing products through my links, I receive a small commission. That's what helps fund Silhouette School so I can keep buying new Silhouette-related products to show you how to get the most out of your machine!
Get Silhouette School lessons delivered to your email inbox! Select Once Daily or Weekly.


.png)


No comments
Thanks for leaving a comment! We get several hundred comments a day. While we appreciate every single one of them it's nearly impossible to respond back to all of them, all the time. So... if you could help me by treating these comments like a forum where readers help readers.
In addition, don't forget to look for specific answers by using the Search Box on the blog. If you're still not having any luck, feel free to email me with your question.