The ability to cut and score with Silhouette CAMEO can be extremely helpful when it comes to paper projects!
This Silhouette tutorial will show to set up cut and score lines in Silhouette Studio..which comes in really handy for cards, 3d box cards and favor bag toppers like for these adorable s'more bags.
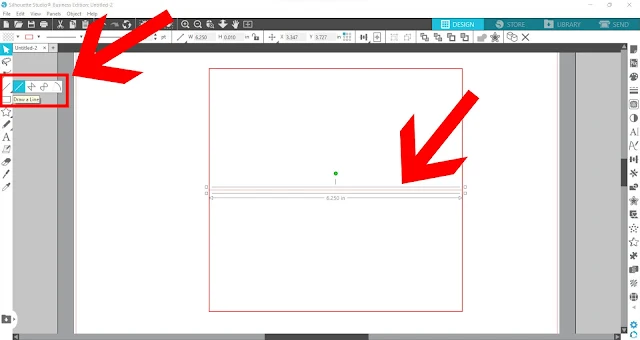
Start in Silhouette Studio by drawing the shape you wish to cut - a rectangle in this case.
Draw a line across the shape - this will be the line where you will fold the shape along. Make the line the same width as the shape. For example, the rectangle is 6.25 inches wide, therefore the line is also the same 6.25 inches.
If you need to center the line within the shape, select both the line and shape and then use the Alignment tools in the top quick access menu to Center them or align them together as you need for your project.
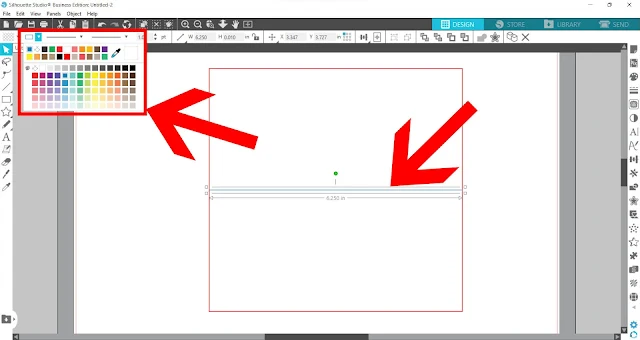
Now, you need the line colors of the rectangle and the line to be different. It doesn't matter what colors they are, as long as they are NOT the same. In this example, the outline color of the rectangle is red, and the straight line is blue.
Change the line color to something else, like blue using the Quick Access Line Color tool.
How To Set a Score a Line Using Cut by Line Color
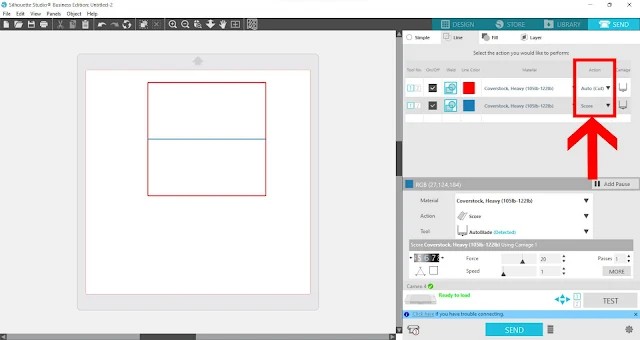
Go to the Send panel and click the Line tab. This tab allows you to cut (or score) by line color. In this case, we want the CAMEO 4 to cut on the red lines and score on the blue line!
Select the appropriate material settings for both of the colored lines in your project - I'm using 110 lb. Recollections cardstock from Michaels so the material setting I chose was Coverstock, Heavy.
The Action setting is where you are going to tell the software which lines to score and which lines to cut.
In the Action column change the Action of the blue line to "Score" - because that's our score line. With the Action set to Score, the CAMEO will not cut all the way through the cardstock, only part way through.
Make sure the red line is still set to cut.
How to Cut a Score Line and Cut Line in a Single Pass with Silhouette CAMEO
IMPORTANT: If you want both the Score and the Cut to happen in the same pass, you MUST use a Silhouette CAMEO Autoblade. Using an autoblade will allow the machine to adjust the blade depth between the scoring and the cutting automatically.If you use a manual blade you will need to pause the machine or send one at a time to give you the ability to adjust the blade between passes.
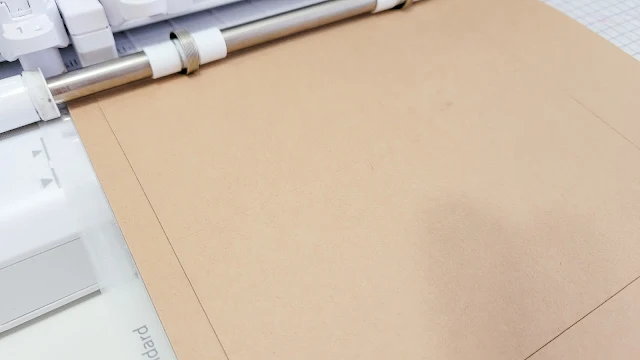
Load the cardstock onto your cutting mat and load the mat into the CAMEO. Click Send in Silhouette Studio to begin the cutting and score.
Here's what the score line looks like in the cardstock. It's a very shallow cut in the cardstock. It's harder to see than the cut lines of the outside rectangle (but it's there!).
Fold the card so the score is in the inside of the fold to hide it.
Use used these bag toppers as the base for make some adorable s'more kit bags. That part of the bag topper was printed and cut using a set of designs in So Fontsy's Summer Vacation and Travel Bundle and then glue directly onto the bag topper.
The Smore SVG designs were original just black, but we changed the colors in Silhouette Studio to give them a custom look. You can check out a tutorial on how to change colors of an SVG in Silhouette Studio here.
To grab the Summer Vacation and Travel Bundle from So Fontsy (and today's daily freebie) head over to So Fontsy!
Get Silhouette School lessons delivered to your email inbox! Select Once Daily or Weekly.


.png)


Hi Melissa, I also score and pass in one go, I have the Cameo 2 and the ratchet blade. I do the same as you with regard to the line colours. I use the same blade depth, but alter the score numbers to the lowest ie, if it says Force 20, I put it to 5, I can then just let it score and cut perfectly.
ReplyDeleteI appreciate your tip. I will have to give this a try.
DeleteI find your tutorials really helpful but can you please mention when the action, like scoring and cutting in one pass, is only available in business edition.
ReplyDelete