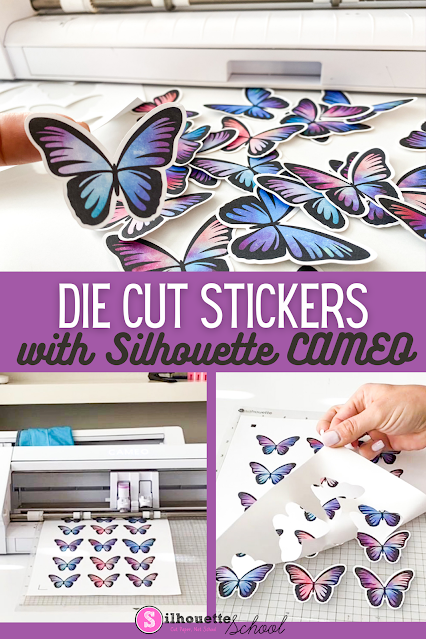
You can easily make die cut stickers with Silhouette CAMEO.
Die cut stickers are stickers that cut completely through the front of the sticker paper and the back liner leaving the sticker completely cut out around the shape of the image.
This Silhouette sticker tutorial will explain exactly how to make die cut stickers with Silhouette CAMEO 4 (or any Silhouette machine) and my favorite sticker paper from Online Labels!
How to Setup Silhouette Studio to Print and Cut Stickers
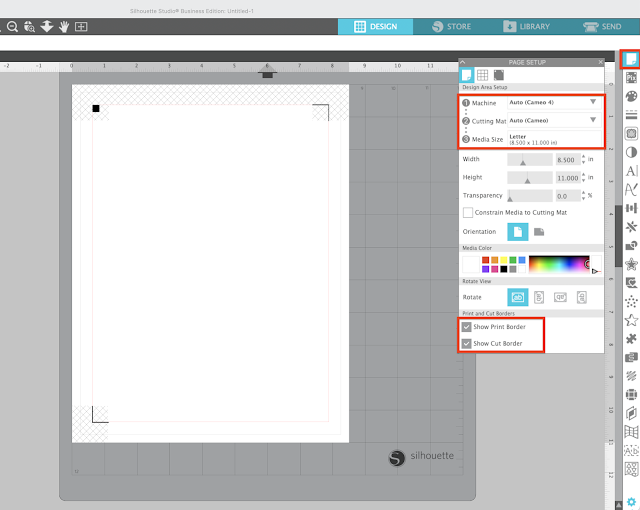
Start in Silhouette Studio by setting up the work area for stickers. If you are a Silhouette beginner and need more detailed help with how to set up Silhouette Studio for print and cut or how to add cut lines to a PNG image, follow the linked tutorials.
- Open the Design area
- Connect and power on the Silhouette cutting machine
- From the Send panel's Machine List select the cutting machine
- From Page Setup panel:
- Change the Material Size to Letter
- Select the Machine as the "Auto" machine
- Select the Cutting Mat as the "Auto" mat
- Checkbox for Show Print Area and Show Cut Area
- Click "M" on your keyboard to turn on registration marks
Once the page is all setup you can add in your designs by either going to File > Merge and navigating to the file from your computer or by dragging and dropping designs directly into the work area.
I am using a set of butterfly sticker designs from So Fontsy. I like this set because it already has the cut line added. So Fontsy also offers a free beginner sticker set you can practice with which will come in with the cut line as well.
Arrange the designs in the work area so they are within the safe print and cut areas.
When you're ready, move to the Send panel. You should see your red cut lines around the outer edge of the designs.
Kiss Cut vs Die Cut Stickers
Making die cut stickers as opposed to kiss cut stickers is all about the cut settings.
Kiss cut stickers are created when only the top layer of the sticker sheet is cut through and the liner is kept whole. Die cut stickers are cut completely through the liner so the sticker is the shape of the design itself. To create die cut stickers you need to cut deeper to cut through both the sticker material and the liner.
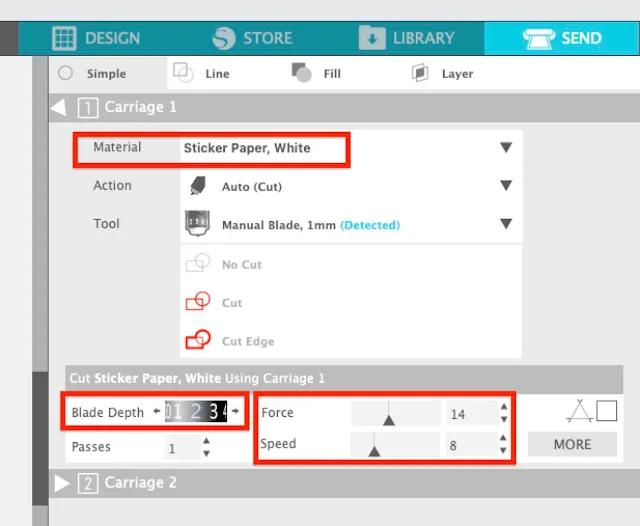
In the Send panel, select Sticker Paper, White as the material. These default Silhouette sticker settings would result in a kiss cut. Which we do not want.
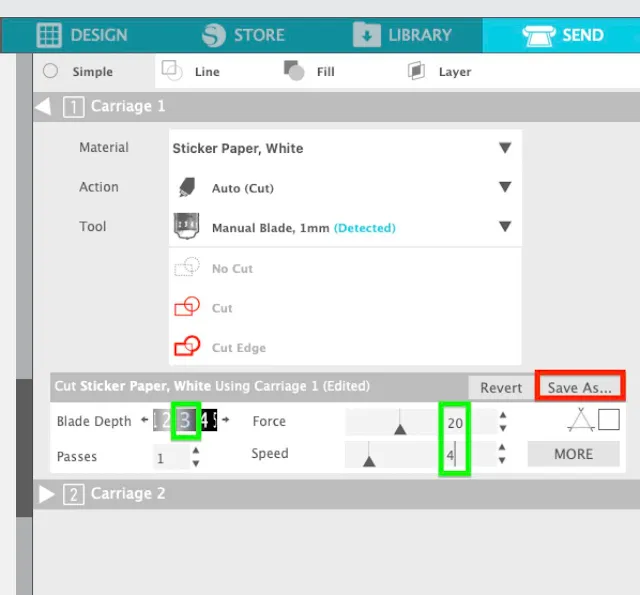
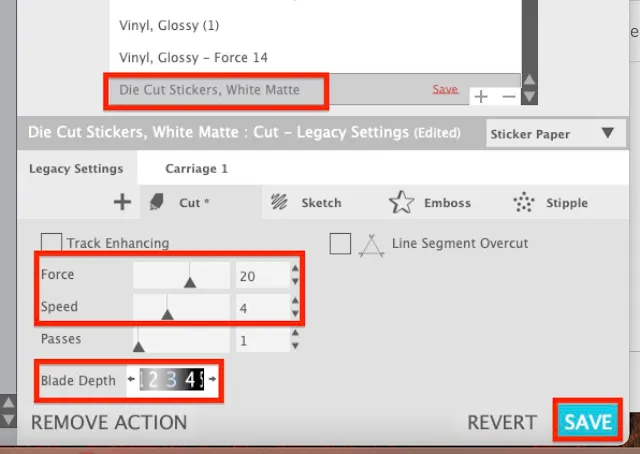
To make the die cut stickers adjust to the following Silhouette cut settings:
Blade Depth: 3
Force: 20
Speed: 4
Optional: If you click "Save As" you can actually save this material setting so you can select it quickly the next time.
How to Save a Die Cut Sticker Setting in Silhouette Studio
In the advanced settings window, rename the material setting to reflect the Die Cut Sticker Settings and make sure the correct cut settings are indicated. If not, change them and then click "Save". You want them copied to Tool 1 if you are prompted.
The setting will now be in your material settings dropdown list in the Send panel.
How to Print and Cut Die Cut Stickers with Silhouette CAMEO
Place a sheet of sticker paper into your printer and then from the Silhouette Studio top toolbar click the Printer icon or go to File > Print to send the sheet to print. I am using Online Labels White Matte Sticker Sheets and would change my print settings to "brochure matte" and "best" to get the highest resolution print.
Once the printing is done place the sheet onto the Silhouette cutting mat and load into the Silhouette CAMEO 4.
From the Send panel click "Send."
When the cutting is done you can peel away the excess sticker sheet and the die cut stickers will be left on the cutting mat.
Remove the stickers from the cutting mat and you've created your own die cut stickers with Silhouette CAMEO.
Get Silhouette School lessons delivered to your email inbox! Select Once Daily or Weekly.






.png)


Pretty!
ReplyDeleteGreat tutorial as always, love the butterflies, Thank you
ReplyDeleteI can’t ever get my Silhouette to correctly read with print and cut. It’s. Always cutting into the design.
ReplyDeletetry getting supports under your mat. go to etsy and search silhouette supports. I make them, but I don't want to put a link or it might be taken off.
DeleteI followed all the instructions and it still cut as a kiss cut and not a die cut. However after looking over the instructions again. I noticed that you're using the Manual Blade, 1mm. Whereas, I'm using the Autoblade that came with the machine. So, I will buy the manual blade and try again. As a new Cameo user, I appreciate this post.
ReplyDeleteHey there, check out this blog post too! https://www.silhouetteschoolblog.com/2022/05/how-to-kiss-cut-and-die-cut-stickers-on.html
Delete