There's a time and place for cutting and layering heat transfer vinyl, but when the number of layers become too many or when working with a full color images (with shading and faded edges) is required - printing and cutting heat transfers at home for t shirts will take your small business to the next level.
You'll save time, increase production, and increase the offerings in your shop by printing heat transfers on an eco solvent print and cut machine like the Roland BN-20A. Read on for how to make full color t shirt transfers at home with printable heat transfer vinyl.
How to Make T Shirt Transfers with Roland BN-20 or BN-20A
When you're ready to take your small Silhouette business to the next level and t shirts are your core you have some choices as far as sublimation, direct to garment, white toner transfers, and printable heat transfers. Each has its own advantages over the others and over heat transfer vinyl. Here I'll show you how to make full color transfers with Roland BN-20A which is an eco solvent printer and cutter that can make t shirt transfers.
The great thing about the Roland BN-20A is you can use a lot of the same designs that you already own to make t shirt transfers. You can also use Silhouette Studio to do 95% of the design work.
How to Design T Shirt Transfers in Silhouette Studio
Open your design in Silhouette Studio. I am using this full color design from So Fontsy that would simply not work with HTV due to the shading and number of colors.
When the design opens in Silhouette Studio scale it to the size you want to make the transfer.
How to Make a Bleed to Avoid White on Print and Cuts
We don't need to add a bleed area to the edge of this design, but it's highly recommended to avoid any white showing on the edge if the print and cut is off just a smidge.
Because this design doesn't have a single color edge on all areas, we are going to add the bleed by adding an internal offset cut line.
Open the Offset panel. Select the design and click "Internal Offset." Adjust the offset distance so it's just slightly inside the original edge of the design. For this example the internal offset distance is only 0.02".
The biggest reason is because we have to account for the text as well. I changed the offset distance line color to white to make it easier for you to see.
Adjusting Cut Lines: Color and Weight Matter
Unfortunately the only thing Silhouette Studio can not do is name the contour cut line, which Roland Versaworks requires to know where to cut. So we have to bring this design into Adobe Illustrator for one single step. To prepare for that, we need to make three important changes before we export this design for the next step.
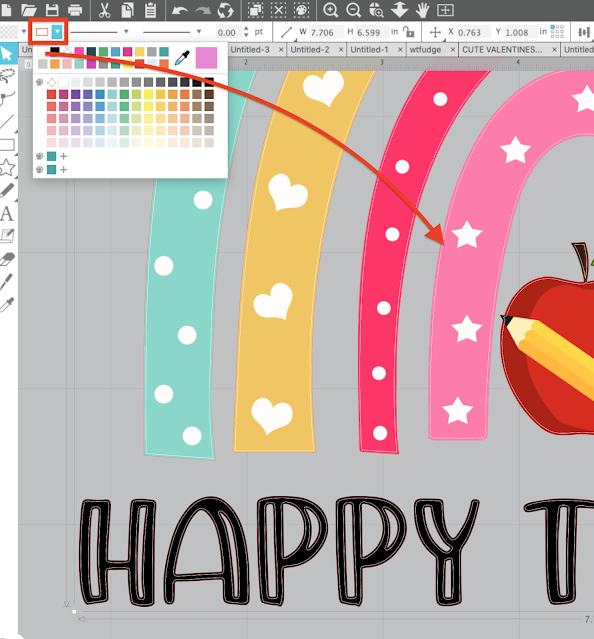
1) Make the original cut line (around the edge of the design) transparent. Do this by selecting the design (not the offset) and change the line color to transparent from the Quick Access Toolbar.
2) Select the internal offset line and change the line color to something you can see. White is fine.
3) Give the internal offset line a line weight from the Quick Access Toolbar. A line weight of even .05 is fine.
Export as a PDF from Silhouette Studio
The design now needs to be exported from Silhouette Studio as a PDF. The one time paid upgrade of Silhouette Studio Business Edition is required for this.
When making heat transfers with Roland BN-20A you do not need to mirror your design.
Go to File > Save As > Save to Hard Drive and select PDF as the file type.
Adding Contour Cut Lines in Adobe Illustrator
Launch Adobe Illustrator and open the PDF file you just exported from Silhouette Studio.
Hover over the file and click "Path" when you see it near the edge of the design. When you click it, you'll see the line color is currently white. We need to change the stroke color to the Roland Contour Cut Line Color.
In Illustrator go to Window > Swatch Libraries > Roland Versaworks. Select the magenta color on the swatch library. If you need help on how to install the Roland Versaworks swatch library into Adobe Illustrator this tutorial will explain.
Repeat this for ALL pieces of the design.
Export this design from Illustrator as a PDF. Go to File > Save As and select where you want to save - again as a PDF.
Opening Designs with Cut Lines in Roland VersaWorks
Launch Roland Versaworks and then go to File > Add to Queue. Select the Queue you want to open the design in.
The file will be listed at the bottom of the queue. Right click it and select Settings.
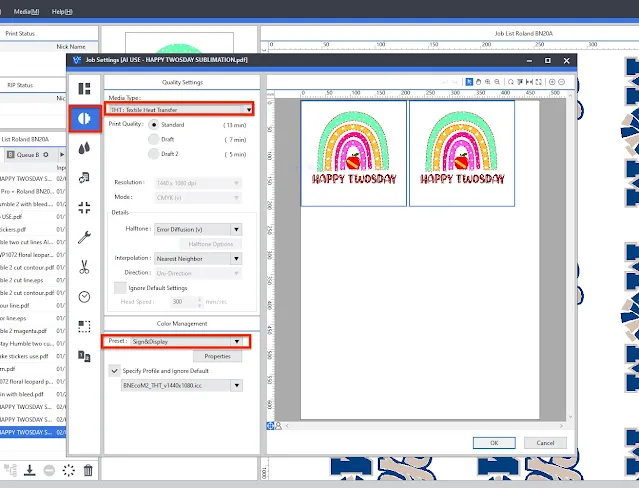
From the Versaworks Quality Settings panel I would suggest only making two changes: Select material type as Heat Transfer Textiles and from the Color Management tab change the Preset to Sign and Display. Save the settings.
Right click the file name again and this time select "Rip" or drag and drop the file name into the rip panel. Wait for the rip status to be complete.
Make sure your Roland BN-20A has a heat transfer material loaded in and ready to go. I am using Siser S print heat transfer because I like how soft and thin it feels on the shirt - plus it has some stretch to it. The low application temperature means it can go on more delicate materials as well.
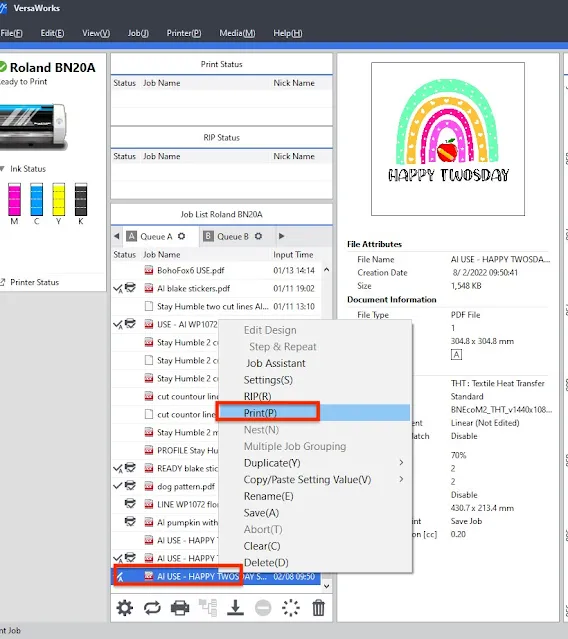
When you're ready right click the file name again from the queue and select "Print."
It will take a few minutes for the job to process then the printing will begin. When the printing is complete, the cutting will begin immediately.
I would suggest waiting at least a few hours after the cutting to weed and apply the heat transfer to the shirt. This allows the ink to fully dry and cure.
How to Use Siser S Print with Roland BN-20A for Heat Transfers
Trim the print and cut designs off the larger roll from the front of the Roland BN-20A.
When making heat transfers with Roland BN-20 or BN-20A you do need to weed the vinyl so go ahead and remove the excess around the design.
Use a mask to pick up the cut HTV off the backing sheet. I am using Siser TTD High Tack mask.
Have your heat press warmed up to 248 degrees. I am using my Swing Design 8 in 1 heat press.
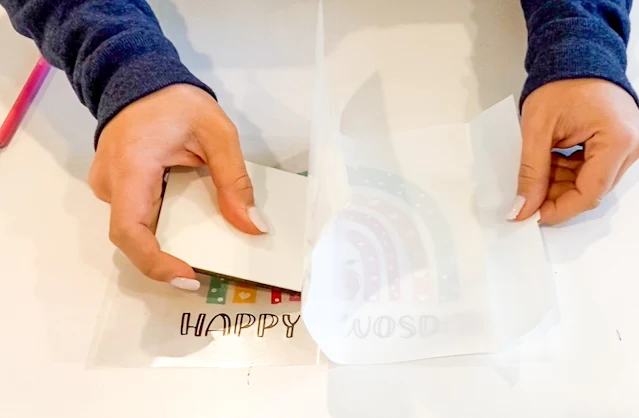
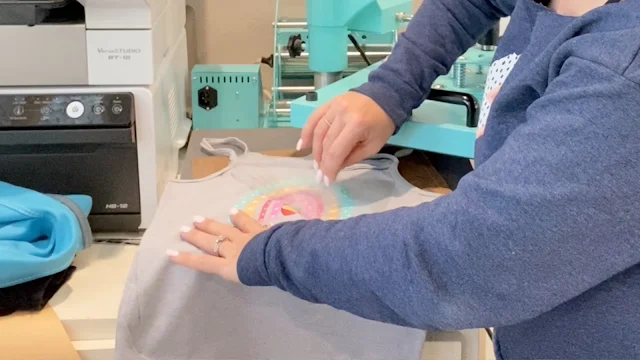
Place the transfer - still on the mask - directly onto the shirt.
The adhesive side of the HTV should now be exposed and directly on the shirt.
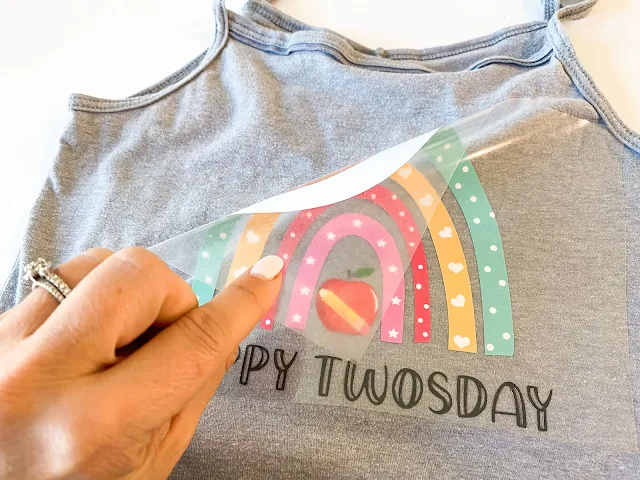
Cover with a teflon sheet and press with medium pressure on your heat press for about 15 seconds. Peel away the mask/transfer sheet while the transfer is still hot.
When the mask is removed, the heat transfer is done!
I found the Siser S print heat transfer vinyl to be really thin and soft and it had some stretch to it which gave it minimal hand on the shirt!
Want to start printing t shirt transfers at home? The Roland BN-20A is a great option as an eco solvent printer and cutter in one!
Get Silhouette School lessons delivered to your email inbox! Select Once Daily or Weekly.











.png)


No comments
Thanks for leaving a comment! We get several hundred comments a day. While we appreciate every single one of them it's nearly impossible to respond back to all of them, all the time. So... if you could help me by treating these comments like a forum where readers help readers.
In addition, don't forget to look for specific answers by using the Search Box on the blog. If you're still not having any luck, feel free to email me with your question.