You can add cut lines to a JPEG in Silhouette Studio by using the trace tool.
The free version of Silhouette Studio allows you to import JPEG files making it a popular file type choice for some. This tutorial will show you how to add a cut line to a JPEG image in the Silhouette software.
In this tutorial I'll show you how to add a contour cut line around a JPEG image. This is usually a single solid cut line around the outside edge of the design so you can print and cut the JPEG with Silhouette CAMEO. If you want to learn how to turn a JPEG into a cut file, check out this tutorial.
Open Silhouette Studio and click Design to open a new work area.
Go to File > Merge and find the JPEG image on your computer then click "Ok" to open. I'm using this sunflower JPEG image from So Fontsy.
Why Is There a White Box Around a JPEG in Silhouette Studio?
Unlike PNG images which have a transparent background and will automatically create the cut line, JPEG images have a solid background that needs to be removed.
If you do not trace, the cut line will be a square around the outside of the image instead out of a contour cut line around the design itself.
How to Use the Trace Tool in Silhouette Studio to Remove a Background
The Silhouette Studio Trace tool will allow you to remove the background of the JPEG image and create the contour cut line.
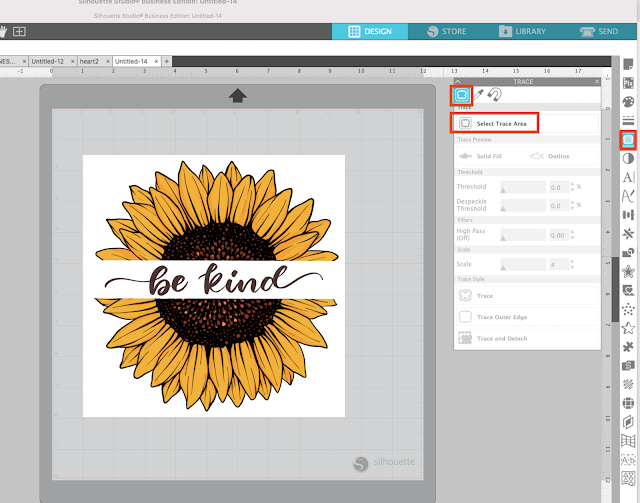
Open the trace panel from the right sidebar. Click "Select Trace Area".
Move the Threshold bar to the right until the design fills with yellow.
Select "Trace and Detach." The yellow trace will disappear and it will appear as if nothing happened.
You can now pull the image away from the background.
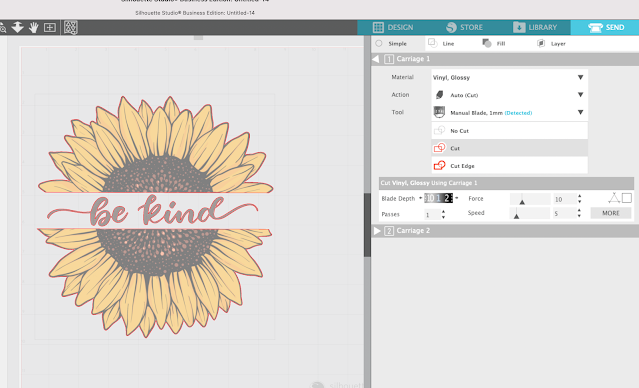
If you go to the Send panel you'll be able to see that there is now a red cut line around the edge of the design.
One Step Further with JPEGs in Silhouette Studio
If you wanted to create a bleed around this design for printing and cutting and ensuring there are no white edges, check out this tutorial on how to create a bleed in Silhouette Studio.
If you'd prefer to create to cut this three-piece design as a solid vinyl sticker or sticker you can use the offset tool for that and this Silhouette Studio offset tutorial will explain that process.
Get Silhouette School lessons delivered to your email inbox! Select Once Daily or Weekly.


.png)


No comments
Thanks for leaving a comment! We get several hundred comments a day. While we appreciate every single one of them it's nearly impossible to respond back to all of them, all the time. So... if you could help me by treating these comments like a forum where readers help readers.
In addition, don't forget to look for specific answers by using the Search Box on the blog. If you're still not having any luck, feel free to email me with your question.