Once you have mastered how to make kiss cut stickers with Silhouette CAMEO, you can take it one step further to create sticker sets!
Sticker sets are a little trickier with Silhouette CAMEO 4 because you need to set the blade to a kiss cut setting for the stickers, but then adjust the settings to cut fully through the sticker sheet and liner to cut the individual sets.
The easiest way to make kiss cut sticker sets with Silhouette is to use the Cut by Line color in Silhouette Studio. I am using Online Labels Glossy Weatherproof sticker sheets as well which has a glossy finish and as the name suggestions..is waterproof.
Open a Silhouette work area and set up the Page Setup panel like you would for any print and cut:
- Page Size: Letter
- Print Border: On
- Cut Border: On
- Registration Marks: On
Go to File > Open and add in your designs or drag and drop the sticker designs. Size your stickers to fit within the Print and Cut borders as well as within the registration marks area.
I am using this set of floral stickers, which are ready to cut with the offset already set up, from the So Fontsy October SVG and Font Bundle.
You can see these sticker designs come in with the offset line already on and red. That's ideal and means there's no editing needed to convert the designs to stickers.
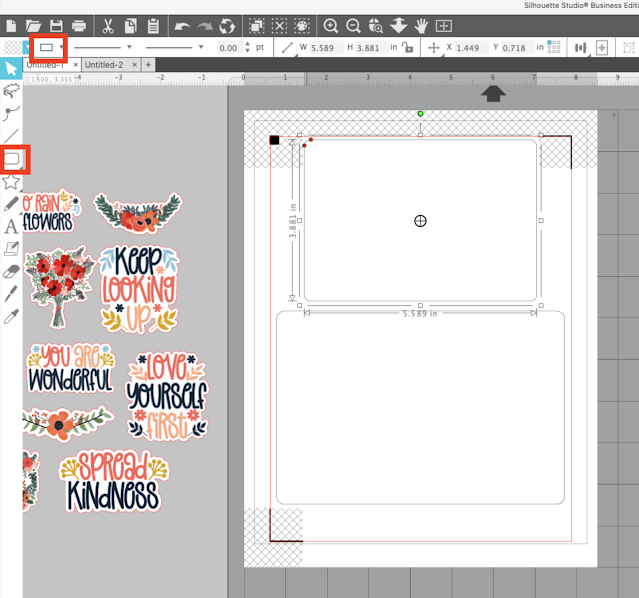
Use the Draw a Rectangle or Draw a Round Rectangle to draw out the shape of the mini sticker sheet. Change the line color to anything other than the same line color that's around our stickers and offset. I'm going to change the line color here to black.
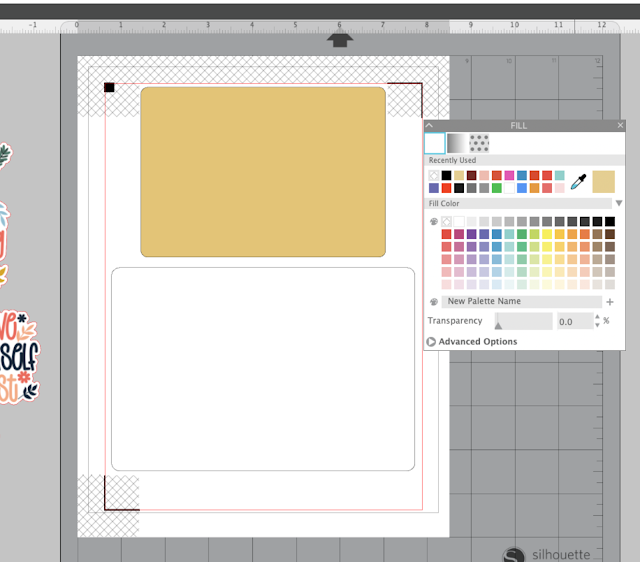
If you want your sticker sheet background to be a color or pattern fill it with either.
Select the sticker sheet > right click > Send to back.
Now, if they're not already move the stickers inside the rectangle sticker sheet shape you just drew.
When you're ready print your sticker sheet and get it loaded into your machine.
How to Set Up Silhouette Studio for Kiss Cut Sticker Sets
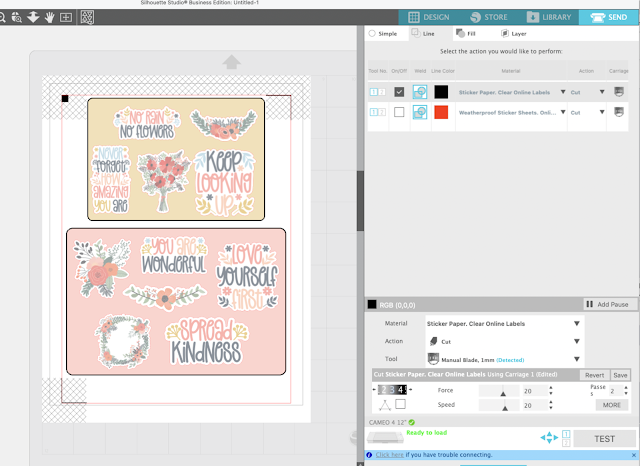
Move to the Send panel and select the Line tab, not Simple.
You should have two color boxes there. You can see mine are red and black. Red for the line color of the kiss cut stickers. Black for the line color of the sticker sheet border.
The reason this is important is because you want to give different settings for kiss cut sticker cut lines vs the cut line of the sheet. Obviously one you want to kiss cut and one you want to cut through.
For the Red (Kiss Cut Sticker Lines) adjust the material settings for Sticker Sheet, White (or a custom cut setting you have created).
For the Black (Sticker Sheet Edge) adjust the material settings for Sticker Sheet, Clear and increase the blade depth of 4 if you need to.
How to Cut by Line Color with Silhouette CAMEO 4
Check the box for ONLY the red to start. And then Send the stickers to cut on your Silhouette CAMEO 4. ONLY the stickers will cut, not the rectangle.
When the stickers are done cutting, leave the mat loaded in your machine.
In the Send panel, uncheck the Red box and check the Black box. If you are using a manual blade, adjust the blade depth to 4.
Once again, send to cut. The machine will once again read the registration marks, but this time will only cut the sticker sheet set border.
It should cut deep enough to cut through both layers of the sticker sheet creating separate sets.
When you're done you'll have individual sets of kiss cut stickers print and cut on your Silhouette CAMEO 4!
You'll have cut off the registration marks to make individual sticker sets while also being able to peel away the stickers from the sheet! Aren't these gorgeous?! The Online Labels weatherproof sticker sheets are among my favorite materials to print stickers.
Get Silhouette School lessons delivered to your email inbox! Select Once Daily or Weekly.


.png)


Thanks for this tutorial, can't wait to try it. Is it possible to send a link to this sticker set? I would like to purchase it individually as the October bundle has expired. Thank you!
ReplyDelete