If you're looking for an alternative to layering HTV and sublimation isn't possible due to dark or cotton surfaces, a white toner printer - like the Uninet iColor 560 - that can print full color transfers is a game changer.
The Uninet iColor White Toner Printer software is called ProRip - and it can open the same files you're used to cutting or printing with your cutting machine or sublimation printer! ProRip can be overwhelming because of all of the options especially if you're coming from another software program like Silhouette Studio.
In this Uninet Prorip software tutorial for beginners I'm sharing the steps for getting started and how to open SVGs, PNG images, or other common file types that you probably already have if you're coming from the at home crafting world of Silhouette, Cricut, vinyl and HTV!
If you haven't checked out my other Uninet iColor 560 White Toner printer posts, you may want to do that first - especially if you're not familiar with printing transfers and are looking for a no-cut, no weeding solution for multi color designs on light and dark color cotton (or other fabrics).
- Which Printer Should I Get Next? Sublimation vs DTG vs White Toner
- White Toner Printer Uninet iColor 560 Unboxing, Beginner Setup & First Print
Uninet ProRip Dongle
The software for the Uninet iColor, ProRip, is delivered on a USB dongle that must be inserted into a PC (sorry MAC users...me being one of them) to use the software. ProRip can not be downloaded or installed on the computer so do not lose this dongle or you'll be shelling out $600 for a new one just to use your white toner printer.
Connect the USB dongle to your computer and start the process to run the software installation for the first time. Just follow the on-screen prompts.
Connecting ProRip Software to iColor UniNet 560 for the First Time
With the iColor 560 printer powered on, connect the USB cable between the printer and your computer.
Launch the Pro Rip software. The first time you use ProRip you'll need to make some adjustments to the settings.
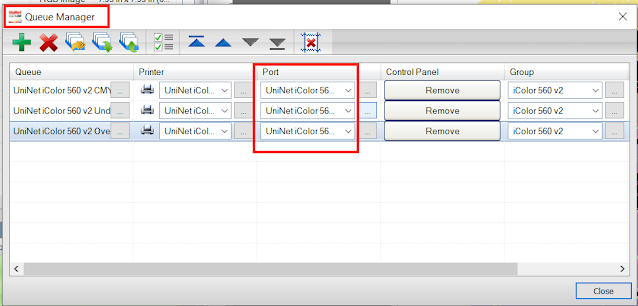
Start by clicking "Queue" along the top menu and select "Manage Queues".
You need to select the Uninet IColor printer from the Port dropdown menu.
These settings should only need to be set the first time you are using ProRip.
Select the Type of Print
Before you import the design you want print, make sure to confirm the print queue and print mode have the correct printer port and the correct material selected.If you are using the iColor Standard 2 Step paper, which is included in the Uninet iColor 560 Bundle, with White OverPrint, which will put colors OVER white. This allows the colors to appear vibrant on a dark shirt. For this type of printing, you will want to select the Uninet IColor 560 Overprint tab.

In the bottom of the right panel select Uninet 2 Step Standard 560-550.
There's a preview of the toner cartridges in this area as well. Make sure the order of the cartridges in the printer matches this preview.
Now you're ready to import your first image or design to print.
Importing SVG and PNG Designs into Pro Rip Software
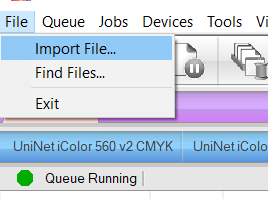
There are a few ways to import a design into the ProRip software. You can drag and drop from your hard drive or you can go to File menu and click > Import File.
Sublimation, sticker, and full color type files are perfect for the White Toner Printer but you can also use single color designs. Just remember though, if you have a cutting machine a single color design cut in HTV may be a better (and cheaper) option especially at low volume. The Uninet iColor 560 or any white toner printer should be used when HTV or sublimation aren't an option for one reason or another.
Basics of ProRip Software Tools
There are a lot of tool options and features in ProRip which can make the software overwhelming. For that reason we are going to focus on just the basics until you get familiar and comfortable with the software.
Scale: Once you import your PNG image or SVG, any area that does not fit on a printed sheet will be in a red zone.
Right click your mouse and then use the Scale options to change the scale of your design or click the Fit to Width button from the top tool bar.
Also verify your design has automatically mirrored (as it needs to print in reverse).
Knockout: To help reduce the thickness of your printed transfer, it's a good idea to knockout parts of the design that are the same color as the garment where the transfer will be applied. In other words, let the shirt do some of the work for you.
If you are applying the transfer to a black shirt, you can remove black areas of the design so they aren't printed and instead let the black shirt fill those areas.
To use this tool go to the Jobs menu > Production Plug-ins > KnockMeBlackOut.
Check the preview (click Shirt Color) and if you are satisfied click Ok. The preview in the work area should adjust to reflect how the new transfer will print.
Rasterize: ProRip not only allows for under and over printing white it will also apply tiny areas of break in the design called rasterizing. These help to prevent cracking in white toner laser decals with wearing, washing and drying.
You can rasterize with either lines or dots. These are the areas that will let your transfer breathe. If your design has large areas of solid color, with no breaks due to the design or distressing, you will want to rasterize.
There are many ways to rasterize and you can get super fancy ... or you can do what I suggest a beginner should do and use the build in rasterization options in ProRip. To utilize them, change the material type to Uninet IColor 2 Step Standard with Holes or with Lines.
By clicking the preview button in the blue menu bar towards the top you can get a print preview of what your rasterized design will look like when it's printed. There are options to change the size of the holes, but again for this beginner tutorial on how to use iColor ProRip software we're going to go with the defaults.
Once your design is set up you are ready to print. You will see your jobs lined up in the queue on the left panel. You can select one (or more) and then click the printer icon along the top toolbar to begin printing on the iColor 560. The status will change from Pending to Active and then the Printing once the printing has begun.
For how to go from printing the full color transfer on the Uninet iColor 560 to applying to a shirt check out this tutorial.
Get Silhouette School lessons delivered to your email inbox! Select Once Daily or Weekly.


.png)


Without software, your computer would be nothing more than a collection of electronic components SerpSling.
ReplyDelete