If you want to create multi color designs, this Silhouette Studio tutorial will give you some tips on how to set it all up in the software for easy previewing and cutting!
Creating multi color designs is fun and creative and another way to add value to the products you create (and sell, for all you small business owners out there)!
Open Silhouette Studio and import the design. This design comes from the Sarcastic SVG Design Bundle only available at So Fontsy.
Consider making a copy of the original design before you even get started editing. This can help in many different ways. Mainly, you'll save a lot of time from having to reopen the file if you need the original to reference or if you want to "start over" after making edits.
Leave the copy off to the side just in case you need it later - you can always delete it if you need to.
Open the Fill Panel and select an area of the design to change color. Then, click the color in the Fill Panel that you want to change the design to.
You can also access fill color options in the top, quick access menu.
Ungroup or Release Compound Path
For some designs, you may need to ungroup or release compound paths to access parts of the design. This will be obvious if you try to use a fill color and the entire design is filled with the same color or you can't select just a small section of the design.
Click on the design, then Right-click >> Ungroup.
Then, change fill colors as desired.
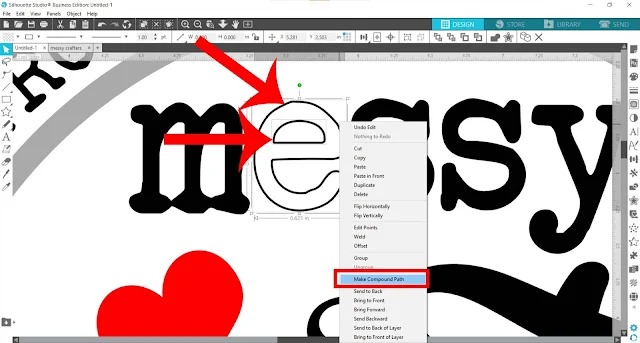
Or right-click >> Release Compound Path, like the words in this design, for example.
For any letters or shapes you need to "reassemble" after releasing a compound path ...
... select each letter separately (make sure to select all parts of the letter if there is more than one part to it), right-click >> Make Compound Path.
Then, you can click on each letter separately to change their colors.
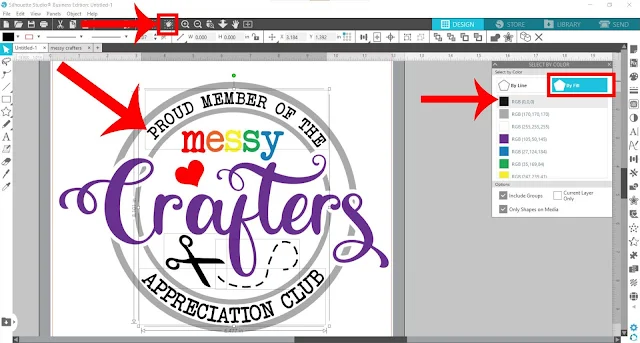
Select by Color tool
This tool is exceptionally helpful when working with multi color designs! This tool allows you to select all shapes of the same fill color with one click!
Why add color to your design?
If you're printing a design, obviously you'll need to add/change its colors to make it print out the way you want the design to look. Here are some other reasons why adding color is helpful, especially when cutting out a design.
Cut by Fill Color
Having multiple colors in a design gives you the ability to use the cut by fill color feature - which is an incredibly handy tool when it comes to layering vinyl! Check out this blog post about how to cut by fill color.
Organization and Design Preview
If you want to use 10 different colors in one decal (which I would not recommend with HTV), you bet it's going to be so much easier to remember what color vinyl to use when cutting the different parts of the design when you have the multicolored design right in front of you on your computer screen. Plus, you and/or your customers will be able to get a better idea of what different colors of the design could look like in the finished project.
Here's a hilariously relatable t shirt design that looks even more amazing with multiple colors of HTV (Siser Easyweed was used on this shirt). Find this and more humorous designs over at So Fontsy in the Sarcastic SVG Design Bundle.
Note: This post may contain affiliate links. By clicking on them and purchasing products through my links, I receive a small commission. That's what helps fund Silhouette School so I can keep buying new Silhouette-related products to show you how to get the most out of your machine!
Get Silhouette School lessons delivered to your email inbox! Select Once Daily or Weekly.


.png)


No comments
Thanks for leaving a comment! We get several hundred comments a day. While we appreciate every single one of them it's nearly impossible to respond back to all of them, all the time. So... if you could help me by treating these comments like a forum where readers help readers.
In addition, don't forget to look for specific answers by using the Search Box on the blog. If you're still not having any luck, feel free to email me with your question.