You can use your Silhouette CAMEO to cut stencils for wood burning signs and create totally custom pieces!
Create Your Stencil in Silhouette Studio
It all stars with a great design. I am using the May 2021 SVG and Fonts Bundle from So Fontsy. This bundle is jam packed full of popular and on-trend SVGs and fonts, including this Father's Day design, that can be used to make just about anything your crafty heart desires!
Import the design into Silhouette Studio by going to File > Open or drag and drop the design right into Silhouette Studio's work area.
To turn the cut file into a stencil design in Silhouette Studio, you want to draw a shape, like a rectangle or even a circle, around the design. Leave some space around the edge of the design...this will become the area that protects the rest of the wood from being scorched or painted.
Select both the design and the outside shape, right-click >> Make Compound Path.
Add a fill color to the newly created shape. This is helpful to remind you that you are creating a stencil, not a vinyl decal - a fact that is especially important to remember when weeding. The red, in this example represents the vinyl. The white is the area you will weed out.
How to Cut Stencil Material with Silhouette CAMEO
Use the Silhouette cut settings and techniques outlined in this stencil making blog post to cut the perfect stencil from Oramask 813 stencil material using your Silhouette CAMEO 4 (or CAMEO 3, 2, 1, or Portrait)
After the stencil is cut, remember you want to weed out the areas that you will be wood burning. Refer to the design in Silhouette Studio if you want to make sure you are weeding the vinyl stencil correctly.
How to Transfer and Apply a Vinyl Stencil
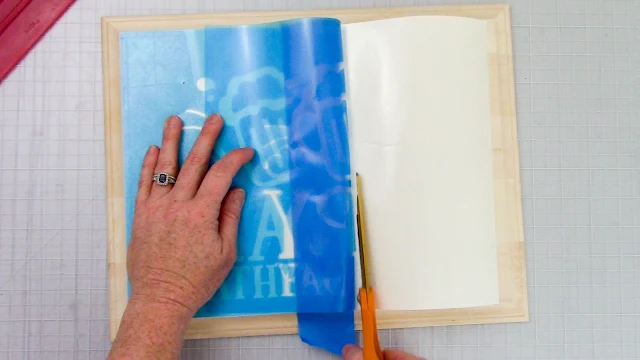
Place transfers tape over your entire stencil and burnish well. Do not remove the stencil material from the backing. Instead, apply the stencil to your sanded wood surface using the hinge method by putting a piece of tape down the center then applying one side at a time to make sure the stencil is centered and even.
Remove the transfer tape in the opposite direction of the wood grain to reduce the chance the transfer tape will pull up any of the wood.
Mix and Apply Burning Solution
There are various ways to scorch wood including using a scorch marker. But today we are going to create a scorching solution that we will paint over the wood sign stencil.
In a small bowl or plastic cup, mix together the following:
1 Tbsp ammonium chloride
8 tsp thickener (Thick-it Food & Beverage Thickener)
1/2 cup hot water
Mix thoroughly with a popsicle stick, and then let sit for about a minute.
Use a foam brush to lightly apply a thin layer of solution over the stencil, making sure to get full, even coverage of the entire design.
This is where the rectangle you drew around your stencil design is really helpful. If you draw that rectangle too close to the edge of the design, you'll have to be extremely careful with how you apply the scorch solution so you don't get it outside of the stenciled area.
Let dry for about 30 minutes.
Remove Stencil
Remove the stencil from the wood sign, by pulling it up in the opposite direction of the wood grain. Unfortunately vinyl stencils are not reusable stencils.
Insert the point of a sharp object, like a needle, under the edge of the stencil material. Try not to gouge the wood when doing this. Use the tip to begin lifting the stencil material from the wood and grab the material with your fingers and pull it up the rest of the way.
The wood burning solution dries clear, but you should be able to see the design very faintly. Let the solution dry completely otherwise when you use the heat gun, any scorch solution that's still a little wet can start to bleed into the wood grain.
Apply Heat with a Heat Gun to Scorch Wood
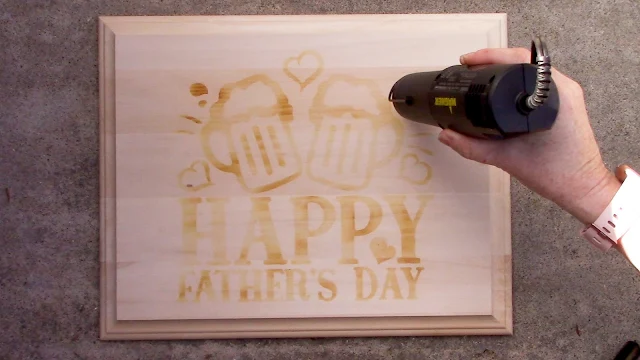
Take the wood outside and run a heat gun over the covered areas. These areas will begin to darken as you apply heat. The more heat you apply the darker the scorch will become. Move the heat gun around the entire design and burn to the desired color. Be careful not to leave the heat gun in the same area for two long.
This will take several minutes to get a dark scorch.
Finish the custom wood sign project as desired. I added a wood stain and decorative hooks to hang up the sign.
Don't forget to grab the Father's Day SVG Design used in this project (plus lots, lots more!) from the May 2021 SVG and Fonts Bundle over at So Fontsy.
Note: This post may contain affiliate links. By clicking on them and purchasing products through my links, I receive a small commission. That's what helps fund Silhouette School so I can keep buying new Silhouette-related products to show you how to get the most out of your machine!
Get Silhouette School lessons delivered to your email inbox! Select Once Daily or Weekly.


.png)


Do you prefer this method over the scorch pen? It looks like you did use the heat gun with a 1000 watt plus and use the smaller wattage heat gun.
ReplyDeleteThey both work well!
DeleteWill this work if I want to paint or stain the wood first?
ReplyDeleteHello there! We would not recommend it.
DeleteCan you store the left over cream? IF so how long and how? Thank you!
ReplyDeleteBecause it can oxidize, we'd suggest not saving the leftovers.
DeleteCould I ask what wood you used, please? I am getting a lot of bleeding and then the wood is burning around the outside of where I need it to burn. Not sure what I am doing wrong. When I tried it on a scrap piece of pressboard it worked great, but on nice looking Pine, I am having no luck.
ReplyDeleteIs your pine treated in any way? You'd want bare wood.
Delete