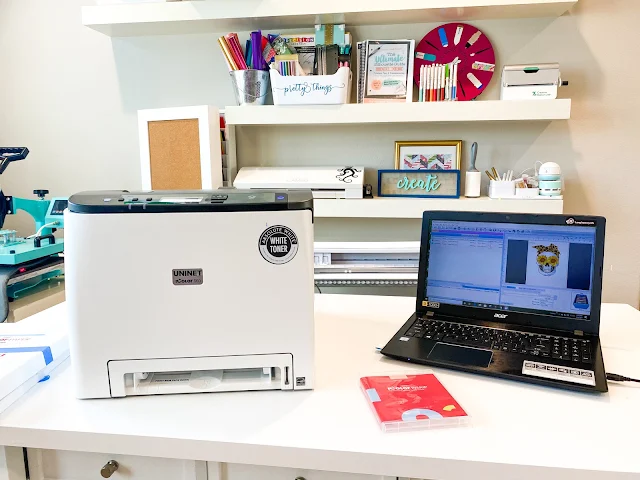
We talk a lot about printers around here...and I get asked about printers a lot because they pick up where HTV and vinyl leave off specifically with multi color decals and transfers.
There is a printer for every budget and need and there are pros and cons to each - the biggest con to many printers is they don't print white or if they do they are extremely expensive. The Uninet iColor White Toner printer checks that box - being a relatively inexpensive white toner printer but not without the biggest learning curve.
This tutorial will walk you through the iColor Uninet 560 White Toner printer set up and first print.
If you haven't yet decided if a UniNet iColor White Toner printer is for you, you can read the pros and cons of it here along with a comparison to other types of printers including DTG and sublimation.
UniNet IColor 560 Unboxing
The Uninet iColor 560 comes - out of the box - with the printer, a set of five toner ink cartridges, a power cord, USB cord, and a USB dongle with the ProRip software. My suggestion is to get the Uninet iColor 560 Printer Bundle which includes the 2 step paper and kraft paper, since it's the same price as just the printer.
Remove all of the packing tape from the printer. You can install four of the five toner cartridges at once. The order in which they are placed in the printer is based on the type of transfer or print you want to create. For the purposes of this set up we are going to place the cartridges in order for Overprinting which is needed to create transfers that can print white UNDER the other colors so they can go on dark surfaces.
To do this place the white toner cartridges in the front most slot followed by Yellow, Magenta, and Cyan.
Connect the power cord and plug it in.
What Else Do I Need to Use the Uninet IColor 560 White Toner Printer?
The UniNet iColor 560 calls itself a "Business in a Box", but it's not a full set up out of the box. There are several other accessories needed before you can start printing and making transfers.
If you did not purchase an iColor 560 printer bundle that included materials you will need to purchase that. I would recommend starting with the iColor 2 step paper which will allow you to make transfers for textiles.
You'll also want a teflon sheet or kraft paper which is used during the pressing process.
And the biggest accessory you'll need is a heat press. You want a good quality heat press where you have control over the pressure. The manufacture of the Uninet printer recommends using a high end heat press such as a Geoknight Dk20S or Stahls Fusion IQ (with a pressure gauge), but honestly the price of investing in a new press AND the printer are likely going to make this unattainable for many crafters or small craft business who already have a heat press. Based on the price point of the recommended heat presses, it puts the price from a $3700 investment closer to a $5000 - $6000 investment.
I am using my Swing Design 8 in 1 15x15 swing away heat press. This press doesn't have a pressure gauge but it has pressure knob. You can get away with using a lower priced heat press, like this one, it if you know how to adjust the pressure.
ProRip Software Set Up
You can do all of your designing in another program and then import the design into the iColor ProRip software before you print. That means you can use your Silhouette designs and SVGs you already own - but you have to print to the UniNet through ProRip.
My biggest frustration with the Uninet iColor printers is the software required to use it, ProRip, only runs on PC.
As a MAC user you have two options: purchase a cheap PC laptop to run it off or install an emulator on your MAC. The emulator was extremely complicated to set up even with this very detailed ProRip Youtube video. After several hours of going through settings I gave up and decided to pull out the backup PC I have for programs like this that can't run on MAC.
The iColor ProRip software is provided on a USB dongle that you have to keep plugged into your computer when the software is running - even after the initial set up. Do not lose this or you will have to pay $650 for a replacement dongle.
On your first software set up, insert the dongle into your computer's USB port and launch the installation. Follow the on-screen prompts.
Once ProRip is installed, launch the program. You need to make some adjustments to the settings in the software before making your first print.
Connecting ProRip Software to iColor UniNet 560
With the printer powered on, connect the USB cable between the printer and your computer.
Click the Queue menu and select Manage Queue. Select the printer from the Port dropdown menu. If you do not change this setting you will end up "printing" to a file on your computer as opposed to printing to the printer.
Save the changes.
First White Toner Transfer Print on iColor UniNet 560
Before you import your design you want to confirm the print queue and print mode have the correct printer port and the correct material selected. For this first print we are going to use 2 step paper and print an image with White OverPrint which will put colors OVER white allowing them to appear vibrant on a dark shirt. Select the Uninet IColor 560 Overprint tab.
In the bottom of the right panel select Uninet 2 Step Standard 560-550.
The order of your cartridges in the printer should match what you see in the Print preview mode area.
Now you're ready to import your first image or design to print.
Importing Images and Designs into ProRip
You can drag and drop your design or go to File > Import.
There are a ton of options in this software that can make it very overwhelming for a beginner, but put your blinders on. We are ONLY going to focus on two for this first print: scale and knockout black.
Scale: Once you import your design, any area that doesn't fit on a printed sheet will be in a red zone. Right click and then use the Scale options to change the scale of your design or click the Fit to Width button from the top tool bar.
Also verify your design has automatically mirrored (as it needs to print in reverse).
Knockout: To help reduce the thickness of your printed transfer, let the shirt it's applied to do some of the work for you. If you are applying the transfer to a black shirt, you can remove black areas of the design so they aren't printed and instead let the black shirt fill those areas.
To use this tool go to the Jobs menu > Production Plug-ins > KnockMeBlackOut.
Check the preview (click Shirt Color) and if you are satisfied click Ok. The preview in the work area should adjust to reflect how the new transfer will print.
First Print with Uninet IColor 560 and 2 Step Paper
Grab a sheet of the 2 Step "A" media. The rougher side is the printable side. Load the A media into the lower bypass tray of the printer with the rougher/print side down.
In the ProRip software click the Print icon along the top tool bar.
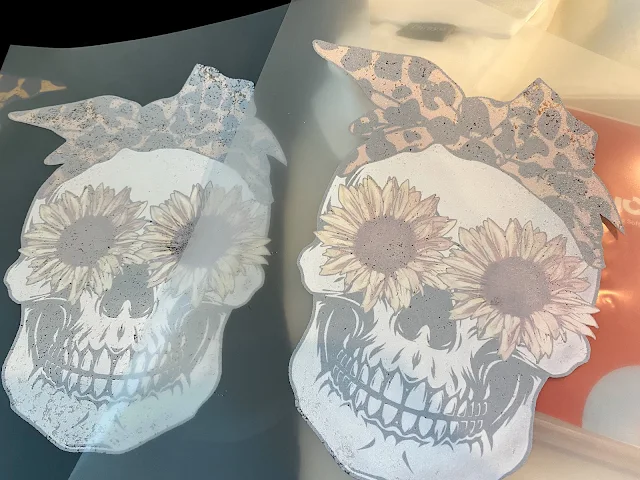
Once the printed transfer comes out of the printer you have a few more steps including adding the adhesive.
How to Apply a White Toner Transfer with 2 Step Paper
Heat up your heat press to 310 degrees and set the timer for 120 seconds. Adjust the pressure to medium. If you aren't sure how to find "medium" pressure on a heat press without a pressure knob, this tutorial on finding the right heat press pressure should help.
When the heat press reaches 310 degrees, close the top of the press so it's directly on the silicon pad on the bottom platen. You need to warm up the pad for about a minute.
When the lower platen is warm, open the heat press and place the printed "A" transfer directly on the lower platen in the center. The ink side should be facing up.
Remember, having the right pressure is important otherwise you may end up with areas of your print where the adhesive doesn't transfer. Spotty areas that don't have adhesive will not transfer to the shirt when pressed the second time.
When the timer goes off, open the heat press but only remove the teflon/kraft sheet. Use a cotton cloth and gently rub the sheets for about 5 seconds while still on the press.
Now it's time to apply the transfer to your shirt.
Place the shirt on your heat press. Trim the transfer sheet down so it's close to the printed transfer. Flip the transfer onto the shirt and secure with high temperature tape.
If you are pressing onto a cotton shirt, reduce the heat press timer to just 30 seconds but keep the temperature at 310.
Cover with a teflon sheet or kraft paper.
Close the press with medium to high pressure.
When the time is up remove the shirt from the heat press and let cool before peeling away the transfer sheet.
You'll notice your transfer is pretty shiny.
You need to do one last press to remove the sheen. Place the shirt back on the press and cover with the kraft paper. Press for another 10 to 15 seconds.
Wait at least 48 hours to wash the shirt (inside out is best) to allow the ink to fully cure.
If you'd like to watch a video of the process to see it in real time you can check out this first shirt with the Uninet iColor 560 White Toner Printer here:
Note: This post may contain affiliate links. By clicking on them and purchasing products through my links, I receive a small commission. That's what helps fund Silhouette School so I can keep buying new Silhouette-related products to show you how to get the most out of your machine!
Get Silhouette School lessons delivered to your email inbox! Select Once Daily or Weekly.


.png)


How much do you think each print costs? That’s one thing I can’t find while doing my research!
ReplyDeleteHey there! Shoot us a message on Facebook!
DeleteThank you so much !!! Your videos really helped me setup the ProRip -- very clear step by step instructions.
ReplyDeleteHi! I am having issues with parts of my design transferring from the A sheet to the B sheet. I am pressing at 310 degrees for 120 seconds at medium to heavy pressure. When I remove the B sheet, some of the ink sticks to it. I tried marrying the design again and then the entire image transferred to the B sheet. Too much pressure, too much time, or not enough of either?
ReplyDelete