Vertical porch signs are super popular with crafters. They're a trend that just keeps hanging around - and for good reason!
This Silhouette tutorial will take you start to finish on how to make vertical stencils for wood signs with your Silhouette CAMEO 4 (or really any model Silhouette CAMEO or Portrait).
Measure the Vertical Wood Sign Board
Measure the height and width of your board. Don't rely on the specs from the hardware store (or wherever you bought the wood) because as you can see, this 12-inch-wide board measures more closer to 11.25 inches wide.
Silhouette Studio Page Setup
Next, open Silhouette Studio and the Page Setup panel. Porch signs can be any size or shape, but for this tutorial we're assuming your porch sign is a long rectangle and measures less than 12 inches wide and more than 24 inches tall. If not, you can still use the principles described in this post to make a stencil for a different sized sign.
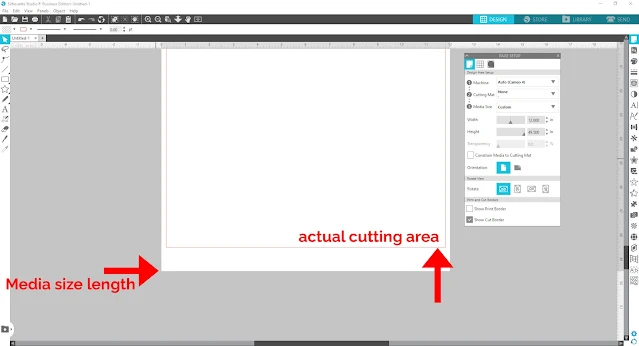
In the Page Setup panel, set the Cutting Mat settings to None and the Media Size to Custom. Then, make sure to check the Show Cut Border box.
Keep the width measurement at 12 inches. Then, take the board length you measured earlier and add at 1.5 inches to it. Enter that new measurement in the Height settings. For example, the board in this project measured 48 inches long + 1.5 inches = 49.5 inches for the Height.
Why Make a Wood Sign Stencil Bigger Than the Board?
The reason you need to add to the length/height of your board is because the actual cutting area of your material is always going to be smaller than the Width and Height settings in the Page Setup panel. We want to make a stencil that is roughly the same size/length as our board, so we need the actual cutting area to be at least that big. So to do that, you need to increase the length in the Page Setup panel.
Next, draw a rectangle to the exact width and height of your board. This will be the outside of your stencil. Make sure the rectangle fits completely inside the red cut area lines.
Then, import/open/merge your porch sign design into the same work area.
Here I'm using one of the 74 adorable vertical porch sign SVG designs from So Fontsy's Spring and Summer Porch Sign Design Bundle.
Size the design accordingly to fit within the rectangle you drew.
Center the design within the rectangle. Select the entire design (grouped together if necessary) and the rectangle, then click the Center button in the top menu.
Centering the design within the rectangle will help later when applying the stencil to your board. Do not delete the rectangle!
Cutting Stencil Material with Silhouette CAMEO 4
Now, cut out your design. Oramask 813 is an excellent stencil material that we've written about before. For tips and cut settings for Oramask 813, check out this blog post. Alternatively, you can also make a stencil out of vinyl or dollar store shelf liners.
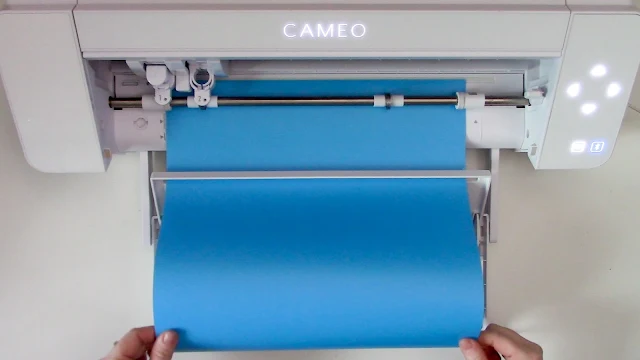
Take the roll of stencil material and load it into the roll feeder of your Silhouette CAMEO 4 or an older model too. This works on CAMEO 3, 2, and 1 as well. For how to use the Cameo 4 roll feeder, check out this blog post. Don't forget to move the right roller bar!
Send to cut, then weed the stencil. Make sure to weed out the correct parts of the stencil and remove the excess stencil material from around the outside rectangle.
Apply transfer tape using a large scraper to help prevent any wrinkles or bubbles.
Applying Vertical Stencil to Wood Board
Applying the stencil so that it is centered on the board can be a tricky task, but since you know that the design is centered within the rectangle around it, all you really need to do is to center that outside rectangle to the board. And since the rectangle is the size of the board itself, aim to apply the stencil lined up directly on top of the board.
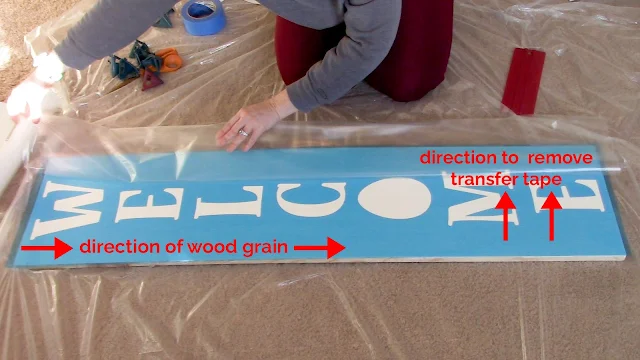
It's easiest to use the hinge method to apply the stencil to the board.
Then, remove the transfer tape in the opposite direction of the wood grain of the board. This reduces the likelihood the transfer tape pulls up the painted wood.
Use your finger to burnish every nook and cranny of the stencil onto the board, and then it's it's time to get painting! Check out this blog post for how to get super crisp paint lines on wood signs.
Here's a quick video of the full process from applying a vertical stencil for a wood porch sign to painting the wood sign.
What vertical porch sign will you create? The design from this tutorial comes from the Porch Signs SVG Design Bundle: Spring and Summer Edition at So Fontsy. The bundle includes 74 designs and a general commercial use license so you could even all the porch signs you make!
Get Silhouette School lessons delivered to your email inbox! Select Once Daily or Weekly.


.png)


Are the stencils reusable?
ReplyDeleteIf you reuse them, you would probably not get as crisp of paint lines, if the stencil material seals at all.
Delete