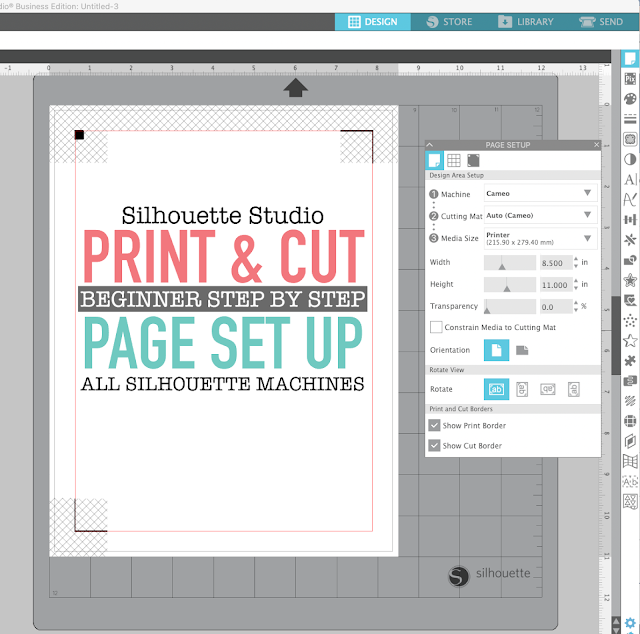
Having a successful Silhouette print and cut with a CAMEO 4 (or any Silhouette machine) starts with having the page set up correctly.
This beginner Silhouette print and cut tutorial is stripped down to focus on exactly how your page should be set up for a successful Silhouette CAMEO 4 print and cut. If you are having print and cut issues I would suggest you open a new design area in Silhouette Studio and start with this step by step Silhouette print and cut setup tutorial.
Power on and connect your Silhouette CAMEO 4 to your computer via bluetooth or USB making sure the blade is correctly seated and locked into the machine.
Launch Silhouette Studio and go immediately to the Send panel.
From the machine list, find the active/ready/available Silhouette CAMEO 4.
Select it so it displays as the machine. This can be indicated by the messaging: Available, Ready or Load Media next to a picture of the machine.
How to Setup the Page for Silhouette Print and Cut
Move to the Design area of Silhouette Studio.
Immediately open the Page Setup panel.
Since you have already selected the machine you are using, it should automatically be selected as the Machine the Page Setup panel. The Cutting Mat should also be automatically selected.
The next few steps represent the MOST important part of the Silhouette Print and Cut page set up options.
Silhouette Studio Print and Cut Registration Marks and Page Size
Change the Media Size to Printer. This will match the media size to the installed printer.
Double check which printer is selected by going to the Silhouette Studio File > Print Page Setup menu.
Return to the Design page and on the Page Setup panel change the Orientation so it's Portrait. Check the boxes for both Show Print Border and Show Cut border.
Press M on your keyboard to turn on the Registration Marks. This will add registration marks to your page at the default location, size and thickness. DO NOT ADJUST ANY OF THE DEFAULTS.
As a beginner I would not even suggest you go into the Registration Marks tab as there are other tempting options in there that, if changed, can easily throw off your print and cut job.
Your page is now successfully and completely set up.
What are Print and Cut Registration Marks
Print and Cut Registration Marks are the three marks on both the digital page and the printed page that are needed so the Silhouette CAMEO machine knows where to place the cut lines after the page is printed on your home printer.
The gridded area between the registration marks indicates the area that is off limits for your designs.
You also want to make sure nothing is outside the Print border (red) OR the cut border (gray). Anything outside these areas will not be print or cut respectively.
In other words, make sure NOTHING is touching the hashed areas or outside the print border. I have shaded the safe print and cut area blue.
That is all there is to setting up your print and cut page. Now you can move forward with adding your designs and complete the actual Silhouette print and cut by following this Silhouette beginner start to finish print and cut tutorial.
Get Silhouette School lessons delivered to your email inbox! Select Once Daily or Weekly.


.png)


Is there anything on changing the registration marks?
ReplyDeleteHey there! Check out this blog post: https://www.silhouetteschoolblog.com/2021/02/how-to-maximize-silhouette-print-and.html
Delete