If you've upgraded the Silhouette Studio software, you may have already played around with reshaping an SVG using the Warp Panel. Maybe you've used the Warp Panel to create some cool looking Word Art or used the warp panel to make realistic mock ups.
In this tutorial, we'll show up some fool-proof tips to using the Warp Panel so you can custom warp SVGs into any shape and exactly how you want it to look. So, no more guessing if your warped design is lined up or symmetrical - here's how to get it perfect!
You need Silhouette Studio Designer Edition (or higher)
You need to have at least Designer Edition to access the Warp Panel. If you're ready to upgrade right now, check out our friends over at Swing Design! If you're thinking of upgrading (which I highly recommend you do!), check out this blog post for a comparison chart of all the software features and answers to some frequently asked questions.
And if you aren't sure what the difference is between a software upgrade and a software update - check out this blog post that explains software upgrades vs updates.
Draw A Shape
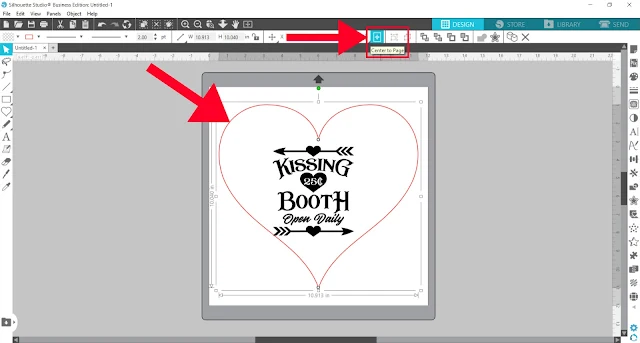
First, start by drawing a shape that you want your design to warp into. For example, I wanted to warp this Kissing Booth design to better fill out a heart-shaped canvas. So, I drew a heart using the Flexishapes panel (available in Designer Edition Plus or higher).
Merge your SVG design into the same Silhouette Studio work area.
Center to Page
I found it's very helpful to center your large shape on your virtual workspace. Select the heart (or whatever shape you're using), then click the Center to Page button in the top menu.
If you want to center your SVG within the large shape, you can quickly do that by selecting both and clicking the Align Center button in the top menu.
Open the Warp Panel
If you don't see the Warp Panel button in the right side menu (and you're sure you're using at least Designer Edition), click this small triangle to reveal more buttons that just couldn't all fit in the side menu.
Select just your SVG design and click Warp Selected Shapes.
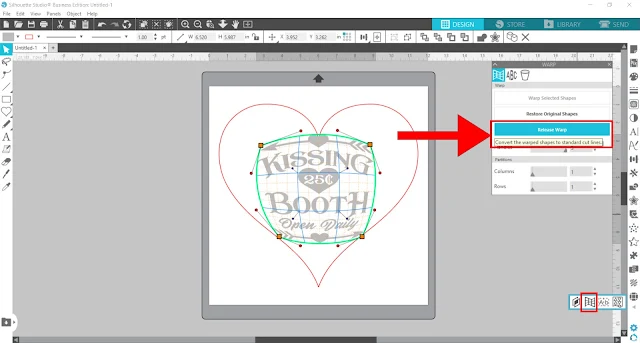
A grid with several "handles" will appear over your design. The handles are the orange boxes, and red and blue circles located around the edge and within the design.
The Warp Panel allows you to adjust how many handles, rows, and columns appear on the grid. Basically, the more you have the more customization and detail you'll have in your warping.
Here's what the grid looks like with more columns and rows. See how many more handles there are? You have a whole lot more points you can select to move around to warp the shape.
So, for example, if your large shape was very complex, you may need those extra handles to warp your SVG into all the detailed edges or curves of the large shape. For a simple shape like the heart, I found the default settings in the Warp panel to be sufficient.
Note: After you've made your first warp adjustment to one of the handles on your SVG, you cannot then change the number of handles, columns, or rows without the SVG reverting to its original design. Decide beforehand how many you want before begin warping.
Also, if you accidentally click away from your SVG, the grid will disappear, but it's not gone forever. All you have to do is click on the SVG again and the grid will reappear.
Additionally, while the SVG is in this "warp mode," you can only resize the entire design by entering numerical values into the height and width boxes in the top menu.
Show Gridlines
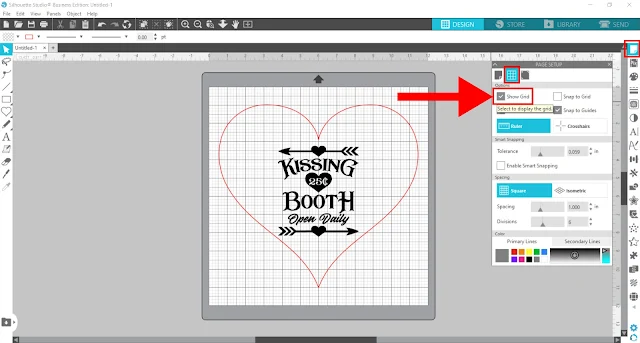
I usually work in Silhouette Studio without the gridlines showing on my workspace; however, for warping, I recommend you try turning them on. It makes the warping process so much faster and precise because you'll be able to use the gridlines as reference points as you adjust the handles on the SVG.
Open the Page Setup Panel and make sure the Show Grid box is checked or click G on your keyboard.
There are lots of options you can fiddle with to make the gridlines different colors and adjust how many there are. I find it's helpful for me to set up the gridlines just like they appear on the actual cutting mat - 1-inch sections with 4 divisions within each section.
Start Warping
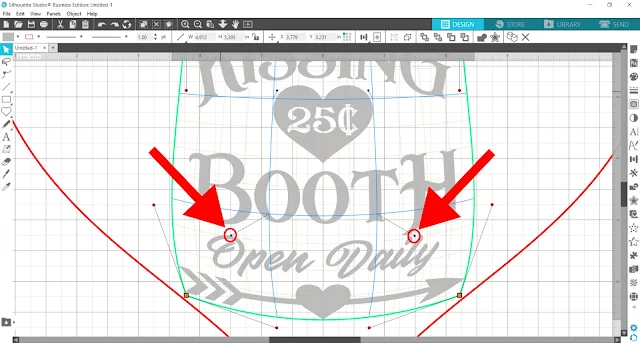
Now it's time to start warping your SVG! All you have to do is click and drag one of the "handles." As you move the handle, you'll be able to see how it warps the SVG. Release the mouse button when you want to "set" that handle in place.
When you have gridlines turned on, you can use them as reference points...
...so that when you adjust one side of the SVG, you can adjust the other side symmetrically.
There are also "handles" within the SVG as well...
...so, you can further customize how you want to warp the SVG.
And at any time, you can turn off gridlines by unchecking the Show Grid box. Then, you can just as easily turn them back on again and continuing using them as reference points for your warping.
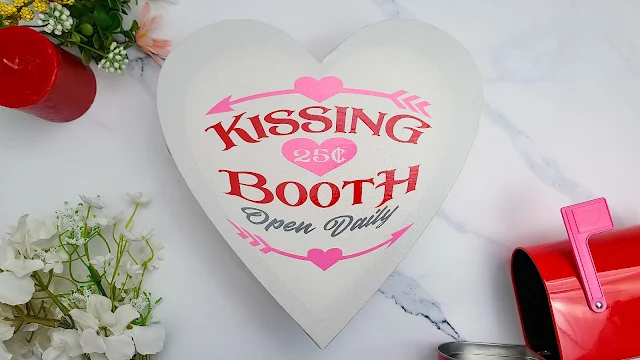
This method really helped make quick work of warping this Kissing Booth design to better fill this heart shape. This Kissing Booth SVG can be found in the December SVG and Font Bundle at So Fontsy. The December Bundle is the largest monthly bundle of 2020, so you won't want to miss out on 456 SVGs, 20 fonts, and 82 sketch/foil quill designs all for 92% off!!
Release Warp
Once you are satisfied with how you've warped your design, the last step is to select it and click Release Warp. The grid will disappear from over the SVG and it will essentially go back to a "normal" SVG element...
...expect that the different parts of the design will probably all be ungrouped so group everything back together again (if you want).
Cut and Complete
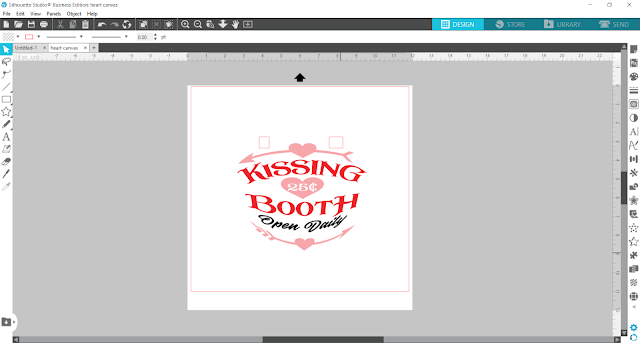
For this project I added registration marks (those two rectangles added at the top of the design) ...
...because I cut it out in different colors of Oracal 651 vinyl.
Check out this blog post about how to add registration marks for layered or multicolor vinyl designs.
Now, you're ready to cut out and apply your vinyl to your project. Just how adorable is this Kissing Booth heart-shaped canvas?! What I really love about it was how I was able to adjust it exactly how I wanted it using the Warp Panel, so it better filled the heart shape.
Note: This post may contain affiliate links. By clicking on them and purchasing products through my links, I receive a small commission. That's what helps fund Silhouette School so I can keep buying new Silhouette-related products to show you how to get the most out of your machine!
Get Silhouette School lessons delivered to your email inbox! Select Once Daily or Weekly.











.png)


No comments
Thanks for leaving a comment! We get several hundred comments a day. While we appreciate every single one of them it's nearly impossible to respond back to all of them, all the time. So... if you could help me by treating these comments like a forum where readers help readers.
In addition, don't forget to look for specific answers by using the Search Box on the blog. If you're still not having any luck, feel free to email me with your question.