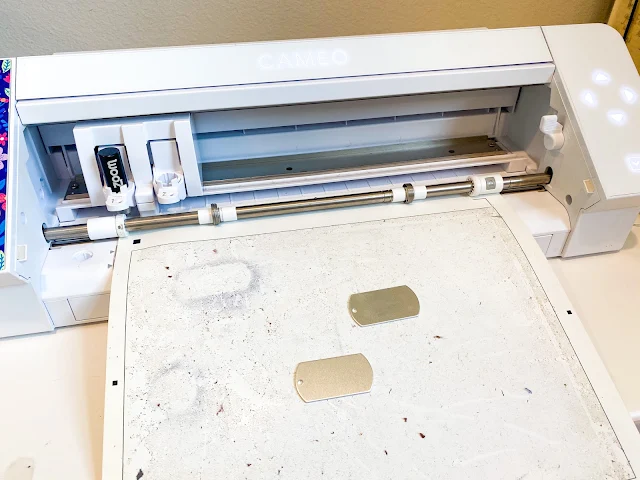
I get asked a lot if it's possible to etch or engrave with the Silhouette CAMEO 4.
This is a sponsored blog post, but all opinions are my own
There were tools that fit in the CAMEO 3 that allowed for engraving and etching, but they're harder to find for the newer model Silhouette CAMEO.
I recently came across the the Zoom Precision 3-in-1 etching tool on Amazon. It not only includes three different size tips, but also several metal blanks to get started and ...it fits perfectly into the Silhouette CAMEO 4's tool carriage with the need for any type of adapter.
The process to use the Zoom etching tip is similar to if you were sketching with a pen. Only instead, you're using the etching tip not a pen to sketch.
One of the biggest biggest challenges when etching or engraving on small item is actually hitting the small metal piece. That's where the Pixscan mat is a game changer.
Pixscan Mat in Silhouette CAMEO 4
Start by placing whatever it is you're going to etch or engrave directly on the Pixscan mat. It is crucial that mat is extremely sticky or that you use some kind of double sided adhesive to keep the blanks in place.
Take a picture of the entire Pixscan mat from above making sure there are no shadows and no glare on the mat.
Send the photo to your computer by email or Airdrop.
Launch Silhouette Studio and click the Pixscan tool then find the photo and import it. If you need a refresher on Pixscan there's a full beginner Pixscan tutorial here.
Once the image opens in a work space in Silhouette Studio, create or merge in a design in the same work area.
I am using the dog tag shaped metal pieces - one I am using as a charm and the other as an actual dog tag.
Size and position the design or designs so they're directly over the blank piece you plan to etch on the virtual mat. This is the beauty of the Pixscan mat as it keeps the exact size and dimension of whatever is on it when you bring it into Silhouette Studio.
How to Get a Solid Etch with Silhouette CAMEO 4
Now if you want your design filled with a solid etch, instead of just the outline, you'll need to add a sketch fill using the sketch options. If you need a refresher on how to get a solid fill with the sketch tool this tutorial will walk you through.
Move to the Send panel. The cut settings will vary slightly depending on the thickness of the item you are engraving. For these metal blanks, makes these changes to the Silhouette cut settings to get the best etch with the Zoom Precision tool:
Material: Cardstock, Plain or Cardstock, Heavy
Tool: Pen
Action: Sketch
Increase Force to between 20-25
Passes: 2-3
Load the Pixscan mat into the Silhouette CAMEO 4 and move the spring rollers so they clear the blanks.
Now before we go any further I have to tell you that using third party tools in any of the Silhouette machines is done at your own risk and may void your initial one year warranty. That being said, I had no issues with this tool at all.
Click Send in the software to begin the etching.
Here's a quick video of the tool while it's etching.
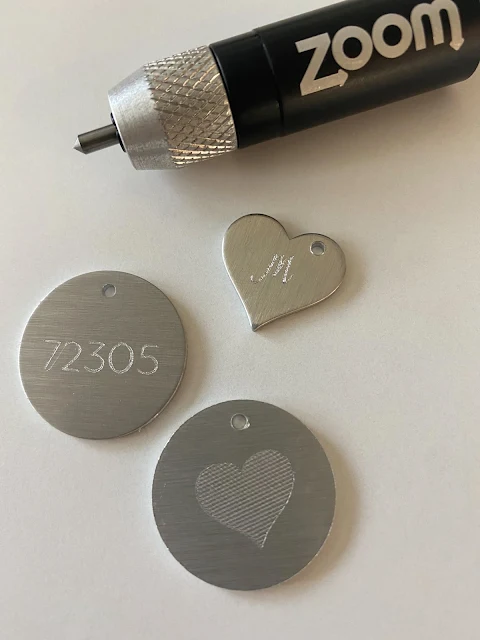
I started with the fine tip which was perfect for the 2020 design. After the initial passes, I swapped out the fine tip for the bold tip (shown below) for the dog tag to make the lines a bit wider and more defined, but still used the same settings as the initial passes.
I was really happy with how the Zoom etching tip worked on these metal pieces and would definitely recommend it for that. You can't beat the price for three tips in one.
Here are a few more of my initials etching tries...you can see even at the smallest scale the Zoom tool gives you a nice etch!
Next up I can't wait to see how the Zoom Precision Etching Tip works on thicker acrylic pieces. The nice thing about the Zoom tool is because of how it's designed it can easily be lifted slightly up in the tool carriage if it's dragging at all across thicker blanks.
Note: This post may contain affiliate links. By clicking on them and purchasing products through my links, I receive a small commission. That's what helps fund Silhouette School so I can keep buying new Silhouette-related products to show you how to get the most out of your machine!
Get Silhouette School lessons delivered to your email inbox! Select Once Daily or Weekly.


.png)


Looks like no adapter used.....do you put a popsicle stick under it to determine where how far it goes into the blade holder - like you do with the Chomas pen holder?
ReplyDeleteNope it is designed so it fits perfectly in the carriage to work with these blanks!
DeleteThank you for this tutorial! This has been one of my biggest questions, especially whether this particular tool brand worked - would love to see one on etching acrylic as well! 😁👍
ReplyDeleteAwesome tutorial.. at the beginning it spoke of the cameo3 -- and then it spoke of the cameo4 - does it work with the cameo3
ReplyDeleteCan this still be done without the Pixscan mat?
ReplyDeleteYes I use it without the pixscan mat, just have to do a sample on paper first to make sure it lines up correctly then etch.
DeleteWould this tool work in the Portrait 3? I'm making a big assumption that it would since most of the other Cameo 4 accessories do?
ReplyDeleteWhere can I find the ornament?
ReplyDeletetwo Questions: I bought the Bevel Pen set and Etch Quill Pen set. But after watching your tutorial I dont know if I should keep either. What's the difference between both of the pens? ones seems for plastic material and other for metal. Wouldn't the Zoom etching tool be able to do both?
ReplyDeleteIf you have them both in hand, might as well try them out!
DeleteWhen I put the zoom in the cameo4 it won’t let me select sketch
ReplyDeleteHi there! Did you select card stock as the material?
DeleteThank you so much for this tutorial. It worked like a charm (pun intended) to engrave a charm using my Cameo 4 with a Pixscan and Zoom Precision Tool. I did use double sided tape and painter's tape around the edges just to make sure it didn't move.
ReplyDeleteThank you for the tutorial! Awesome as always. I am wondering if you can do this with the Cameo 3?
ReplyDeleteHey there! There is a specific zoom tool for the Cameo 3s. Just make sure the description includes the Cameo 3 and it should be the correct one.
DeleteApologies if this has already been asked- Can this tool be used to engrave on leather?
ReplyDeleteWill it work on stainless steel or just aluminium?
ReplyDeleteDoesn't this void the warranty? I've read where the Cameo 4 is not designed for etching and/or embossing; that's why there aren't any tools specifically sold by Silhouette for the machine.
ReplyDeleteDoes anyone know if using this engraving tool damages to machine?
ReplyDelete