If your heat press is too small for the large HTV design you've cut, no need to worry!
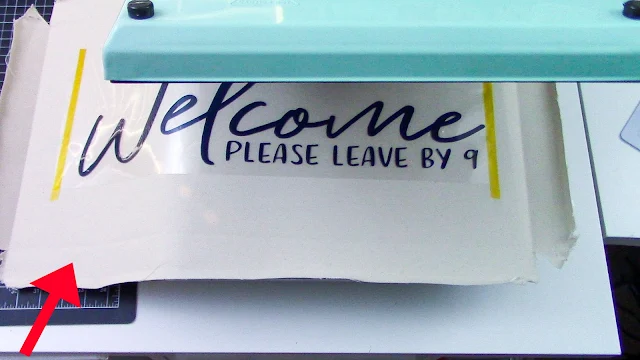
The HTV design for this 24-inch "welcome" sign measures almost 20 inches long - which is obviously larger than the pressing area on the StarCraft 15 x 15-inch mint heat press. This means we definitely won't be able to press this entire HTV design all at one time. What you have to do to heat press oversized heat transfers is press it in sections.
The humorous "welcome" design on this project comes from the Funny Everything SVG Bundle from So Fontsy. The Funny Everything SVG Bundle includes 50 commercial free SVG designs that are sure to tickle your funny bone... and it's 87% off which is certainly no laughing matter!
To start, cut and weed the HTV design like you normally would for any other HTV project. And then, like normal, place the carrier sheet with the HTV side face down onto your project. You really don't need to but, you can secure it to your project with a couple pieces of heat resistant transfer tape if you want.
Move your entire project to your heat press and place as much of it as will fit onto the lower platen of your heat press. Allow the excess to overhang the press.
Press this section of the HTV design onto your project, just as you would if the entire design fit on the platen. For this sign project that includes areas of Easyweed and SparkleBerry patterned HTV, we pressed this first part of the Easyweed HTV layer for a quick 2-second press to just initially tack-down this layer. (If there aren't any other HTV layers for your project, then you would want to press the HTV for the full recommended time.)
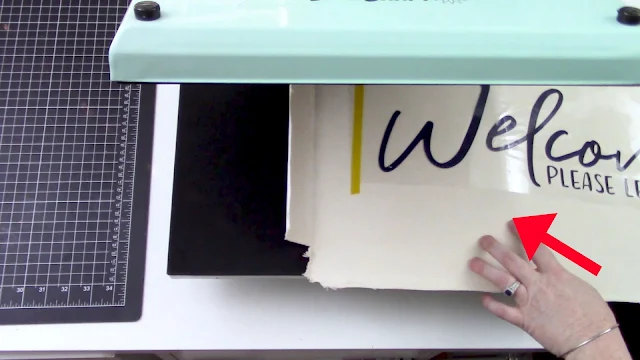
After pressing, open the press, but do not remove the carrier sheet off this section of the HTV. If you look closely at your project after the first press, you should be able to see a crease in it from where the excess overhung the platen from the previous press. On the opposite side of this crease is the unpressed HTV you'll press next.
Note: The pictures below show the crease after the carrier sheet had been removed after the second press. And although the photographs don't show it very well, the crease was definitely very distinguishable in real life.
Slide the project over so that the unpressed part of the HTV design on the opposite side of the crease line is arranged on the lower platen of the heat press.
To avoid over pressing the HTV, try not to overlap any pressed HTV on the heat press because then it would then be pressed a second time. Over pressing HTV could lead to it cracking and peeling off the project.
Press the unpressed HTV as before (either a 2-second quick press to tack down the layer if you're adding additional layers, or a full press if this is the only layer of HTV).
Remove the carrier sheet to reveal your pressed (and oversized) HTV design.
If you have additional HTV layers, repeat the previous steps like before - first, press part of your design onto the project with the excess hanging off the side of the platen. Since this is the last HTV layer in this project, we can press this HTV for the recommended amount of time.
Though, if you want to avoid the chance of getting carrier sheet press marks in your HTV, one thing you can do is first do a quick 2-second press of the second layer, then remove the carrier sheet over the HTV. Then, press for the remaining recommended time.
After this pressing of the second layer of HTV onto part of your project, slide the next section of your project onto the lower platen to press the remaining second layer of HTV.
Remember to always cover any HTV that does not have a carrier sheet over it.
Cover with a Teflon cover sheet or parchment paper so that the hot upper platen does not directly touch (and melt!) the exposed HTV.
And it's really just that simple! To complete this "welcome" sign, just follow the steps in this reverse canvas tutorial.
And now that you know how to press projects that are larger than your heat press, just think of all the exciting oversized projects you can create! Check out the Funny Everything SVG Bundle over at So Fontsy to grab the design used on this "welcome" sign, plus so many more hilarious designs!
Note: This post may contain affiliate links. By clicking on them and purchasing products through my links, I receive a small commission. That's what helps fund Silhouette School so I can keep buying new Silhouette-related products to show you how to get the most out of your machine!
Get Silhouette School lessons delivered to your email inbox! Select Once Daily or Weekly.


.png)


No comments
Thanks for leaving a comment! We get several hundred comments a day. While we appreciate every single one of them it's nearly impossible to respond back to all of them, all the time. So... if you could help me by treating these comments like a forum where readers help readers.
In addition, don't forget to look for specific answers by using the Search Box on the blog. If you're still not having any luck, feel free to email me with your question.