Take a look at the latest home decor project that is taking the craft world by storm - oversized wooden door tags. Don't they make such a charming front door decoration?
This step by step tutorial will walk you through how to make wooden door tags, plus some tips for perfectly crisp paint lines.
Start with Sanding
You can find wooden door tags at the craft store but they're also available on Amazon where you can customize the size!
You need to sand these wooden tags (or wooden signs) really, really well until they are super smooth. This is the first important step to avoid paint bleed under your stencil. You can use sanding blocks to do this, but the fastest way to get the smoothest results is to use an electric sander.
Whatever you choose to use, start off with a 120 or 150-grit sandpaper. Then, use a 180-grit, and finally a 220-grit. And always make sure to sand in the same direction as the grain of the wood.
Paint the wood door tags the base color of your choice with a medium or large size foam brush. This dark gray is called Maui Sand by Folk Art Home Decor Chalk Paint.
How to Get the "Distressed" Look
To achieve a distressed and white-washed effect, apply white paint over the dry base paint by running a foam brush flat along the grain of the wood. Apply as much or as little as you like (I may have been a little heavy handed, but don't worry if you apply too much).
Let the white paint dry. At this point the white paint is very bright and stark. So to "age" it, sand over the white paint to remove and soften it against the dark gray paint. If you sand by hand, this will definitely take some real elbow grease, but continue sanding until you have removed enough white paint (and maybe even some of the base color) and you like how it looks.
I used an electric sander to achieve the look below. Whatever method you choose, finish with one last sanding by hand with a 400-grit sandpaper to get a super, ultra-smooth finish before applying the stencil.
Cut Your Stencil
If you're unfamiliar with making a stencil with your Silhouette, check out this blog post for how to make a stencil for your door tags. Oramask 813 is an excellent stencil material for achieving clean, crisp paint lines.
The design for these holiday tags comes from the Farmhouse Christmas SVG Bundle..back for ONEO DAY ONLY (9/16/21)!
This bundle is chock full of charming, rustic farmhouse designs ready for you to create some lovely holiday home decor. With 124 SVGs (and 1 mockup) at a whopping 88% off, this is a steal of a deal for holiday crafting!
I used the Wishing You a Merry Christmas design and just put half of the design on each of the two tags.
Weed Your Stencil
Weeding a stencil is different than weeding a vinyl decal. To create a stencil, you need to weed out the pieces of the design which creates the opening in which you'll apply your paint. With vinyl decals, you are actually weeding out everything around the design.
Transfer Stencil to Tags
Apply transfer tape over the stencil and apply it to your tag using the hinge method.
Carefully, remove the transfer tape from the stencil.
Burnish the stencil really, really well with your finger paying particular attention to all the edges.
Put some easy-release tape around the outside edges of the stencil to protect the wooden door tag from getting paint outside the stencil. I used Scotch Delicate Surface Painters Tape.
Apply Paint to the Stencil
Another tip to avoid bleeding paint lines with wooden signs (or tags!), is to apply your first coat of paint in the same color as the base - also known as the Paint Vinyl Paint Peel method. This creates a seal around the edges of the stencil so the actual paint color doesn't seep through. And if there was a little paint bleed from the first coat of paint it will hardly be noticeable because it's the same color as the base.
Makeup sponges from the dollar store work wonderfully for smooth paint application between the stencil, plus cleanup is super easy because you can just throw them away when you're done.
After this coat has dried, apply the desired paint color in the stencil. This red paint color is Imperial by Folk Art Home Decor Chalk Paint.
Remove Stencil
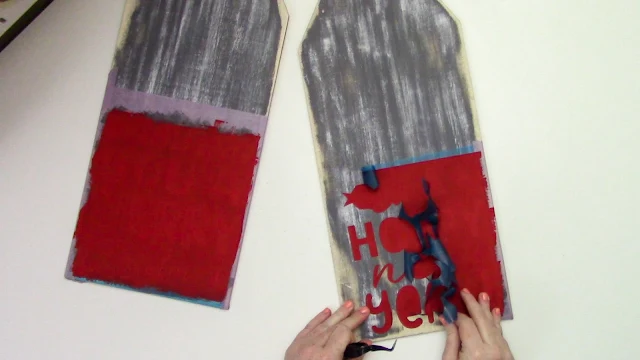
Once the paint has dried, remove the stencil material in the opposite direction of the wood grain by rolling the stencil material back onto itself instead of pulling it straight up. This helps avoid the stencil material pulling up the base coat of paint.
Use a pair of sharp point tweezers or a sewing needle to remove the inner parts of the letters and design. Just be sure not to push too deeply with the tweezers or needle so that it scratches the wood underneath the stencil material.
Look at those perfect paint lines!
Decorate!
These tags are very lightweight so if you want to attach them together, then hot glue works very well.
The tags have a hole in the tops of them to attach twine and a beautiful floral spray!
A popular alternative to the wooden door tags are the round wood signs!
Note: This post may contain affiliate links. By clicking on them and purchasing products through my links, I receive a small commission. That's what helps fund Silhouette School so I can keep buying new Silhouette-related products to show you how to get the most out of your machine!
Get Silhouette School lessons delivered to your email inbox! Select Once Daily or Weekly.


.png)


Thanks for this amazing article this help me a lot.
ReplyDeleteFor seeing 3D printer visit Best Printer for Cricut
What size door tags did you use? They are perfect!
ReplyDelete