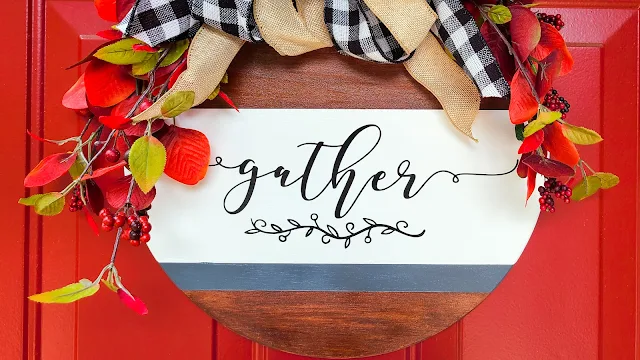
Wood round signs are SO incredibly popular right now!

This tutorial will take you start to finish on how to make wood round signs including where to get wood rounds and how to use Silhouette Studio to create sign mock ups to help you plan your project.
You can get really creative with wood round signs by painting and/or staining different sections of the round for infinite color combination possibilities!
Creating round sign mock ups in Silhouette Studio is especially valuable for previewing new color schemes and showing to customers. It's very easy to create your own wood round mock up in Silhouette Studio and here's how:
Draw a Circle And Some Straight Lines
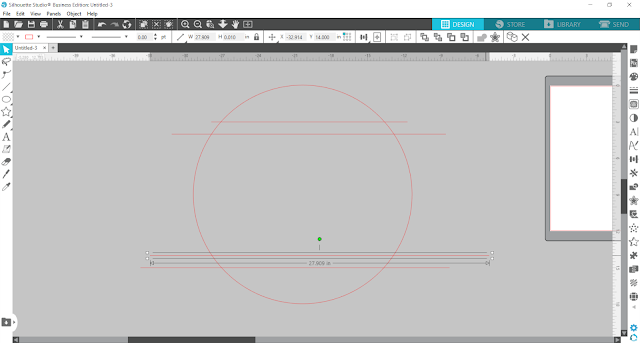
Measure your wood round and draw a circle in Silhouette Studio with the same dimensions.
To draw a perfect circle, after selecting the Draw an Ellipse tool, hold Shift on your keyboard while you click and drag across your workspace. When the circle is about the correct size, release the mouse, then release shift.
To draw a perfect circle, after selecting the Draw an Ellipse tool, hold Shift on your keyboard while you click and drag across your workspace. When the circle is about the correct size, release the mouse, then release shift.
To resize to the exact measurements while keeping the perfect circle dimensions, make sure the aspect ratio lock icon is "locked." Then, type either the height or width you want, and click enter on your keyboard.
Next, draw a straight line horizontally through the circle. To make sure the line is completely straight, press and hold the shift key on your keyboard, then click and drag your cursor across the circle. Make sure to draw the line long enough so that both ends of it intersect with the circle.
Continue drawing straight lines across the circle until you have the number of sections you want in your wood round. Adjust the lines up or down to make the sections of the circle bigger or smaller, but make sure that both ends of each line intersect with the circle.
Copy and Modify
I highly suggest you make a copy of this entire thing before moving on to the next step. If you make a copy and set it aside, you can come back to it to easily make adjustments if you need to.
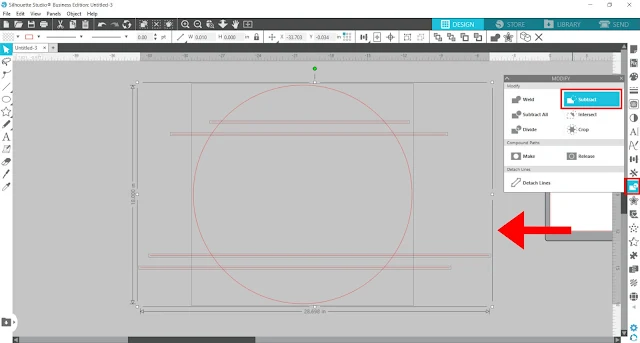
Next, select the circle and all the lines that run through it. Open the Modify Panel and click Subtract.
The circle will now become divided into sections than you can click on individually (which is important for the next step!).
Colorize and customize
Now, select one of the sections in your wood round, open the Fill Panel, and select a fill color or pattern to add to it. Experiment with different color combinations!
There are even a few wood grain fill patterns you can try that come standard in Silhouette Studio - scroll down in the Fill Pattern tab of the Fill Panel to find them.
If you're interested in even more wood grain patterns, check out the Wood Grain Textures digital papers. There are 24 colorful wood grain patterns that would be perfect to make holiday-themed wood round mock ups. If you've never worked with custom fill patterns before, check out this blog post for how to add custom fill patterns into Silhouette Studio.
If you decide you want to change the size or number of sections in the wood round you created, here's where you'll go back to that copy you created earlier. Make your changes (then I suggest you make a copy of this new design, just in case you want to go back to it to make additional edits!). Then, just like before, select the circle and lines and click Subtract from the Modify Panel.
The Fall Farmhouse SVG Design Bundle has lots of perfect SVGs for round signs like this. The bundle includes 84 rustic farmhouse SVGs, plus 6 mock ups for farmhouse decor! The bundle is available at So Fontsy for 86% off!
To add a Fall Farmhouse SVG to your mock up, click File > Merge and navigate to where on your computer you've saved the Fall Farmhouse Bundle that you downloaded from So Fontsy. Select the SVG file then click okay.
Scale the design to fit within your wood round mock up. Note: you'll need at least Silhouette Studio Designer Edition to open SVGs. If you have Standard Edition, open the DXF file (which is also included in the bundle!).
Scale the design to fit within your wood round mock up. Note: you'll need at least Silhouette Studio Designer Edition to open SVGs. If you have Standard Edition, open the DXF file (which is also included in the bundle!).
Your mock up is (almost) ready for cutting or to send to a client as a preview. A good business practice is to add a watermark to your mock ups, so here's a blog post about how to add a watermark in Silhouette Studio. (It's super easy!)
And because these mock ups were created true-to-size, you have the exact measurements of both the vinyl decal and the sections in the wood round to easily create the physical project!
How to Make Wood Round Signs
You can use tape as a sort of stencil to block off the sections of your wood rounds for painting. Once the paint is dry, just add vinyl, a bow and greenery and a hanger on the back! You're done. Here's a quick video tutorial if you're a wood round sign beginner.
Get Silhouette School lessons delivered to your email inbox! Select Once Daily or Weekly.


.png)


I may be overlooking it in your post, but were you going to list a source for the wood rounds?
ReplyDeleteThanks for the tutorial on the mock up and video. Patti
Hello! I contacted her b/c I couldn't find it either. "Home Depot or Lowes - the one I used was a deconstructed lazy susan from Ikea." I found some on Amazon too! Hope that helps.
DeleteHi Patti! This wood round was actually an Ikea Lazy Susan that I disassembled.
DeleteWhere is the best place to purchase the wood circle?
ReplyDeleteHello! I contacted her b/c I couldn't find it either. "Home Depot or Lowes - the one I used was a deconstructed lazy susan from Ikea." I found some on Amazon too! Hope that helps.
DeleteI agree, there was a part where it was stated that you were going to mention where to purchase the wood rounds. I really am interested in that info. Could you please make a mention of this?
ReplyDeleteHello! I contacted her b/c I couldn't find it either. "Home Depot or Lowes - the one I used was a deconstructed lazy susan from Ikea." I found some on Amazon too! Hope that helps.
DeleteI really like your tutorial, thanks
ReplyDeleteAlso interested in where to find the wood rounds! Have looked at all the crafting stores.
ReplyDeleteHello! I contacted her b/c I couldn't find it either. "Home Depot or Lowes - the one I used was a deconstructed lazy susan from Ikea." I found some on Amazon too! Hope that helps.
ReplyDeleteThank you! I'll check it out!
DeleteYou can get them at Home Depot or Lowes if you can find them in stock. You can also order them on Amazon. I just got some from Mr Peabody's.
ReplyDeleteAm I missing the volume?
ReplyDeleteHello! I love this tutorial - thank you! A couple of comments:
ReplyDelete1. It was unclear to me exactly how the foliage was attached. Can you provide more detail on that?
2. Do you seal the wood before applying vinyl?
3. What type of stain and paint did you use?
Thank you!