The Singe Quill is a pen that contains a special heat-activated ink. When
the ink is applied to wood and then heated with a heat tool, it singes the wood for
that burned look.
You could always sketch a design by hand on some wood, but what's better than having the Silhouette CAMEO do it for you?!

Just look at this design that comes from the Holiday Starter SVG Bundle at So Fontsy. This huge bundle is so cool because it has 234 SVGs and 1 font that will make sure you are ready to craft for any holiday - including Father's Day!

Just look at this design that comes from the Holiday Starter SVG Bundle at So Fontsy. This huge bundle is so cool because it has 234 SVGs and 1 font that will make sure you are ready to craft for any holiday - including Father's Day!
The reason this works best on the CAMEO 4, 3 and Curio is because of the higher clearance which you'll need for the thin wood to it under the roller bar.
To use the Singe Quill pen in your CAMEO or Curio you'll need to insert it in the pen holder. I am using my CAMEO 4 so I am using the Silhouette CAMEO 4 pen holder. The medium (white) collet included with the Pen holder fist best for this pen. If you need a refresher on how to use the CAMEO 4 pen holder, check out this tutorial.
I prefer the Chomas pen or marker adapter for my older Silhouette machines.
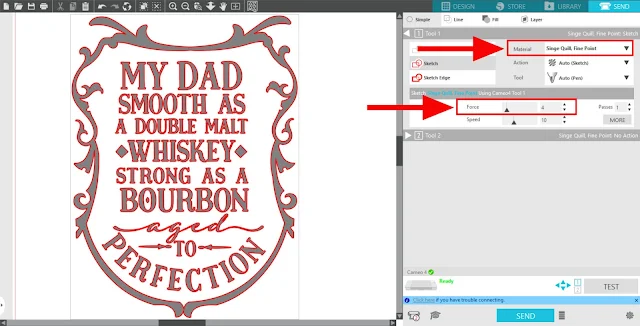
Silhouette CAMEO 4: With the pen holder (with Singe Quill Pen) loaded in Tool Carriage 1 and the Silhouette CAMEO 4 machine turned on, Silhouette Studio will automatically detect and change your tool and action in the Send panel.
Silhouette CAMEO 3 and Curio users can also use the left tool carriage, but will need to manually change the Tool to Sketch Pen which will change the Action to "Sketch" in Silhouette Studio's Send panel.
Since the WRMK 8 x 8 wood veener sheet used for this sign is considerably thicker than your standard piece of cardstock, you may want to adjust the default sketch settings. This way the tip of the pen doesn't get pressed so hard onto the material.
A Force setting of 4 worked really well. And to remember this setting for future Singe Quill projects, you can create custom material settings - check out this blog post for more on how to add custom material settings to Silhouette Studio.
The Singe Quill pen ink dries clear, but when it is first applied you can see the wood darken slightly for a moment - so you know it really is being applied.
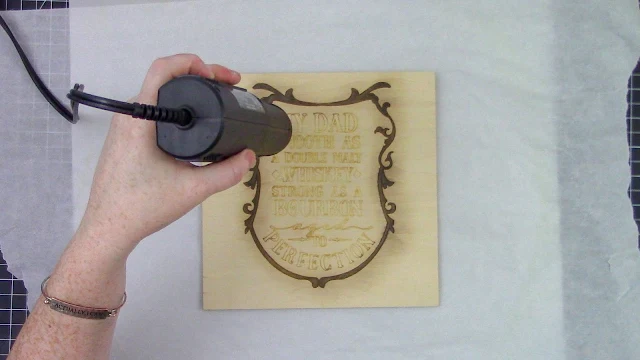
When it's done sketching, unload and remove the wood from your mat. Set on a heat resistant surface because things are about to heat up! Hold a hot heat tool over the inked areas for a few moments until you just begin to see the outline of the sketched design.
Remember, when you sketch an SVG with the Cameo, you are only sketching the outline.
There are ways to alter the design in Silhouette Studio so that the Cameo
will fill it in – or with just a little extra effort you can color in the design yourself.
Use the same singe pen you sketched with in the Cameo to color in the rest of the design. The areas you color will darken slightly when the ink in applied, then dry completely clear (if you miss a spot that's okay because you can always add more ink to that spot later).
When you're done coloring, take your heat tool again and apply heat over the ink. The longer you hold the heat over an area, the darker it will become. The outline you previously singed will also darken, but eventually the outline and the middle color will level off and match.

To heat this entire 8 x 8-inch sign took a
little under 10 minutes. To make the process go as quickly as possible,
use a high quality heat tool like this Wagner heat tool. It gets really
hot, which is exactly what you want for this
project (just be careful!) And again, be sure to work on a heat
resistant surface.

If the wood veneer sheet bends slightly during the heating process, immediately after heating a sheet of parchment paper over the top (to protect the sign), then something heat and heat resistant (the wood will still be warm) over the top.
Leave until cool and the sign will flatten out. Then, use a power drill to put a couple holes in the top. Run each end of a piece of jute rope through each hole. Then, tie several large knots at either end so that the ends don't fall back through the hole.
Leave until cool and the sign will flatten out. Then, use a power drill to put a couple holes in the top. Run each end of a piece of jute rope through each hole. Then, tie several large knots at either end so that the ends don't fall back through the hole.
And as easy as that, you have a super cool, professional-looking wood burned sign and a perfect Father's Day gift for that awesome dad in your life!
And don't forget about all the other 234 SVGs and fonts in the Holiday Starter SVG Bundle that would make awesome as a wood burned design! The bundle is now 89% off for just a limited time so get it before it's gone!
And don't forget about all the other 234 SVGs and fonts in the Holiday Starter SVG Bundle that would make awesome as a wood burned design! The bundle is now 89% off for just a limited time so get it before it's gone!
Note: This post may contain affiliate links. By clicking on them and purchasing products through my links, I receive a small commission. That's what helps fund Silhouette School so I can keep buying new Silhouette-related products to show you how to get the most out of your machine!
Get Silhouette School lessons delivered to your email inbox! Select Once Daily or Weekly.


.png)


Hello! Fun idea! As I was reading, I wondered if instead of using a heat tool, can you use a Cricut heat press and keep checking to get the desired color?
ReplyDelete