In
this post, learn what a layered font is, how to use it, and how to create a fun
birthday banner with it.
What are Layered Fonts?
Layered fonts consist of multiple font files that are
designed to be used together to create a complete font design. Sometimes the
separate fonts can be used individually, but the intention is to layer them
together because they usually create an overall really cool effect.
For example, this Unicorn Smiles font contains 2 separate
font files – Unicorn Smiles Regular, the letters with unicorn cutouts, and
Unicorn Layer Two, the cutout unicorn themselves.
When you layer them on top of
one another, you can create an adorable multicolor, magical font!
The Unicorn Smiles font is part of the Extra Fancy Fonts Bundle over at So Fontsy. This bundle is a mix of fun monograms, dingbats, states,
earrings and more that make up the 20 fonts/1000 + extra characters
included in this bundle – all at 86% off!
Oh and P.S. – there’s also a layered font, The Fresh Onion, in So Fontsy’s June Bundle as well!!
Oh and P.S. – there’s also a layered font, The Fresh Onion, in So Fontsy’s June Bundle as well!!
How to Use Layered Fonts in Silhouette Studio?
You’ll probably need to install more than one font file on
your computer to achieve the complete layered font design. For how to add new fonts to Silhouette Studio, read this blog post.
Once they are installed, open Silhouette Studio and the Text Style Panel and select the first (or bottom layer) of the font. Then, select the text tool, click the cursor in your workspace and begin typing. (I found it best to type each word in separate text boxes.)
Next, select the second (top layer) of the layered fonts from the Text style panel. Then, repeat the steps as above to type the exact same characters as the first (bottom) font layer.
It is probably helpful to add fill/line colors to the
text/characters. This makes it easier to see on your
computer and you can preview what your finished project would look like when
you choose the same colors as the material you’re going to be cutting.
Then, click and drag the top layer text box onto the bottom
layer text box. The unicorns in the second font line up right on top of the letters in the first font! Super adorbs!
What Do You Do with Layered Fonts?
You can use layered fonts for anything you would use a
regular font with – logos, flyers, signs, invitations – layered fonts are
perfect for print and cut and paper projects. You can also use layered fonts
with adhesive vinyl and HTV – like this fun happy birthday banner.
Project Inspiration: Happy Birthday Banner
This banner was created by welding the bottom and top layers
of the Unicorn Smiles font to create a “base” layer (cut in patterned HTV) then, the
second unicorn font layer was cut in glitter HTV and pressed on top.
To start this project, first, type "Happy Birthday" in both
fonts. I recommend typing each word in a separate text box. For this particular
font, I also recommend typing a space between each letter so it's easier to see
what elements (like the little extra stars) belong to each letter.
Click to select one of the text boxes, then click the Weld icon. This will
separate the text into its individual design elements.
Then, select
all the elements of a particular letter, right click on them, and select Group to keep
all these different elements together. Do that for each letter and you won't lose any of the font's little pieces.
Next, select a letter and its corresponding unicorn top layer. Create
a copy of that top unicorn layer and set it aside for now.
Then, take the original unicorn and align it on top of the bottom letter layer. Try to line up the unicorns as best you can, but if you zoom in really tight, you’ll see that actually the layers don’t line up exactly, but that’s okay.
Then, take the original unicorn and align it on top of the bottom letter layer. Try to line up the unicorns as best you can, but if you zoom in really tight, you’ll see that actually the layers don’t line up exactly, but that’s okay.
With the layers lined up, select them both and click Weld. With the new welded shape selected, change it to a white fill color with a black outline. You’ll then probably see that you’ll have extra lines and shapes in the middle of the
letter, which we want to get rid of. This happens because the letters don't line up perfectly, but here’s how to
easily clean that up.
All you have to do is right click the welded shape and select Release
Compound Path. Then, hold Shift and click on the outermost outline of the shape
to deselect it. Then, hit Delete on your keyboard to remove those extra parts
in the middle of the letter.
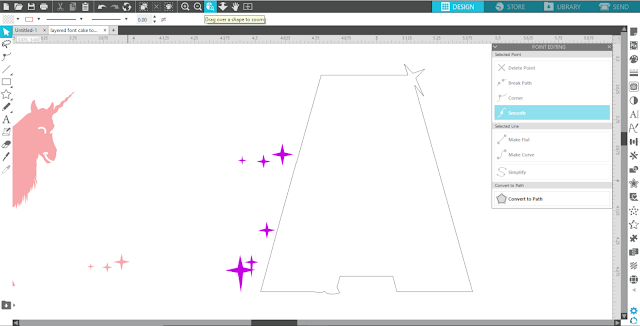
With some letters, even after deleting the inner bits, there may still be some funky extra lines connected to the outline. Select the letter, go into the Edit Points panel, click on one of the points, and then tap delete to remove it (or you can right click and select Delete Point from the drop-down menu).
Keep deleting points until you can a smoother outline.
Some letters may require different edits than others. Don't be afraid to Edit Points to create a simple base layer for the top layer unicorn to sit on. You have some creative freedom here so you can make it as simple or detailed as you like.
Group together any extra bits that weren't connected to the first layer. You can change the fill and line colors back if you want. Then, this new welded shape will be the base HTV layer for
the top unicorn layer – cut from glitter HTV! (Remember that one we set
aside?!)
Repeat this welding/editing points step for every different letter – for
duplicate letters, like H, P, Y, A just copy and paste the ones you already
created!
To resize the letters to fit on your banner, select both the base
layer and the unicorn aligned on top of it. Click and drag out one of the corner anchors of the outside selection box to make both the letter and the unicorn the right size for your project. These letters were sized to about 4 inches tall to fit on these pieces of a burlap banner from Michaels.
Now it’s time to cut out the different elements from
different materials. I was able to fit all the unicorns on 1 sheet of 12 x 12-inch Siser glitter HTV, and all the base letters on two 12 x 12-inch sheets of Siser Sparkleberry patterned HTV.
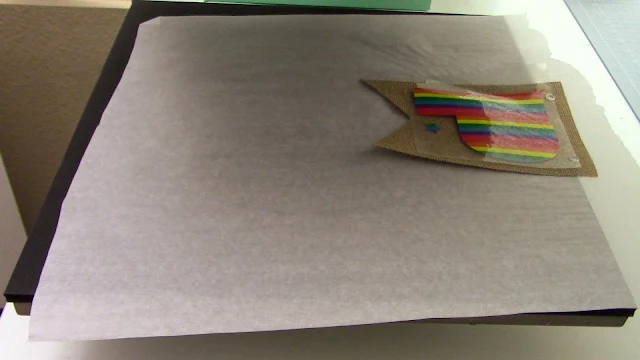
To assemble the HTV layers, put the burlap piece on your heat press with the bottom HTV layer on first.
Because there are metal eyelets in the banner, arrange the burlap so that those
hang off the edge of the press. Cover the entire project with a cover sheet, then press for about
5 seconds or so to tack down this first layer.
Next, remove the carrier sheet and align your next HTV layer over the
top. Again, cover with a cover sheet and press for another 5 seconds or so. Then, remove the carrier sheet from the top HTV layer, replace the cover sheet, and lastly press for another 10 seconds.
Repeat for each banner piece. Then string together with twine or white embossing thread. You can
add decorative pom poms between the letters if you want. Then, just hang up
your banner and admire your handy work!
Like the font used in this project? You can get this font (plus so much more) from the Extra Fancy Fonts Bundle over at SoFontsy!
Note: This post may contain affiliate links. By clicking on them and purchasing products through my links, I receive a small commission. That's what helps fund Silhouette School so I can keep buying new Silhouette-related products to show you how to get the most out of your machine!
Get Silhouette School lessons delivered to your email inbox! Select Once Daily or Weekly.


.png)


No comments
Thanks for leaving a comment! We get several hundred comments a day. While we appreciate every single one of them it's nearly impossible to respond back to all of them, all the time. So... if you could help me by treating these comments like a forum where readers help readers.
In addition, don't forget to look for specific answers by using the Search Box on the blog. If you're still not having any luck, feel free to email me with your question.