
Well, it’s not difficult to do with the WRMK Foil Quill and here’s how to do.
You’ll need the Foil Quill for this project and more than
one color of the WRMK heat activated foil. If you’re unfamiliar with the Foil
Quill, you may want to check out this beginner Foil Quill and Silhouette tutorial for lots more info.
Best Designs for Foil Quill
You’ll also need a design to foil and you can foil pretty much any SVG or DXF design, but single-line designs and fonts are perfectly suited to show off the beauty of this incredible tool!
For a whole host of Foil Quill-friendly single-line designs
and fonts, check out the fully loaded Foil Quill SVG and Font Starter Bundle over at So Fontsy. It has 81 files and 4 fonts that are perfect for
not just the Foil Quill, but also sketch pens, markers, and glitter pens too!
Check it out!
Setting Up a Multi Color Foil Quill Design in Silhouette Studio
So, first, open your design in Silhouette Studio, and position
it in the bottom part of your mat (you’ll see why later).
Then, decide which lines of the design you want to foil with which foil color.
Next, you’re going to change the colors of those lines in Silhouette Studio to the same color of the foil you’ll be using.
Then, decide which lines of the design you want to foil with which foil color.
Next, you’re going to change the colors of those lines in Silhouette Studio to the same color of the foil you’ll be using.
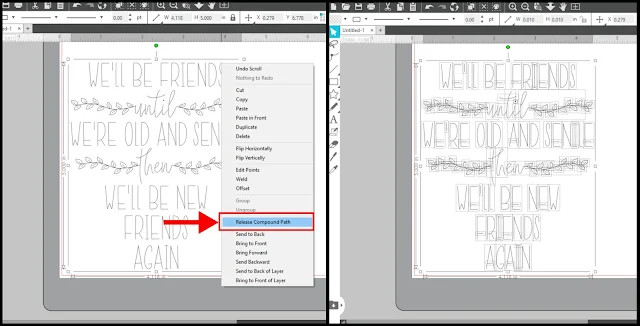
To access the different lines of a design, you’ll probably
need to ungroup and/or release the compound path of the design.
Then, select
just the lines you want. Hold Shift when you click on each line to select
multiple at once.
Or you can click and drag across the lines you want to change to select them all at one time.
Then, click the icon for line color in the Quick Access Tool Panel and select the color you want to change them too.
Or you can click and drag across the lines you want to change to select them all at one time.
Then, click the icon for line color in the Quick Access Tool Panel and select the color you want to change them too.
For this particular design, the words “until” and “then” were
connected to the decorative vines in this design. Since I wanted the vines and
the words to be different colors, I used the Knife Tool to “slice” them apart. Then, I could select them
separately to change them to different line colors.
You can use as many colors as you want, but for your first
time you may want to stick with just two different colors. However, the process is the same no matter how many colors you're using.
When you’re done coloring, open the Send panel and click the Line tab. Here, you’ll be able to foil by line color based on the line color in the design.
When you’re done coloring, open the Send panel and click the Line tab. Here, you’ll be able to foil by line color based on the line color in the design.
First, I suggest changing all your foil settings for each color now, so you don’t accidentally forget to do it later. Click on one of the colors and change the Action to Sketch and the Tool to Pen. Do that for each color.
You'll also want to change the default force and speed settings for each color as well.
The recommended foil settings to use with the Silhouette Cameo 4 is a force of 4 and a speed of 7. Then, uncheck every box except the color you want to foil first.
The recommended foil settings to use with the Silhouette Cameo 4 is a force of 4 and a speed of 7. Then, uncheck every box except the color you want to foil first.
Setting Up Your CAMEO for Multi Color Foil
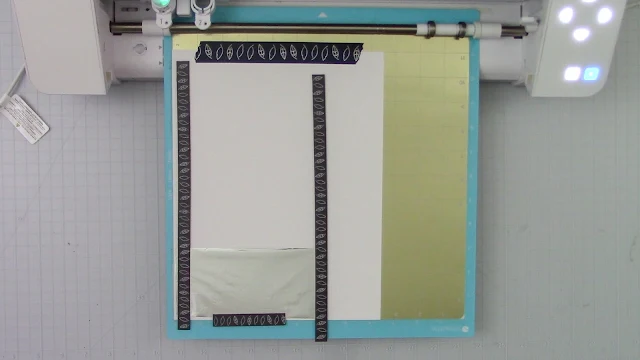
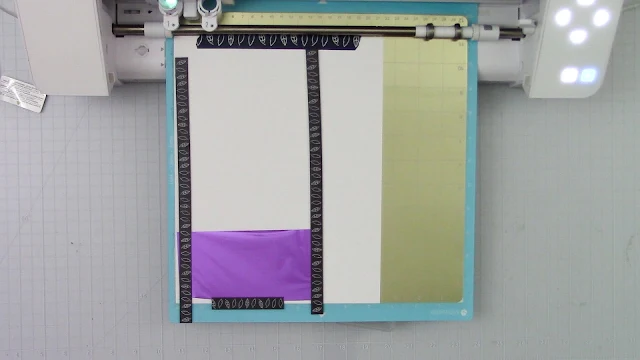
Now head over to your Cameo. Adhere a piece of cardstock on your mat - remember you need to work in the bottom part of the mat.Add a piece of foil over the card stock. The foil should be big enough to cover the design area with extra space around the edges for room to adhere the foil to the paper (either with washi tape or magnets). Make sure the foil is pulled taut against the card stock.
For foiling multiple colors, the Foil Quill Magnetic Mat is extremely
helpful for the ease and speed of changing out foil colors. However, you can use
a regular mat too and washi tape to adhere the foil to the cardstock. Just make sure that either the washi tape or magnets are not covering the design (move the magnets out a little farther from the design to make sure there is enough room for the quill tool to access it).
And yes, you can use the Magnetic Mat in the Cameo 4. It’s just very important to keep the small magnets positioned very low down on the magnetic mat (so they avoid the metal bar in the Cameo 4).
If you are using the Magnetic Mat then it also very helpful
to washi tape your card stock to the mat so it won’t move when you
change foil colors.
Other things to be aware of with the magnetic mat is to make sure
the rollers are pushed off to the side and out of the way, so they won’t hit the
magnets. And make sure the magnets will not hit the bumpers when the mat is
fed into the Cameo.
Now load the mat. With the Magnetic Mat, you can put something underneath it to support the additional weight of the mat.
Then, grab the Foil Quill with the appropriate adapter. For the Cameo 4, use either the medium or bold tip quill and the D adapter. Let the Foil Quill warm up for 5 minutes before inserting into the machine.
Then, grab the Foil Quill with the appropriate adapter. For the Cameo 4, use either the medium or bold tip quill and the D adapter. Let the Foil Quill warm up for 5 minutes before inserting into the machine.
Now back in Silhouette Studio, double check your settings. Make
sure that only one box, the color you want to foil first, is checked.
Then, hit Send.
Then, hit Send.
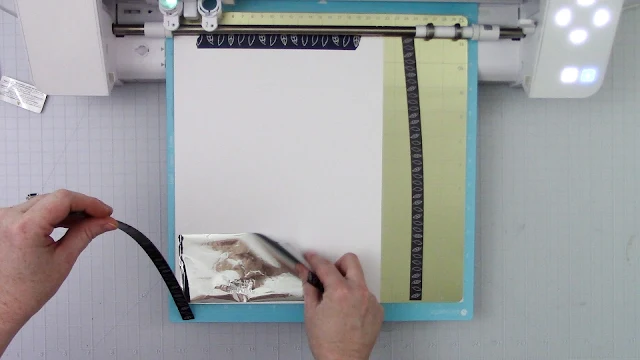
When the machine is done foiling and the tool carriage
returns to the starting position – leave the mat in the Cameo! DO NOT unload
the mat. Simply, remove the foil from the cardstock, gently so you don’t accidentally
move the card stock.
This is why you need to work on the bottom part of the mat - so you can easily access the foil because it won't be laying under the roller bar of the machine.
This is why you need to work on the bottom part of the mat - so you can easily access the foil because it won't be laying under the roller bar of the machine.
Now lay down a second color of foil and adhere to the card
stock just like before, either with washi tape or magnets. Be sure not to move the card stock.
Next, go back into Silhouette Studio, uncheck the box of the color you
previously foiled and check the box of the next color you want to foil now.
Then, hit Send.
When it’s done foiling, repeat the same process (if you have more colors to do): do not unload the mat, remove the used foil, adhere a new piece of foil, deselect the previous color, select the next color in Silhouette Studio, and then hit Send.
When it’s done foiling, repeat the same process (if you have more colors to do): do not unload the mat, remove the used foil, adhere a new piece of foil, deselect the previous color, select the next color in Silhouette Studio, and then hit Send.
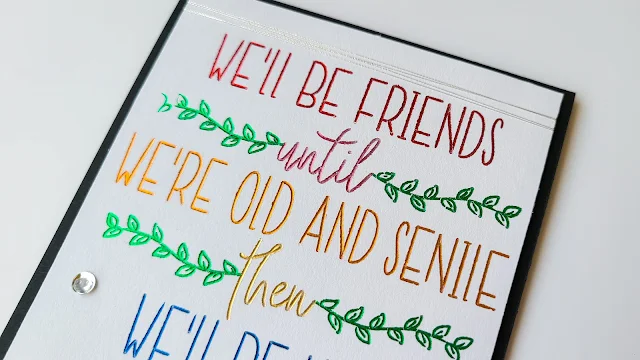
When all the colors are foiled, unload the mat and here’s your finished colorful foiled project! Once you get the hang of it, you’ll be a colorful foiling machine! I mean, and there are so many stunning foil colors to choose from for your projects – why choose just one?!
And there are also so many awesome designs in the Foil Quill SVG and Font StarterBundle. It'll keep you foiling for days!! But the bundle isn’t around forever,
so you want to grab it now while it’s still 91% off!
Note: This post may contain affiliate links. By clicking on them and purchasing products through my links, I receive a small commission. That's what helps fund Silhouette School so I can keep buying new Silhouette-related products to show you how to get the most out of your machine!
Note: This post may contain affiliate links. By clicking on them and purchasing products through my links, I receive a small commission. That's what helps fund Silhouette School so I can keep buying new Silhouette-related products to show you how to get the most out of your machine!
Get Silhouette School lessons delivered to your email inbox! Select Once Daily or Weekly.










.png)


I would add a pause between the colors, that makes it easier instead of sending it for each color
ReplyDelete