There’s no better feeling in the crafting world than when the
multi-color, multi-layer vinyl decal you’ve worked so hard on comes out perfectly aligned! Using the registration marks method is a tried and true way to line up the different layers of a decal perfectly.
But what if I told you that there is a way you can line up vinyl decals WITHOUT registration marks? Well there is, and here’s how!
But what if I told you that there is a way you can line up vinyl decals WITHOUT registration marks? Well there is, and here’s how!
This layering technique works really well with
designs like this social distancing cactus from So Fontsy. The cactus has a bold, black outline with smaller layers that you want to fit perfectly inside the outline.
How to Layer Vinyl Without Registration Marks
To get started, cut and weed
all the different layers of the design in the vinyl colors of your choice - we're using Oracal 651.
The parchment sheets should be cut larger than your decal.
The transfer tape should also be cut larger than the finished size of your decal.
Supplies Needed:
You'll also need 2 pieces of (flat) parchment paper, transfer tape, a Sharpie pen, and glue dots.The parchment sheets should be cut larger than your decal.
The transfer tape should also be cut larger than the finished size of your decal.
Multi Color Vinyl Decal: The First Layer
Determine what vinyl piece is the top most layer. For this cactus design, it is the black outline because the green layers sit behind it, and there aren't any elements that sit on top of the black outline. For this technique, always begin with the topmost layer.
Use a piece of the transfer tape to pick up this top layer of weeded vinyl. Before you put the transfer tape down on the vinyl, be aware of the positioning. For example, with this cactus, there is the "#SocialDistancing" text that will sit below the cactus itself. That means that you’ll need to position
this first vinyl layer high enough on the transfer tape so there is enough room underneath it to account for the bottom text.
Remove the vinyl backing so only the vinyl is stuck to the transfer tape.
Now grab one piece of parchment paper.
Take the transfer tape with your first layer of vinyl on it and place it directly on top of the parchment paper. Don't worry, the transfer tape and vinyl can be easily removed from the parchment paper.
Place this piece to the side for a minute.
Now grab one piece of parchment paper.
Take the transfer tape with your first layer of vinyl on it and place it directly on top of the parchment paper. Don't worry, the transfer tape and vinyl can be easily removed from the parchment paper.
Place this piece to the side for a minute.
Setting Up the Second Vinyl Layer
Grab the other piece of parchment paper and lay it flat on your work space using a piece of tape along the top edge so it doesn't move around.
Take your next vinyl layer in the decal - in this case the green cactus piece - and put a glue dot on
the back of the vinyl backing and stick it on top of the parchment taped to your work surface. The glue
dot keeps the vinyl piece from moving around which is a very important part of this technique.
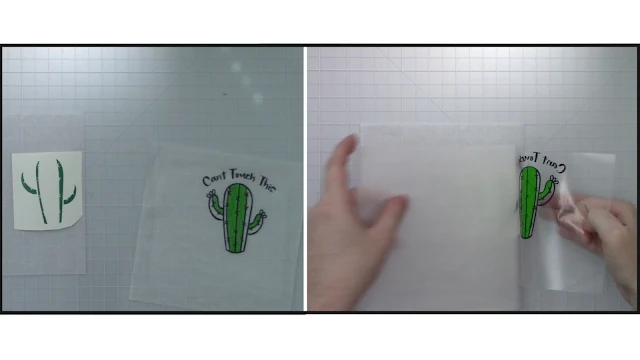
Grab the piece of parchment paper with the first vinyl layer and transfer tape on it and remove the transfer tape with the vinyl decal.
Use that piece of parchment paper to cover the next layer so you basically have a vinyl and parchment paper sandwich: parchment paper, second layer of vinyl, parchment paper.
Now you can see the second layer of vinyl, through the parchment paper.
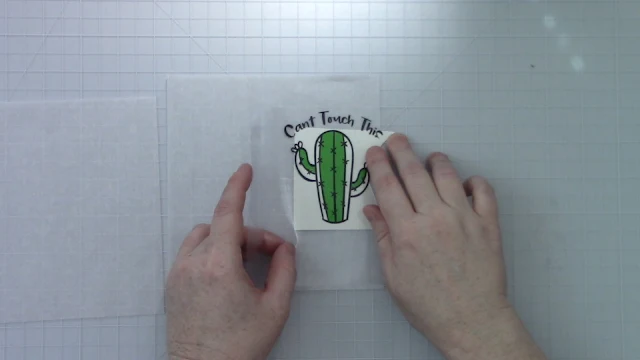
Take the top layer of vinyl (still on the transfer tape) and align it over the second layer.
The parchment paper is acting as a protective layer until you get the two vinyl layers exactly lined up. Once you do, stick the edge of the transfer tape down to your work area to act as a hinge.
Once it's hinged so it stays in place, fold the transfer tape with the top layer of vinyl back and slide out the layer of parchment paper between the two vinyl layers.
Now, fold the transfer tape back down and this hinge method will lay it back down in the exact same place as it was before, but this time without the parchment, and now directly onto the second layer of vinyl.
Now burnish the transfer tape onto the second vinyl
layer and remove the remaining parchment paper and vinyl backing from this layer. And now you have two layers
of your decal aligned on your transfer tape!
Repeat these same steps exactly as before with your next vinyl layer until all layers have been transferred to the transfer tape.
Remember to always work in order from the top layer first to the bottom
layer last. Then, you're ready to apply your completed vinyl decal to
the surface of your choice.Repeat these same steps exactly as before with your next vinyl layer until all layers have been transferred to the transfer tape.

What is really cool about this method is that you can use very small pieces of vinyl that may not have been large enough for registration marks. So, go out there and start using up every last bit of your vinyl scraps to create multi-colored, multi-layered vinyl decals that are perfectly aligned!

I know this is a pretty complex tutorial with lots of steps so I've also included a video to help you see how this process works.
Note: This post may contain affiliate links. By clicking on them and purchasing products through my links, I receive a small commission. That's what helps fund Silhouette School so I can keep buying new Silhouette-related products to show you how to get the most out of your machine!
Get Silhouette School lessons delivered to your email inbox! Select Once Daily or Weekly.


.png)


Hi! This is great! How do I access the video?
ReplyDeleteGreat tutorial! But I can't find any video?
ReplyDeleteNo video??
ReplyDeletevideo-great! Glue dots-AWESOME!!!
ReplyDeleteThe video is posted at the very bottom :)
ReplyDelete