Silhouette Studio Designer Edition Plus will open embroidery files which means you can cut fabric applique with your Silhouette then finish the machine embroidery applique on your embroidery machine!
On So Fonsty, most of our embroidery designers offer a variety of file formats along with various sizes for embroidery applique designs.
One of the best options for compatibility between Silhouette Studio and a Brother embroidery machine is the PES file type.
Start by downloading the zip file for the embroidery design. Unzip the zip file. There are probably a series of folders inside so open them up and find the PES for the design size that will fit your hoop.
I am using this adorable cactus design from the Machine Embroidery and Applique Bundle on So Fontsy. It includes 125 designs and 6 embroidery fonts for just $16.99.
Open Silhouette Studio and either drag and drop the PES file into your work area or go to File > Open and navigate to it.
DO NOT RESIZE THE DESIGN. I REPEAT...DO NOT RESIZE THE DESIGN. You need the fabric applique you cut to perfectly match the embroidery file size.
If the design is grouped, ungroup it. Depending on the number of stitches - which are now cut lines - it make take a few minutes for the software to process the editing requests.
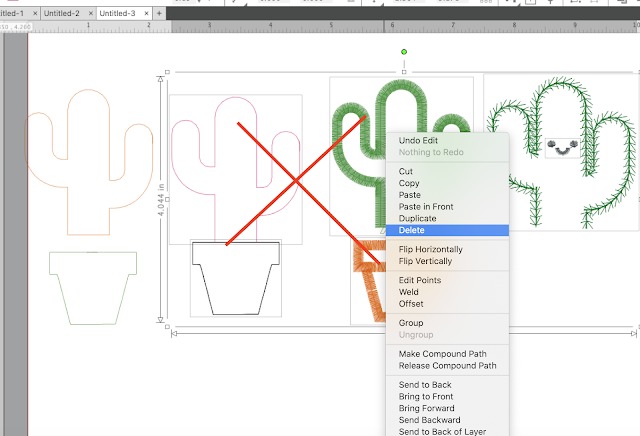
Once ungrouped, separate the layers of stitching until you can pull away the tack down or placement stitch. The placement stitch is the solid line stitch that looks like a cut file.
There are probably two separate solid line stitches so be sure you are working with only one. You can delete everything else in the work area.
The placement stitch can be used as a cut line which means you can use it to cut your fabric applique.
Tip: You may wish to put a small offset around the cut line so the fabric applique is just slightly larger than the placement stitch. The black line you see in this example is the offset I made which is an offset distance of 0.035. This will ensure the machine catches it when you sew. But don't worry as long as the offset is small, the edge should be hidden by the satin stitch.
The Silhouette CAMEO 4 makes cutting fabric super easy since you can use the rotary blade and do not need any type of stabilizer on your fabric when cutting.
Click here to read the second part of this beginner tutorial on how to cut and then sew fabric applique embroidery designs with Silhouette CAMEO.
Note: This post may contain affiliate links. By clicking on them and purchasing products through my links, I receive a small commission. That's what helps fund Silhouette School so I can keep buying new Silhouette-related products to show you how to get the most out of your machine!
Get Silhouette School lessons delivered to your email inbox! Select Once Daily or Weekly.


.png)


Thank you for the great ideas!
ReplyDeleteI have all different embroidery formats n tried to drag n drop each one but says it doesn't support it - i have the basic silhouette studio - thanks yvonne x
ReplyDeleteHi there! You need to have Business Edition to open embroidery files. Check it out here: https://shrsl.com/2p5v
DeleteHi there, newbie here. Can this project be performed on portrait 3 instead of cameo?
ReplyDelete