Silhouette Studio gives you a lot of editing options that will allow you to make changes or modifications if you need to so the cut file is perfect. Check out these few basic edition options in Silhouette Studio.
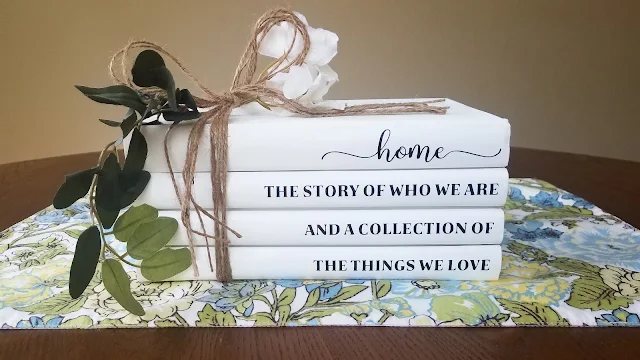
I was working on making a farmhouse style stack of books and and found the definition of home cut file in the Home Starter SVG Bundle to be the perfect sentiment.
The problem is the layout of the design doesn't quite work for the stack of four books. It would be better with the words slightly realigned.

To start, import the design into Silhouette Studio. Here are 8 different ways to open or import cut files into Silhouette Studio.
Once the design is in the work area, you could always resize the entire design using the square handle boxes on the edges of the design to make it the perfect size for your project. That, however, will scale the size of the entire design.
For this project I want to right justify all of the rows and I want the bottom three rows to be more even.
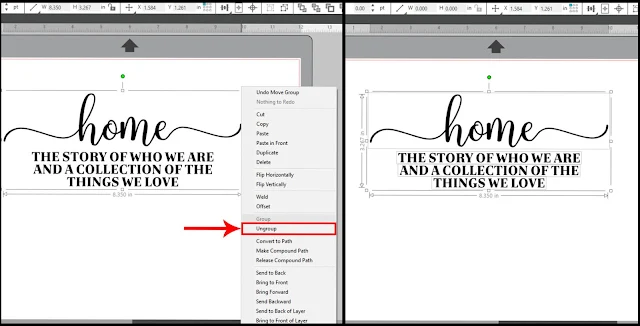
Start by right clicking on the design and select “Ungroup” from the
drop-down menu.
You can now move around each line of text separately. Since we want to only move the word “the” from the third line, right-click on the third line of text. But you’ll see that in the drop-down menu that “ungroup” is not clickable – it’s not an option for this part of the design.
You can now move around each line of text separately. Since we want to only move the word “the” from the third line, right-click on the third line of text. But you’ll see that in the drop-down menu that “ungroup” is not clickable – it’s not an option for this part of the design.
Ungroup isn't an option because of how the design was originally created. So in this case we need to click “Release
Compound Path.” What this does is essentially “ungroup” the line by separating
all the individual shapes of each letter in this line of text.
You'll notice when you release the compound path, certain letters like O and A will fill in solid. Just leave them for now.
For the word “the," all you need to do is select all the letters, right-click and click “Group” from the drop-down menu.
For the word “the," all you need to do is select all the letters, right-click and click “Group” from the drop-down menu.
Then, you can easily click and drag the word to the fourth line of text. Use the
alignment tools in the Quick Access Tool bar or in the Transform Panel to help get the text lined up straight.
When you like
how it looks, group the word “the” with the rest of the fourth line of text. But
you are not quite done.
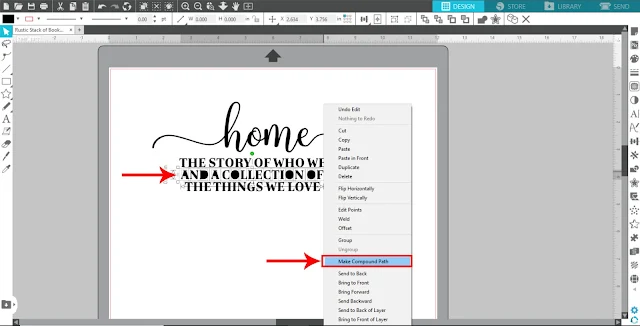
You still need to put the third line of text back together by
selecting everything in that line (all the shapes), right-clicking, and
selecting “Make Compound Path.” Now, the last three lines of text are closer to the same length, which looks great for this stack of books project.
To get the sizing right for the text, collect four books
to use for this project. These can be old books you want to “upcycle” or even
new books from the dollar store.
Measure the height and width of the spines of each book and
draw rectangles the same size in Silhouette Studio using the Draw a Rectangle tool.
Move the lines of text within these rectangles and size accordingly. When you like how it looks, delete the rectangles from your cutting mat, then send to cut to your Silhouette machine! (Or you can keep the rectangles there while you cut and use them as weeding boxes)
Move the lines of text within these rectangles and size accordingly. When you like how it looks, delete the rectangles from your cutting mat, then send to cut to your Silhouette machine! (Or you can keep the rectangles there while you cut and use them as weeding boxes)
For tips on cutting small lines of text, check out this post that will make weeding SO much easier!
Using black vinyl, like Oracal 651, against bright white books is such a strikingly beautiful contrast! But did you know that 651 also comes in black with a matte finish?! It was the perfect choice for this farmhouse project!
How to Make a DIY Farmhouse Book Stack
Next, start painting your books (for hardcover books, remove the outside sleeve if it came with one). Folk Art Home Décor Chalk paint in the color White Adirondack gives the books a really nice, flat white finish - and here’s the best part: you don’t
have to paint the entire book! Since these books are stacked, just paint the
parts of the books that will exposed when they are stacked.
So really all you need to paint is the front of one book for
the top of the stack, the back of another for the bottom of the stack, and then the sides of each of them. You can even put a very thin coat of paint along the pages to make those bright white as well (if they aren't already).
Let the paint dry, then use a strong adhesive like E6000 to glue the stack together. Apply a thin line of glue about an inch to a 1/2 inch from the
edge of one book, then place another on top of it. The glue doesn’t set immediately,
so you have some wiggle room to line them up. Repeat with the rest of the books and
place something heavy on top of the stack while it dries so the books stay pressed together.
After the glue has set, spray the spines with a thin coat of clear acrylic spray. Vinyl doesn’t like to stick to painted surfaces, but with a clear coat of acrylic like Krylon Acrylic Crystal Clear over top, you shouldn’t have a problem.
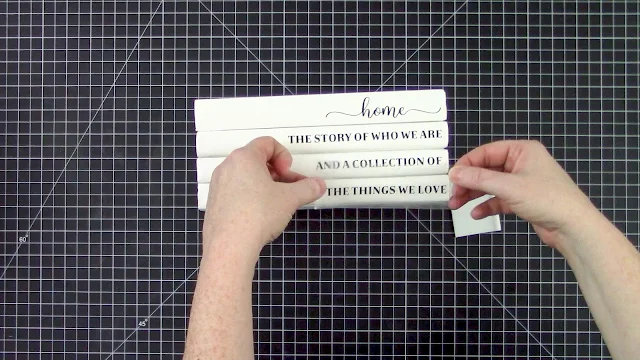
Once it’s dry, it’s time to apply your vinyl. Use transfer
tape to transfer the vinyl onto the spines of the books. The hinge method is a perfect way to
get them lined up perfectly on the first try.


Next, decorate with some jute twine or ribbon. You could add some flowers or other greenery. Get creative! But any way you dress
it up, you've got yourself a professional-looking DIY home décor piece.
The text design used for this stack of books comes from the Big Starter Home Bundle from SoFontsy. Isn’t it just the perfect quote for this stack of books project? This entire bundle is jam packed with 92 heartwarming (and humorous) SVG designs that are perfect for a home décor facelift or a heartfelt housewarming gift.
Note: This post may contain affiliate links. By clicking on them and purchasing products through my links, I receive a small commission. That's what helps fund Silhouette School so I can keep buying new Silhouette-related products to show you how to get the most out of your machine!
Get Silhouette School lessons delivered to your email inbox! Select Once Daily or Weekly.


.png)


would be easier to use the Knife tool to cut THE away from the rest; then re-align everything.
ReplyDelete