We’ve shared tricks about correctly sizing with blanks before, but here are even more tips to help you get it right on the first try.
Here we’re customizing these adorable plush baby elephants with
baby birth announcements.
The fonts used for them are part of the Fun Craft Font Bundle at SoFontsy. Finding fonts for all your craft needs has never been easier – or more fun! 12 fonts and 1 font duo for only $19.99!
Measure the Craft Blank
Start your project by first using a tape measure or ruler to
record the dimensions of the "working space" on your blank. The working space is the area in which the design would go. For items that are
oddly shaped (like these baby elephant ears), simplify the working space to an imaginary rectangle and record the measurements of that.
Open Silhouette Studio and draw a rectangle with the same dimensions. Place your design in this area and resize as desired. Assuming your measurements are correct, if the design fits within this rectangle in Silhouette Studio, the cut vinyl design will fit similarly on your project.
Open Silhouette Studio and draw a rectangle with the same dimensions. Place your design in this area and resize as desired. Assuming your measurements are correct, if the design fits within this rectangle in Silhouette Studio, the cut vinyl design will fit similarly on your project.
Take a Picture with a Ruler
If you hate taking measurements or you want to preview what the design will look like on
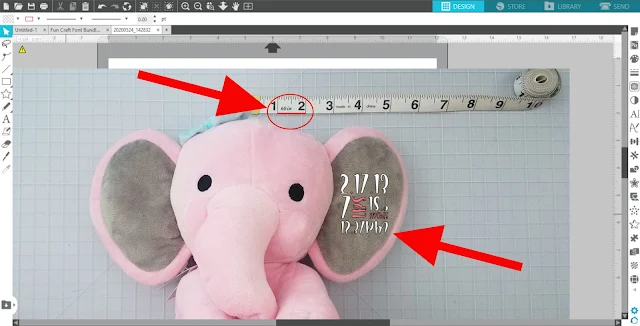
your blank, try this. Lay a ruler down flat next to your blank and take a
picture of them together. Email the picture to yourself and import into
Silhouette Studio.
Now, draw a line in Silhouette Studio that is 1 inch wide. Resize the photo until the ruler’s inch-marks in the photo match the width of the 1-inch line you drew. When it does, you can now arrange and size the design on the picture that corresponds to the blank’s true-to-life size.
This is helpful for both sizing and placement of a design and seeing what vinyl colors might look nice on your blank.
Print a Draft
Before you actually cut the design, print a copy of it. You
can print in black and white or in draft mode to save on ink. Trim around the
design with scissors and now you can physically place it (temporarily) on the
blank to check if you like the sizing and placement.
You will need to add a line weight to the outline of your design for it to print unless you have filled the design with a solid color.
You will need to add a line weight to the outline of your design for it to print unless you have filled the design with a solid color.
To finish off these baby elephants, mirror, cut, and weed your HTV. Then, press the design onto the elephant's ears, and the Cricut Easy Press Mini is the perfect tool for a job like this!
And don't forget to grab the Fun Craft Font Bundle for SoFontsy! It's only 90% off for a limited time!
Note: This post may contain affiliate links. By clicking on them and purchasing products through my links, I receive a small commission. That's what helps fund Silhouette School so I can keep buying new Silhouette-related products to show you how to get the most out of your machine!
Get Silhouette School lessons delivered to your email inbox! Select Once Daily or Weekly.


.png)


Taking a picture with a ruler is very clever! Thank you!
ReplyDeleteIs there a link to buy elephants?
ReplyDeleteGood morning everybody! Are you in need of online assignment writing service? So, do not worry, the team of professionals at this paramountessays.com/college-research-paper website accept all your requests and continue giving excellent essays. They can simply take all the important topics and all conected information to it and you will see how brilliant it is looks like.
ReplyDelete