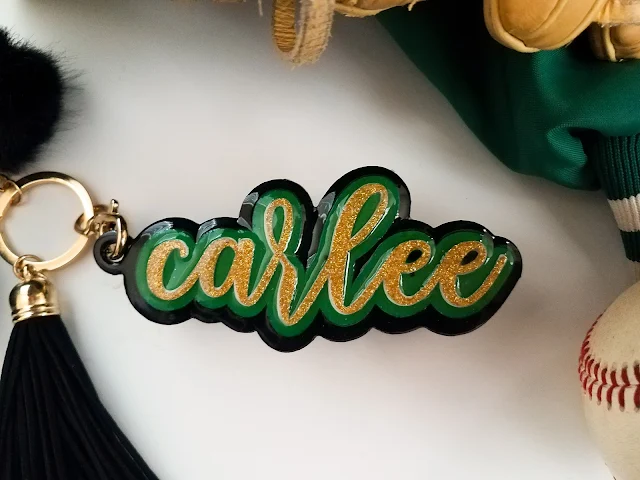
You could pretty much use any font you want for these
keychains, but script fonts where the letters connect together work the best!
I used two different fonts in the Script Font Bundle 4.0 available at So Fontsy. It is jam packed with 18 beautiful fonts to choose ...and they're just over $1 each right now for a limited time!
I used two different fonts in the Script Font Bundle 4.0 available at So Fontsy. It is jam packed with 18 beautiful fonts to choose ...and they're just over $1 each right now for a limited time!
To make the keychains, first type your name and click on it to make sure it is
selected. Then, go to Offset tool panel in the right-hand toolbar and click Offset.
The default is set 0.125, but you can adjust it smaller or larger if you want, which you’ll see previewed around the name. Click Apply when you want to finalize the offset.
The default is set 0.125, but you can adjust it smaller or larger if you want, which you’ll see previewed around the name. Click Apply when you want to finalize the offset.
Now, with some fonts and offsets, you’ll get these really teeny
tiny offset shapes between each letters or parts of one letter. You could
choose to leave them in, but since these shapes are so small and sometimes hard for your
machine to get a clean cut, you can make things so much easier and faster in
this project by removing them.
To do that, right click on the line of the offset and click Release
Compound Path. What will happen is those “inner” pieces from the offset (plus
the offset outline itself) will now be selected - you can tell because there is
a gray outline around each of them. Note: the original name is NOT selected.
Since you want to delete everything in the offset except the outermost offset line itself, you want to deselect that line. So, hold down shift on your keyboard and click right on the line of the outermost offset. This will now deselect that part (and only that part) and now just the “inner” shapes of the offset will only be selected (see how there’s a gray box only around those parts?). Now, just hit delete on your keyboard and boom they’re gone!
Since you want to delete everything in the offset except the outermost offset line itself, you want to deselect that line. So, hold down shift on your keyboard and click right on the line of the outermost offset. This will now deselect that part (and only that part) and now just the “inner” shapes of the offset will only be selected (see how there’s a gray box only around those parts?). Now, just hit delete on your keyboard and boom they’re gone!
The third and final thing you want to do it create an offset of the offset, the same way you just did the first one. Again, you can adjust the size smaller or larger, but I just used the default for this project.
Apply fill colors to the offsets and move the bottom offset
off to the side. You now need to add a hole to this layer so you’ll be able to attach
the finished project onto a keychain.
Open the shapes panel in the left-hand tool bar and select
the donut.
Draw a small donut next to the outermost offset of the keychain and
move it so that it overlaps just a little bit. Select both the offset and the
donut than, then click the weld tool in the quick access toolbar.
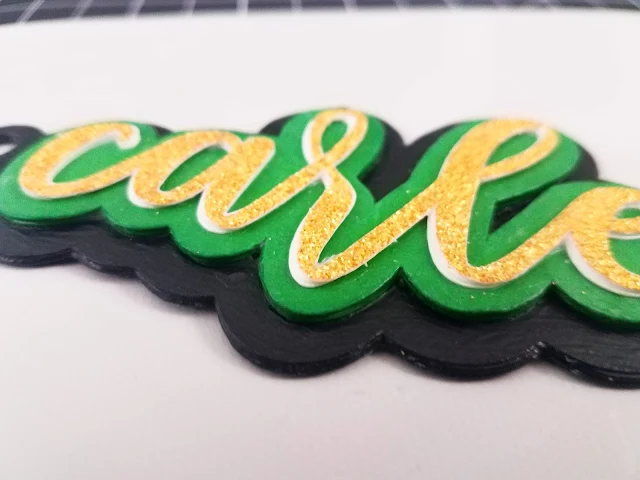
Next, it's time to start cutting! Cut the offsets out 6 times each from medium to heavyweight cardstock. The top layer just cut out 3 times. If you
like to be conservative with your glitter cardstock, you can only cut the name
out once from the glitter and then the other two from plain white cardstock
(since those will be covered up anyway).
Then, you’re ready to assemble. Glue all the layers of the
first offset together with Mod Podge. Use a foam brush to swipe a fair amount
across each layer of cardstock, then press another cardstock layer on top.
Next,
glue 5 of the cardstock layers of the second offset (the bottom layer) and set
one aside to use later – we’ll come back to it. Make sure you press the layers
together really, really tightly.
For the name itself, if you chose a super thin scripty font,
just very lightly dab the Mod Podge on and use tweezers to get the cardstock
layers together.
Next, Mod Podge the first offset stack on top of the bottom
offset stack. And then Mod Podge the script name stack on the very top.
For the glitter layer, if you you don’t want glitter pieces
spreading all over the rest of the keychain, paint the Mod Podge just over the
glitter to seal it in. Let that dry, then apply another coat over the entire
thing, even on the sides of the stacks of cardstock.
You want to make sure you use enough Mod Podge so the paper
is completely sealed. Then, let it dry completely - until the Mod Podge is completely clear.
This last step is what really brings out the shine and makes
this project super special – adding the shiny epoxy gloss. Read the safety instructions carefully before using epoxy
which include wearing a mask, gloves and working in a well-ventilated area.
Use a small brush to paint on the epoxy (make sure it’s not
your favorite brush because this will be a one-time use only brush because you’ll
have to throw it away after you’re done).
Start in the middle and work your way out, with just a little at a time and using the brush to spread it out. Work on a nonstick, epoxy safe surface like the Ken Oliver Best Craft Mat Ever, so if a little spills off the edge it’s okay. Just move the keychain to another spot on the nonstick surface and continue.
Now you have to wait for the epoxy to cure, anywhere from
24-48 hours. Then, after it’s cured, when you flip it over, you’ll see the backside
probably doesn’t look too pretty. But that’s okay because remember that extra
piece we set aside.
Use your Mod Podge just like before and align that last
layer on the bottom, covering up any messy bits for a nice clean back to your
keychain. Seal the bottom with another layer of Mod Podge. You could then also apply a
thin layer of epoxy to the back as well, but that is optional.
Now just add your keychain, accessories, and your keys because
you’re done!
Script fonts really do work best for a project like this
because most (if not all) of the letters stay connected, so gluing the layers together goes so much faster. There are so many beautiful fonts to
choose from in the Script Font Bundle 4.0 at So Fontsy, so be sure to check out
this bundle before its gone!
Note: This post may contain affiliate links. By clicking on them and purchasing products through my links, I receive a small commission. That's what helps fund Silhouette School so I can keep buying new Silhouette-related products to show you how to get the most out of your machine!
Note: This post may contain affiliate links. By clicking on them and purchasing products through my links, I receive a small commission. That's what helps fund Silhouette School so I can keep buying new Silhouette-related products to show you how to get the most out of your machine!
Get Silhouette School lessons delivered to your email inbox! Select Once Daily or Weekly.


.png)


If you don’t want to use a script, say for a male recipient, use a bolder font and use the ‘weld’ function to attach them together.
ReplyDeleteI've never purchased epoxy before. Are there some brands you prefer? locations that sell epoxy? This looks like a fun project. TY
ReplyDeleteWould like to know about the epoxy also
DeleteI would like to know this as well. Also, I'm looking online and see that it comes with two bottles, a resin and a hardener. Are both needed?
DeleteThanks! Looks like fun and easy. Think I’ll try it!
ReplyDelete