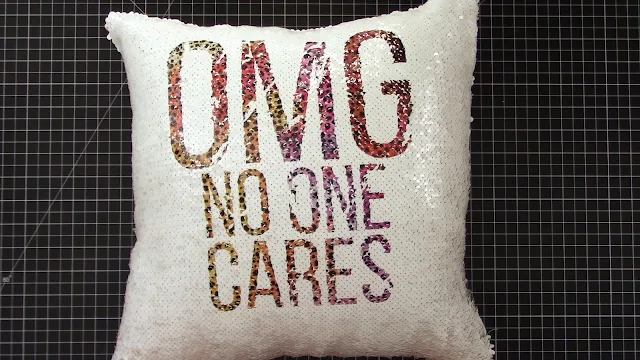
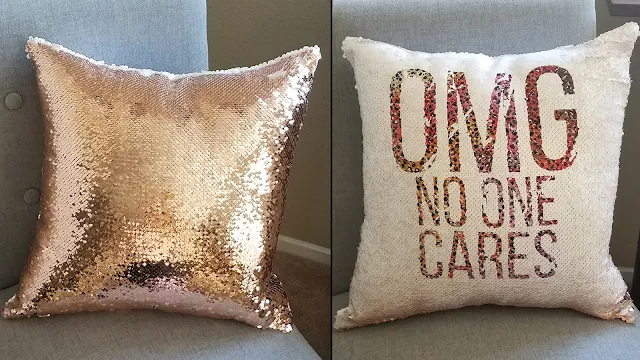
This is perfect for those of you who do not own a sublimation printer but still want sublimation quality. Remember, Cricut Infusible Ink sheets are just pre-printed sublimation sheets and they can be used on any sublimation blanks.
The steps to make this reverse sequin pillow are pretty much
exactly the same as the sublimation pillow, just this time
substituting with Infusible Ink Transfer Sheets. It's really easy, and here are some tips on how to do it.
Open and size your design in Silhouette Studio. For this 16 x 16 inch pillow, I sized this design to about 8.6 inches wide and 9.8 inches tall. And don’t forget
to mirror before cutting!
This cut file is from the Sarcastic SVG Bundle over at So Fontsy. If you're easily offended this limited time bundle is not going to be for you. But if you like you're crafting with an edge if sass...check this out because the 50 designs included are only $12.99 and include the commercial license.
I went with the leopard print Infusible Ink Sheets, but there are a bunch of patterns to pick from.
The Infusible Ink Transfer Sheets come packaged very tightly rolled. This can make it a little clumsy to lay flat on your cutting mat. Just make sure you're using a really sticky mat and secure the sheet down firmly to it.
Here are the Silhouette cut settings I used with my CAMEO 4 to cut the Cricut Infusible Ink Transfer Sheet:
Blade: 5 (AutoBlade)
Force: 26
Speed: 4
For this project, I also did 2 passes and turned on Line Segment Overcut and achieved a very nice cut!
But before unloading your mat from the machine, test weed an area just to make sure it cut nicely. That way if it didn’t, you can send it through again to cut.
But before unloading your mat from the machine, test weed an area just to make sure it cut nicely. That way if it didn’t, you can send it through again to cut.
Remove the transfer sheet from your mat
by flipping the mat over and peeling it away from the transfer sheet.
Use one hand to hold the sheet down on your workspace while pulling the
mat back with your other hand.
Weeding the design will feel a little different than weeding
heat transfer vinyl. The Infusible Ink Transfer Sheets kind of feel like
cardstock. So, you can gently bend the sheet to get pieces
to “pop out.”
If some of the actual design starts to lift from the sheet though, just push it back down onto the sheet to stick again.
Work carefully as to not rip your actual design. Tweezers and/or a weeding hook can also be helpful, but for the most part, even with this distressed design, it was pretty easy to just bend the sheet to snap out the unwanted pieces.
Prepare the pillow for pressing by laying it on a flat surface and flipping all the sequins so that the white
side is facing up. That's the side you can press on.
Apply your design to it with the ink side
(colorful side) facing down on the pillow. You can secure the design
with some heat transfer tape if you want, but it's not absolutely
necessary since the weeded areas of the transfer sheet are sticky and
will lightly adhere to the pillow.
Now transfer the pillow to your heat press and arrange it so that the zipper hangs
off the platen (so it doesn’t melt while pressing!). Then, be sure cover the entire pillow with a Teflon sheet or the 2 butcher paper sheets that come with the Infusible Ink.
Press for one minute at 400 degrees Fahrenheit. The pillow will be super hot after
pressing, so let it cool a little bit before removing the transfer sheet.
Then, just stuff with a pillow insert and bingo!
A stunning reverse sequin pillow!
Super fast, super easy! And isn't it so cool?
There are lots of other things you can use with Cricut Infusible Ink Transfer Sheets, and you can find the perfect design for your project in the Sarcastic Design Bundle over at So Fontsy.
Note: This post may contain affiliate links. By clicking on them
and purchasing products through my links, I receive a small commission.
That's what helps fund Silhouette School so I can keep buying new
Silhouette-related products to show you how to get the most out of your
machine!
Get Silhouette School lessons delivered to your email inbox! Select Once Daily or Weekly.


.png)


Hello, if you are broke like me and still have the cameo 3 can you still do this or no?
ReplyDeleteYou used a 16x16 inch cover and an 18x18 inch pillow? Just curious...thanks!
ReplyDelete