Up to this point when a transparent PNG file is imported into Silhouette Studio you get a giant red cut line around the out edge of the design...but the new Auto-Trace feature changes that and eliminates the need to trace.
You guys know I love to make stickers and other print and cut type designs using all.the.materials from Online Labels. But when I'm in a rush because I'm last minute (ahem...all.the.time these days) the design process can take longer than I can afford. BUT that's about to change!!!!
Here's how you can take advantage of the auto-trace feature once Silhouette Studio V4.4 is released (which will be VERY soon). Keep in mind you must use Silhouette Studio V4.4.014 or higher (currently it's in closed beta)...hence the "sneak peek".
You want to start with the PNG file on your computer. Think sticker sets and print and cut-type designs. Those will get the most use out of this feature since Auto-Trace traces the edge of the design.
I'm using this set of Vintage Christmas Planner stickers. With the file download and unzipped on my desktop now I can just drag and drop the PNG file into a work area in Silhouette Studio.
Go to the Send panel to quickly see how the Auto-Trace works. See how the cut lines are around each individual sticker?!
In previous versions of Silhouette Studio, this is how the set would look on import. You'd have to trace the entire set to create the cut lines around each individual sticker.
But with Auto Trace you simply import!
NOTE: Keep in mind - this only works on PNG files, not JPEG files since the software is placing a cut line at the border of where the design hits the transparent background. JPEGs are not transparent so it would not work.
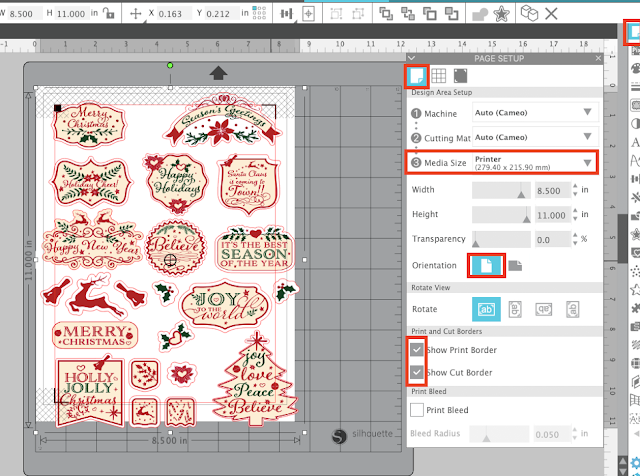
Now just set up your page size and registration marks from the Page Set Up panel. Tip: Click "M" on your keyboard to quickly add registration marks at the default position.
Resize the set to fit within the safe print and cut area if you need to. And that's it you're ready to print and cut!
I printed on my favorite stickers sheets - Online Labels. I love the glossy waterproof sticker sheets. They have them for both inkjet and laser printers. The colors always turn out stunning and they have the perfect glossy finish.
I use the Silhouette cut settings for Stickers, Clear when I print and cut on the waterproof Online Labels sheets because the sheets are a little thicker.
That's it!
These are the fastest stickers I've ever made and that's because of the Auto Trace feature!
I'm actually really excited about this feature for several reasons - but mostly because it's such a huge time saver and for beginners, who don't yet know how to trace it's a game changer.
Note: This post may contain affiliate links. By clicking on them and purchasing products through my links, I receive a small commission. That's what helps fund Silhouette School so I can keep buying new Silhouette-related products to show you how to get the most out of your machine!
Get Silhouette School lessons delivered to your email inbox! Select Once Daily or Weekly.


.png)


Can you tell me if the recent software updates are for the Cameo 3? Or, are they specifically for the cameo 4? I’ve read where folks with the 3 downloaded updates meant only for 4 and had major issues. How can you tell which version is for your machine? Thanks in advance for your help.
ReplyDeleteThanks for the auto trace tip and sneak peak. If you have a Cameo 3 with the latest update it should work correct? Hope you are having a wonderful Christmas with family and friends and will have an awesome and safe New Year.
ReplyDeleteThis is great! As a graphic designer I often create my own ongs in Illustrator then import them this is going to be awesome! Thanks for sharing!
ReplyDeleteI just updated to 4.4 and I jumped for joy at this new feature. Great to have it.
ReplyDeleteI just want you to know that I have been playing around for hours trying to figure this out! Then I came here (should have first) and realized I needed to update my software. Oh my goodness, I am sooooo happy now!
ReplyDelete