Because Silhouette Studio is not able to do this automatically, you need to set up a series of custom material cut settings for every material you cut with 3mm Kraft Blade.
If you haven't read over my Tips and Best Practices for the 3mm Kraft Blade yet, do that first. There is a lot of very important information there to help increase the chances of a successful, clean cut and reduce the risk of damaging your machine, blade, and material.
Remember, the 3mm Kraft Blade is not a tool you put into the Silhouette CAMEO 4 high pressure tool carriage and just start using to cut. There is a lot of prep work that needs to happen first so don't try to do his when you're rushed - especially the first time.
In general, the most successful cuts I've had with the 3mm Kraft Blade are when turning OFF the smart tool cuts (aka those extra loops used to help the Kraft Blade turn in combination with using a series of 5 passes of varying forces.
Why a Series of Passes?
Gradually cutting through your material rather than trying to puncture and cut it clear through is a much better strategy which is why a series of passes works best.The goal of the first pass is NOT to cut the material. It's to create a track or score so the blade has something to following during the remaining passes.
The goal of the next three passes (passes #2-4) are to cut deeper and deeper into the material. And the last pass (pass #5) is to slice away the shape from the material with just the very tip of the blade. During all of this the goal is to avoid the blade digging into the mat which can mess up the entire cut.
Unfortunately there are hardly any recommended default cut settings in Silhouette Studio for materials for the 3mm Kraft Blade. That means you need to add your own. But where do you even start?
Start with the Blade depth.
Deciding What Blade Depth to Start With
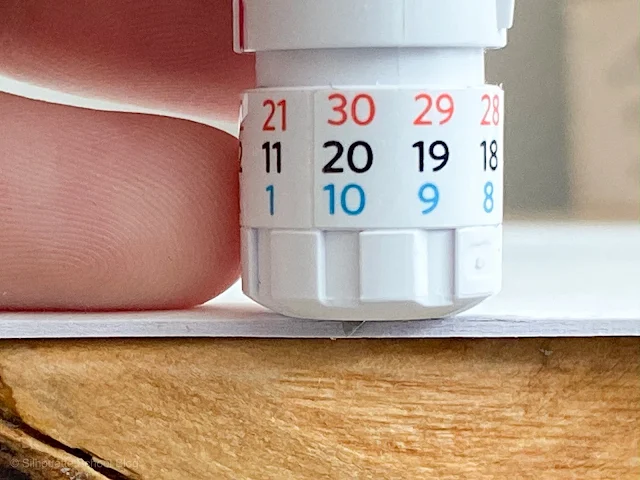
To find the blade depth, take your 3mm Kraft Blade and twist the cap fully closed. You should see a slight black rim.Then, twist in the other direction to line up the red line with the 1 so you have a starting point.
Now, hold your material in one hand and twist the cap of the blade so it is the same depth as your material. Literally line up the blade against the edge...but not hanging below. You should NOT be able to feel the tip of the blade if you rub your finger under the material.
For the Genuine Cricut Leather I am using in this example, the blade was on a 16 which makes sense because the material is about 1.6mm thick.
This is the blade depth you are going to use for Pass #5 - the final pass. Write that blade number down.
The first four passes of the material you're going to use a SLIGHTLY lower blade depth. This way the blade does NOT drag into the mat. For this leather I went with a blade depth of 14 on passes 1-4.
Now you have your blade depth(s) and you know you need to add increasing force for passes #1-4 starting with a relatively low force. I usually start with a force of 4 and add 3 with each pass.
Then on the final pass, when I change/increase the blade depth, I use the original force. So for this leather it would look like this:
Pass 1: Blade Depth: 14, Force 4
Pass 2: Blade Depth: 14, Force 7
Pass 3: Blade Depth: 14, Force 10
Pass 4: Blade Depth: 14, Force 13
Pass 5: Blade Depth: 16, Force 4
Speed is ALWAYS slow. Always. Like a speed of 1 or 2 on every pass.
Keep in mind none of this is an exact science. We're crafting here...but using this strategy will give you a good chance of success when you're basically 'guessing'.
Now you have your five cut settings for your single material, how do you add them to the software?
Adding Custom Cut Settings for 3mm Kraft Blade
Each of the above passes needs to be added to your material list as a custom material setting. Get in the habit of naming them something like "Cricut Leather 1", "Cricut Leather 2" and so on. The number indicates the pass number so Cricut Leather 1 is the first pass and the settings would match Pass 1 above.As we add these, through the "More" option on the Send panel, we are also going to turn off the smart cut loops by choosing the action as "Cut" rather than "Kraft Cut".
Okay let's start with the first one.
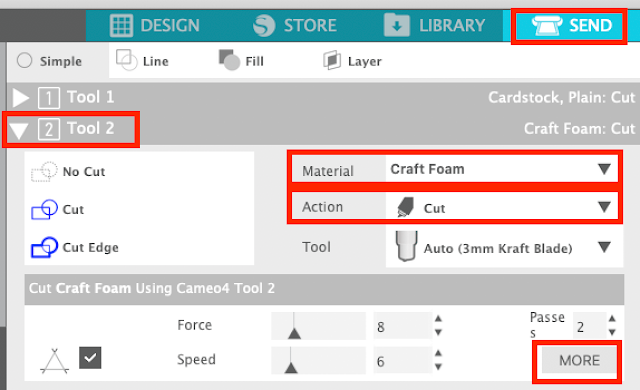
Open the Send panel.
- Expand the Tool 2 options and select the material Craft Foam. It's the ONLY one right now that has the 3mm Kraft Blade as a tool option
- Change the Action from "(Auto) Kraft Blade" to "Cut". This will remove the loops in your work area
- Click More
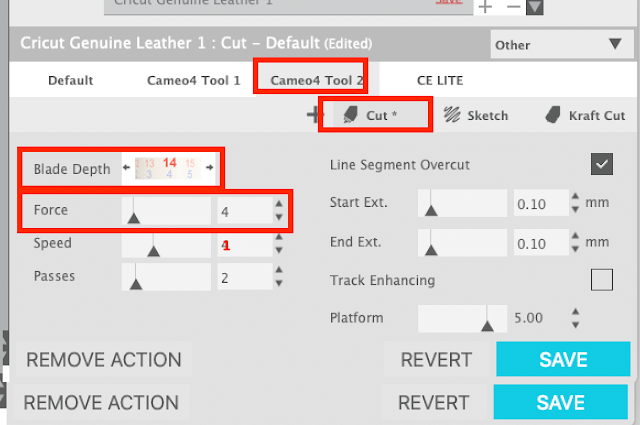
From the Advanced Material Setting panel you an add custom cut settings. Select the Craft Foam setting > Right click and click "Duplicate 'Craft Foam'".
It will show up as "Craft Foam (2)" at the bottom of your list. Right click and select "Rename". Then type in the new name.
I changed it to Cricut Genuine Leather 1 for this example.
Make sure CAMEO 4 Tool 2 and "Cut" are still selected
Using the blade depth and force settings you wrote down for pass 1 change the Blade Depth and Force settings.
Click "Save."
Now right click Genuine Cricut Leather 1 and select "Duplicate Cricut Genuine Leather 1". You'll now have "Cricut Genuine Leather 1 (2)". I'd suggest you change the name to "Cricut Genuine Leather 2".
The blade depth is the same as the first pass so you don't need to change that or the speed, but update the force. Click Save.
Repeat for passes 3-5 ensuring that on Cricut Leather 5 you change both the force AND the blade depth.
Click the large X to go back to the Send panel.
You can test that your custom cut settings saved correctly by clicking the Material List drop down and finding your set of settings at the bottom. Click on one to ensure it saved correctly. If not update it and click "Save."
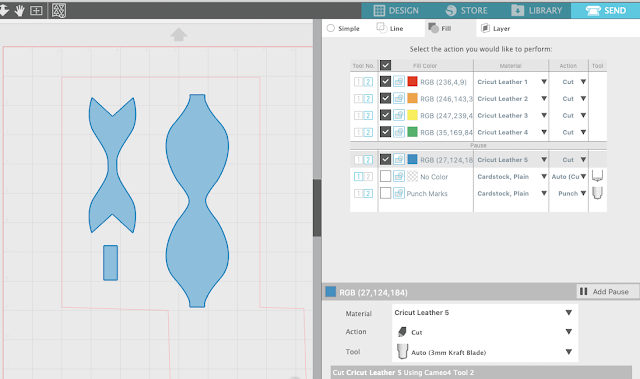
You'll use each of these settings when you cut your design which you'll set up with a stack of - you guessed it 5 - copies of your design. Filling them with color will let you cut by color.
Then your Color Send panel will look like this with each colored layering being assigned a different custom cut setting - in succession. A pause between pass 4 and 5 will force the machine to pause giving you enough time to manually adjust the blade depth from 14 to 16 for this leather.
I'll have more in depth tutorials on this part of the process in the near future, but I don't want to overwhelm you with information since this a totally new process for almost everyone.

Again remember, this is not a fast process. But if you take the time to set it up correctly, you will have much better results when cutting.
Note: This post may contain affiliate links. By clicking on them and purchasing products through my links, I receive a small commission. That's what helps fund Silhouette School so I can keep buying new Silhouette-related products to show you how to get the most out of your machine!
Get Silhouette School lessons delivered to your email inbox! Select Once Daily or Weekly.


.png)


Where can I get the bow design you used in the tutorial please????
ReplyDeleteHi Melissa,
ReplyDeleteI haven't got a Cameo 4 (yet). And I've done multiple setting cutting for ages using line color - but mainly for different effects I wanted. And I know that using to much pressure can cause ragged edges on intricate designs. So why when cutting thick material did I never think to adjust depth between cuts of the same cutting lines? Pure genius. Thank you so much! Best wishes from Germany, Stef
hi
ReplyDeleteVery informative but can you please guide step by step for settings in silhoutte cameo 4 as well.I am experiencing too much problem.
thanks in advance.
Hi there, this is for the Cameo 4. If you would like extra help, we offer a membership service that offers in depth videos here: https://silhouetteu.com/pages/silhouette-videos-help
DeleteThis does not allow you to use blade settings above 20 but you state its for the Kraft 3mm blade. This tutorial is not for the Kraft 3mm blade but the Kraft 2mm blade.
ReplyDeleteI bought a used cameo when its all plugged it says cameo 3 so I'm guessing that's what it is. I'm having a hard time getting my blades to cut the vinyl. I'm cutting very small lettering and it keeps snagging. I read up above the CB096 is what to use but not sure on what you mean by 3mm or the 6mmm when I bought this it has 3 cutting blades but not sure what they are they are all the white rachet I'm getting very frustrated. thank you for your help.
ReplyDeleteHey there! I'd check out this blog post instead: https://www.silhouetteschoolblog.com/2017/02/7-tricks-to-cleanly-cutting-tiny-script.html This tutorial is for a different type of blade.
Delete