Using the Silhouette Pixscan mat you can upcycle cards to re-use them as gift bag tags or scrapbook sentiments and handmade card sentiments.
Go through your cards and find those that have either text or designs you'd like to cut out. It's best if the elements you want to cut are not overlapping things like pictures.
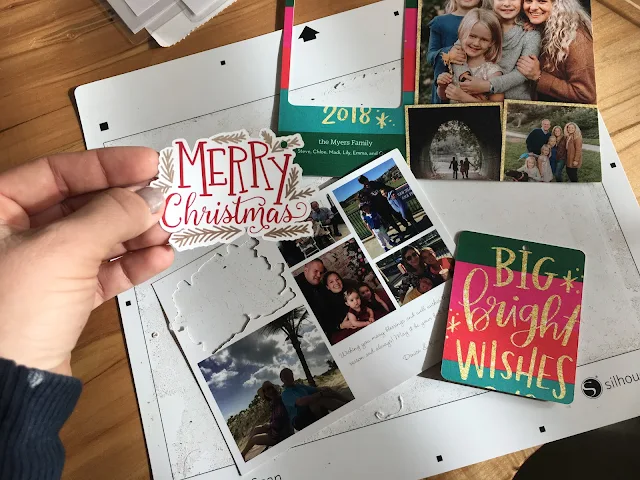
Place the card on your Silhouette Pixscan mat. If you're working with a greeting card either flatten the card out or cut apart the two sides.
Use your phone or a camera to take a straight on picture of your Pixscan mat then transfer it to your computer either by emailing it to yourself or airdrop. This is the exact picture I used.
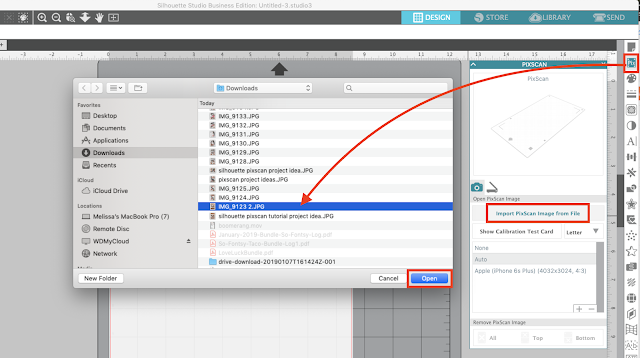
Open up Silhouette Studio and select the Pixscan tool on the right sidebar. Click "Import Pixscan Image From File" and then find the photo of your Pixscan mat with the cards on it.
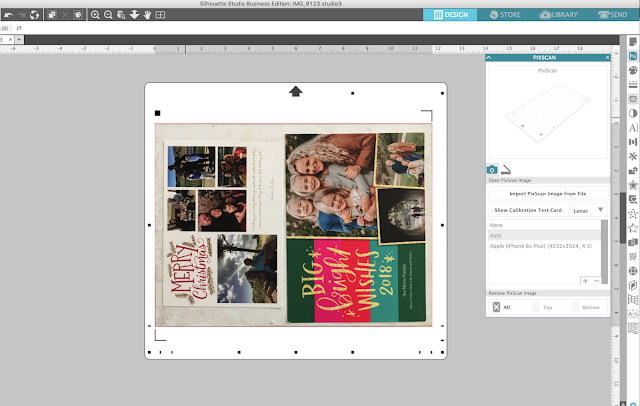
Wait for the import process to complete. You should then have something that looks like this.
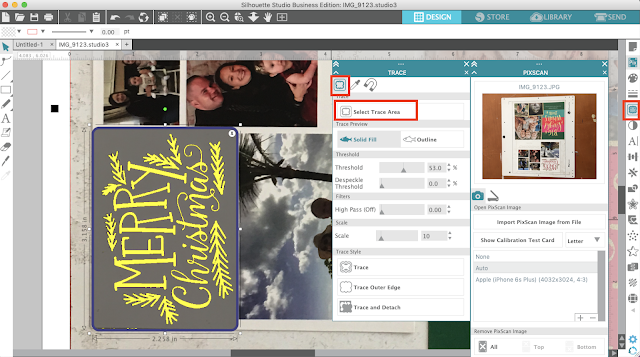
Now you need to create cut lines around the areas you want to cut out. You can do this two different ways depending on the shape of the image you want to cut.
Option 1: Use the trace tool to trace the area and create cut lines.
If you cut the design like this it will cut out in multiple pieces. Instead you want to add an offset so you create a single cut line around the outside of the design.
Open the Offset tool and offset the original cut lines to create a slight border so the traced elements cut as one solid piece. Delete the original cut lines so you cut just the offset.
Option 2: Use the drawing tools on the left sidebar to draw a circle, square, rectangle, or rounded rectangle around the area to be cut out.
TIP: If you are going to use the cut elements as gift tags, use the Draw an Ellipse tool to add a small circle (highlighted in blue above) so you can loop a ribbon through.
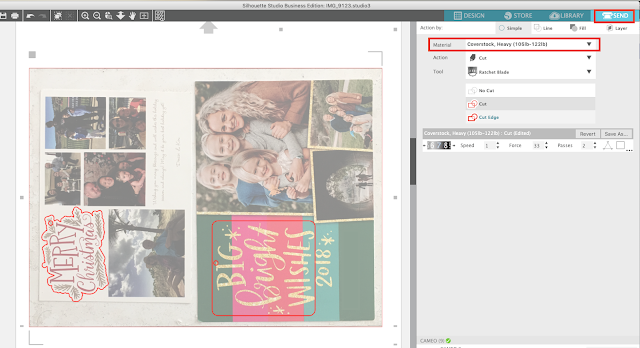
From the Send panel select your material type. I usually go with the Coverstock cut settings since greeting and holiday cards tend to be printed on pretty thick paper.
Load the Pixscan mat into your Silhouette machine and then click "Send" in Silhouette Studio to begin the cutting process.
That's all there is to it. When the cut is complete, you'll have some perfectly cut out images or sentiments you can use for your next Silhouette paper project!
Note: This post may contain affiliate links. By clicking on them and purchasing products through my links, I receive a small commission. That's what helps fund Silhouette School so I can keep buying new Silhouette-related products to show you how to get the most out of your machine!
Get Silhouette School lessons delivered to your email inbox! Select Once Daily or Weekly.






.png)


No comments
Thanks for leaving a comment! We get several hundred comments a day. While we appreciate every single one of them it's nearly impossible to respond back to all of them, all the time. So... if you could help me by treating these comments like a forum where readers help readers.
In addition, don't forget to look for specific answers by using the Search Box on the blog. If you're still not having any luck, feel free to email me with your question.