My best piece of advice has always been to just pick one Silhouette project instead of doing all.the.things right.now and getting overwhelmed at all the possibilities.
However I've realized over the years, while that's still my best advice, sometimes picking one project to start with leads to picking a project that's not so beginner level.
This beginner tutorial will walk you through the best first project with Silhouette CAMEO 3. If you have a Silhouette CAMEO 4, start with these beginner projects and tutorials.
So....today I'm just going to be a little bossy and leave no doubt about what I think is the perfect Silhouette project for your very first Silhouette CAMEO cut.
With the design and material specifically picked out for this beginner project, you'll be able to focus on learning your new machine instead of trying to troubleshoot.
The design itself is multiple pieces, but each piece is relatively solid - rather than overly intricate - allowing you to focus on the basics of cutting rather than concerning yourself with fine tuning cut settings for intricate cuts.
I'm going to walk you through this project every single step of the way from downloading this free Silhouette design to applying the design with an iron - because most Silhouette beginners don't start off with a heat press.
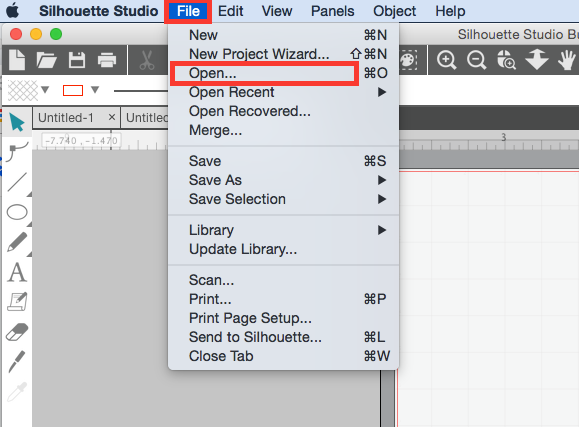
Open Silhouette Studio and from the File Menu pick "Open".
Navigate to the Little Hipster design on your computer and click "Okay".

This will open the design in a design work space in Silhouette Studio.
The design has come into Silhouette Studio "grouped" which means all of the pieces will move around together while staying in their relative positions. You know they are grouped because when you select the design (click on it) there is just one single box around all of the shapes.
When the design is selected it, you can see the size and dimensions of the design on the side and top/bottom of the selection box. If you need to resize the design to fit on the surface where you will be applying it, use your mouse to pull one of the corner nodules in or out. This will keep the design in proportion while you scale the design up or down.
For heat transfer vinyl you will need to reverse or mirror your image in Silhouette Studio before cutting. Select the design > right click > Flip Horizontally.
It's best to move the design to one of the corners of your virtual cutting mat so you can limit wasting your material. Most people place their design in the upper left corner of their cutting mat.
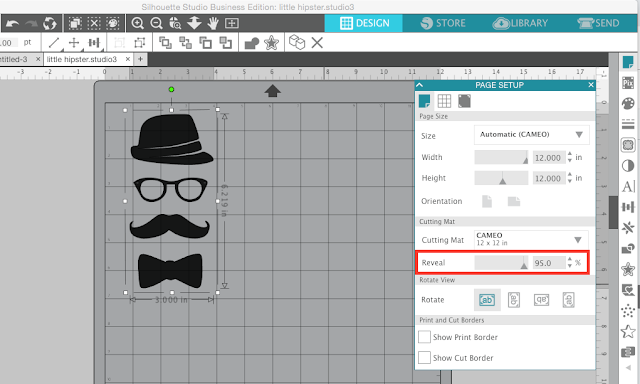
Finally from the Page Set Up panel move the Reveal bar all the way to the right, if it's not already. This will turn on the grid lines. Notice the blocks that are your design is covering. These are the same squares on the actual Silhouette cutting mat where your HTV needs to be placed. (We'll get to that part in a moment).
Select the design and then click on it with your mouse and drag it to the spot on the mat where you want it to cut.
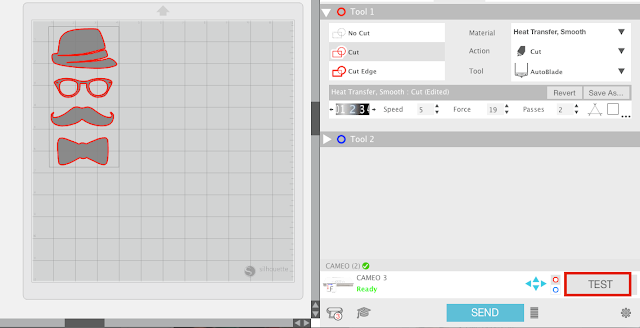
The design should have a bold red line around it. These are the cut lines. If your design does NOT have bold red lines, select the design and click "Cut."
From the Material list scroll down to Heat Transfer Vinyl, Smooth. When you do this the recommended cut settings will update based on the material selected (highlighted in yellow).
Pause here to get your material, mat, and blade ready!
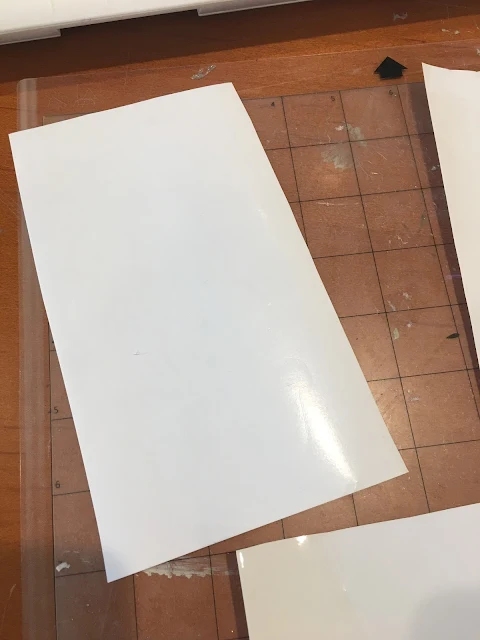
Take a sheet of heat transfer vinyl and with the shiny side down place it on the sticky, gridded area of the Silhouette cutting mat (be sure to remove the blue cover to expose the sticky area). If you are not using a full sheet of HTV make sure the scrap piece is covering those same boxes on the mat where your design is covering in Silhouette Studio.
Place the cutting mat so the top edge is gently resting up against the rollers and the left edge is aligned with the raised guide mark on the left side. Hold it there gently while you click "Load". This will pull the mat under the rollers.
Use a weeding hook or another sharp tool to remove the excess HTV from around the design. Your design itself - the hipster set - should remain on the clear carrier sheet.
Don't forget to weed out any interior cuts - in this design those are in the glasses.
Warm up your iron to the cotton setting and then pre-press the shirt or surface where you will be placing your HTV design. This removes wrinkles and any moisture.
Flip the HTV design onto the shirt so the clear carrier sheet is facing up.
Cover the entire design with a thin piece of fabric such as a pillow case or teflon sheet. Position the iron so it's covering the design and press down.
Do not move the iron around like you are ironing just hold it in one spot for 30 seconds. If the entire design does not fit under the surface of the iron, you'll need to repeat this step for every iron-size area.
After 30 seconds on each iron-size area of HTV, carefully peel away the clear carrier sheet leaving the HTV on the shirt!
And that's it! Congrats you've successfully completed your first Silhouette CAMEO project! Now you're ready to move on. Check out these other beginner Silhouette projects and tutorials for vinyl, print and cut, and more as well!!
Note: This post may contain affiliate links. By clicking on them and purchasing products through my links, I receive a small commission. That's what helps fund Silhouette School so I can keep buying new Silhouette-related products to show you how to get the most out of your machine!
One sure-fire way to get off to a rocky start with your Silhouette machine is to pick a project that's too advanced for your first cut. When it comes to picking the perfect Silhouette beginner project, I think heat transfer vinyl is the best material to start with.
So....today I'm just going to be a little bossy and leave no doubt about what I think is the perfect Silhouette project for your very first Silhouette CAMEO cut.
What Makes THIS the Perfect Silhouette Beginner Project?
This heat transfer vinyl project is the perfect level of easy to cut and forgiving material along with single color and easy to cut, weed, and apply Silhouette design.With the design and material specifically picked out for this beginner project, you'll be able to focus on learning your new machine instead of trying to troubleshoot.
Since smooth HTV is more forgiving than almost any other material in almost every way it makes it ideal for beginner Silhouette projects.
The single color design means you are only focused on cutting and applying one design rather than layering multiple colors.The design itself is multiple pieces, but each piece is relatively solid - rather than overly intricate - allowing you to focus on the basics of cutting rather than concerning yourself with fine tuning cut settings for intricate cuts.
I'm going to walk you through this project every single step of the way from downloading this free Silhouette design to applying the design with an iron - because most Silhouette beginners don't start off with a heat press.
Downloading and Opening Designs in Silhouette Studio
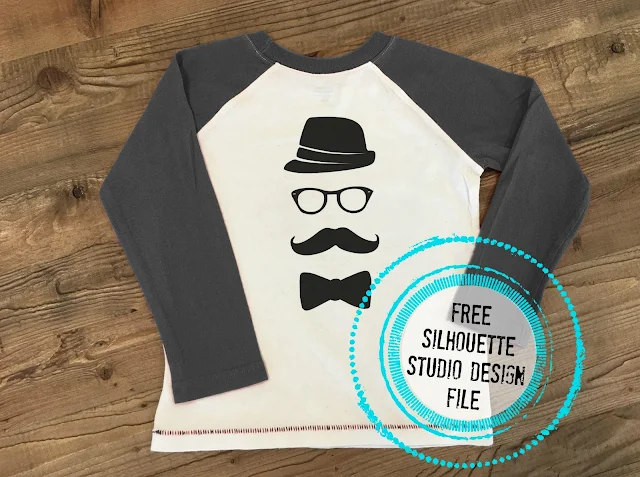
This Little Hipster design is available as a free download . I've specifically designed it for this beginner heat transfer vinyl project. Download the .Studio file onto your computer. Unzip the folder.Open Silhouette Studio and from the File Menu pick "Open".
Navigate to the Little Hipster design on your computer and click "Okay".

This will open the design in a design work space in Silhouette Studio.
Design Panel: Preparing a Design to Cut in Silhouette Studio
You are now working in the Design Panel.The design has come into Silhouette Studio "grouped" which means all of the pieces will move around together while staying in their relative positions. You know they are grouped because when you select the design (click on it) there is just one single box around all of the shapes.
When the design is selected it, you can see the size and dimensions of the design on the side and top/bottom of the selection box. If you need to resize the design to fit on the surface where you will be applying it, use your mouse to pull one of the corner nodules in or out. This will keep the design in proportion while you scale the design up or down.
For heat transfer vinyl you will need to reverse or mirror your image in Silhouette Studio before cutting. Select the design > right click > Flip Horizontally.
It's best to move the design to one of the corners of your virtual cutting mat so you can limit wasting your material. Most people place their design in the upper left corner of their cutting mat.
Finally from the Page Set Up panel move the Reveal bar all the way to the right, if it's not already. This will turn on the grid lines. Notice the blocks that are your design is covering. These are the same squares on the actual Silhouette cutting mat where your HTV needs to be placed. (We'll get to that part in a moment).
Select the design and then click on it with your mouse and drag it to the spot on the mat where you want it to cut.
Send Panel: Selecting Your Cut Settings and Material
Now we're going to move to the Send Panel. Don't worry - clicking SEND at the top of Silhouette Studio is not going to begin the cutting process...yet.The design should have a bold red line around it. These are the cut lines. If your design does NOT have bold red lines, select the design and click "Cut."
From the Material list scroll down to Heat Transfer Vinyl, Smooth. When you do this the recommended cut settings will update based on the material selected (highlighted in yellow).
Pause here to get your material, mat, and blade ready!
Preparing Your Silhouette Mat and Blade to Cut
With your Silhouette machine powered on and connected to your computer (I'd recommend by USB for now), place your Silhouette AutoBlade in the left/red carriage of the Silhouette CAMEO 3 (or Portrait). This is exactly how your blade should look in the holder. There should not be ANY space or gaps between the blade and the carriage. Push the locking mechanism in to lock the blade in place.Take a sheet of heat transfer vinyl and with the shiny side down place it on the sticky, gridded area of the Silhouette cutting mat (be sure to remove the blue cover to expose the sticky area). If you are not using a full sheet of HTV make sure the scrap piece is covering those same boxes on the mat where your design is covering in Silhouette Studio.
Place the cutting mat so the top edge is gently resting up against the rollers and the left edge is aligned with the raised guide mark on the left side. Hold it there gently while you click "Load". This will pull the mat under the rollers.
First Silhouette CAMEO Cut: Test Cut and Cutting
Return to Silhouette Studio and from the Send Panel click "Test". The AutoBlade will first begin tapping to adjust to the recommended blade setting. Then the cutting will begin. This will perform a small test cut (a triangle inside a square) in the very upper left corner of your material.
After the test cut is complete press "Unload" on your machine to remove the mat. Use a weeding hook to remove or "weed" the square. You'll know you have the right cut settings for your material if the box weeds away easily leaving the triangle behind without any type of stretching or pulling.
Repeating the steps in the previous section, reload the cutting mat and HTV.
This time when you return to the Silhouette Studio Send panel click "Send" at the bottom of the screen. The AutoBlade will first begin tapping to adjust to the recommended blade setting. Then the cutting will begin.
When the cutting is complete click "Unload" on the Silhouette CAMEO touch screen to remove the mat from the machine.
Weeding and Applying HTV with an Iron
Use a pair of scissors to carefully cut off around the cut design before you weed away the excess HTV from around your design.Use a weeding hook or another sharp tool to remove the excess HTV from around the design. Your design itself - the hipster set - should remain on the clear carrier sheet.
Don't forget to weed out any interior cuts - in this design those are in the glasses.
Warm up your iron to the cotton setting and then pre-press the shirt or surface where you will be placing your HTV design. This removes wrinkles and any moisture.
Flip the HTV design onto the shirt so the clear carrier sheet is facing up.
Cover the entire design with a thin piece of fabric such as a pillow case or teflon sheet. Position the iron so it's covering the design and press down.
Do not move the iron around like you are ironing just hold it in one spot for 30 seconds. If the entire design does not fit under the surface of the iron, you'll need to repeat this step for every iron-size area.
After 30 seconds on each iron-size area of HTV, carefully peel away the clear carrier sheet leaving the HTV on the shirt!
And that's it! Congrats you've successfully completed your first Silhouette CAMEO project! Now you're ready to move on. Check out these other beginner Silhouette projects and tutorials for vinyl, print and cut, and more as well!!
Note: This post may contain affiliate links. By clicking on them and purchasing products through my links, I receive a small commission. That's what helps fund Silhouette School so I can keep buying new Silhouette-related products to show you how to get the most out of your machine!
Get Silhouette School lessons delivered to your email inbox! Select Once Daily or Weekly.










.png)


Is there a way to down load these lessons as I am the type to follow best from written worn not from the computer, when it is further away from the Cameo ?
ReplyDeleteYou can try to print from your browser menu, but it's not ideal. If you prefer to have lessons in hand you might want to check out the Ultimate Silhouette Guide. it's easily printable with no ads and in progressive order. https://www.ultimatesilhouetteguide.com/2017/05/ultimate-silhouette-guide-v4-second-edition.html
DeleteDoes the tee-shirt have to be a polyester blend or can it be cotton?
ReplyDeleteYour HTV will have time and temperature settings for both materials!
DeleteGreat Tutorial for beginners, ME! Followed along easily, however I cannot get the carriage to do the test cut on the material, and when I just proceed to cut patter it doesn't cut in the right place. ANY IDEA WHY?
ReplyDeleteI'm also stuck at the first test cut. It made some scratches in a small spot but all on top of itself. Is there a trouble shooting guide for first cuts and testing?
DeleteHello there! I would make sure that your blade is installed all the way. Check out this blog post for troubleshooting your blade: https://www.silhouetteschoolblog.com/2019/11/silhouette-cameo-4-autoblade-wont-cut-5.html
DeleteHi there! I am not entirely sure what you're meaning. If your blade doesn't seem to be cutting in the right place, definitely make sure you've got your mat turned on in your design area.
ReplyDeleteAhhhh I did my first cut thank you so much for this easy to follow tutorial
ReplyDelete