 If you've been avoiding print & cut, this is the Silhouette tutorial to get you
ready to learn a new skill and take your Silhouette crafts to the next
level!
Silhouette School contributor Kati from Houseful of Handmade is here to share tips for mastering Print & Cut.
I use print & cut all the time, probably even more than I use vinyl. The print & cut feature has allowed me to make lots of amazing paper home decor items like this faux wooden snowflake and these paper tea cups I filled with Chai Spice Caramel Popcorn.
Setting up your Print & Cut Settings
Whether you are designing your own print & cut design in Silhouette Design Studio or using a file you purchased (like these awesome print & cut files from SoFontsy), the settings are important to get right to ensure a successful cut.Silhouette Studio Page Setup
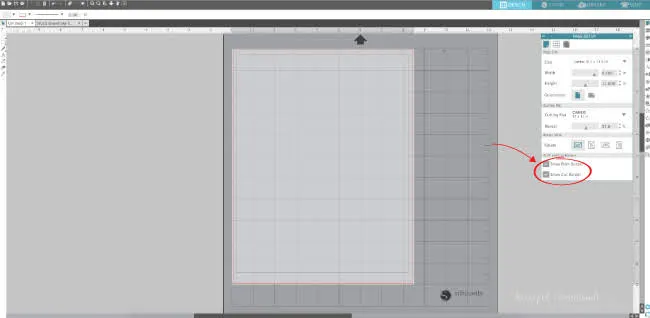
Under the Page Setup tab, you will want to make sure you select the right paper size. It's best to select "Current Printer" from the dropdown menu. Even though the cut mat can cut up to 12x12, you will only be able to print & cut what your printer can print. Make sure you have a mat selected, whichever mat you will be using. Then I also like to click on the "Show Print Borders" and "Show Cut Borders" option so I can see the usable area.Registration Marks Setup
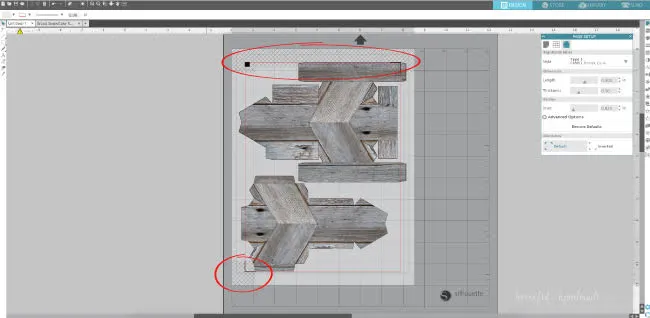
Next you need to setup your registration marks. For all the newer Silhouette machines you will want Type 1. Type 2 is only used for the old, original Silhouette SD.Before making any changes to the registration marks, I like to place my print & cut design on the page. Depending on the size and shape of the design, you may want to adjust the registration marks settings. You will want to avoid having your design in the areas of the page that are covered in the crosshatch lines to make sure the print & cut works properly. If your design is too big you can resize the item (for 3D shapes, you can read all my tricks for resizing here) or adjust the registration marks.
Changing the length or thickness of the registration marks will change the area that has crosshatch lines. I prefer to leave the thickness the default because the machine tends to have a harder time registering the thinner lines. But by reducing the length by a couple points will reduce the amount of crosshatching.
The other place I like to make changes is the Inset. This will move your registration marks further toward the edge of the page, but you need to be careful that the registration marks remain in the printable area (which is why we selected that option earlier).
Whatever you do DO NOT change the position of the Bottom Inset. In the photo above you can see the top registration marks are fine, but the lower mark will not be printed properly because it is outside the print area. To fix that, select Advanced Options and you can move just the bottom registration mark inside the printable area.
Now you need to double check that all of the cut lines are inside the cut area (red border). You may have noticed that adjusting your registration marks adjusted your cut area.
Borderless Printing
One last tip before printing, if you have a printer that does borderless printing, you can get a bit more area for your print & cut designs. But you need to make sure you select that in the Print Page Setup under File before printing or else your bottom registration mark will not print. Now you can move those registration marks out as far as possible.Cutting your Print & Cut Design
After printing your paper, double check that all registration marks printed completely. If one edge of the marks did not print because it was on the print border, it will cause your machine to not register it properly.Loading Cut & Print Designs
Place your paper on the cutting mat. Make sure it is oriented the same way as it is show on the mat in Silhouette Design Studio. If not, the registration marks will not register. Also, make sure the top of the mat is the side that has the arrow on it. If not, the registration marks will not register.Load the cut mat into the Silhouette machine. Make sure you select Load Cut Mat instead of Load Media or the paper will not be in the correct spot for the registration marks to register.
Send the Design to the Silhouette
Click on Send in Silhouette Design Studio and set up your cut settings. To make sure your paper cuts cleanly, here are the Best Silhouette Cut Settings for Paper. Then hit Send.The machine will immediately start looking for the registration marks. After finding all 3 marks, it will start the design so don't worry if it doesn't start cutting immediately.
What to do if Registration Fails?
Nothing is worse than the dreaded "Registration Mark Error" on your Silhouette screen. If that happens, do a quick double check of the following.- Make sure Load Cut Mat was selected when loading the cut mat.
- Make sure the cut mat was lined up with the blue line when loading. Too far to the left or right will cause it to bee to far away for the registration marks to register.
- Make sure the cut mat was loaded with the arrow first, an upside down mat will not load to the correct spot to find your registration marks.
- Make sure the registration marks are printed correctly (all 3 marks are there and no parts are missing). They need to look exactly like they do in Silhouette Design Studio.
- Make sure there is enough light in the room for the sensor to see the registration marks (a regular room light will work, but don't try to print & cut in the dark by the light of your computer). If lighting is low, shine a flashlight on the registration marks while the sensor is reading them.
- Turn off the machine then turn it on again. Sometimes a little reset is all it takes to fix a problem.
And don't forget to stop by and say hi at Houseful of Handmade. I love sharing lots of fun DIYs for the home including lots of paper decor no one will be able to tell was made from paper!
Note: This post may contain affiliate links. By clicking on them and purchasing products through my links, I receive a small commission. That's what helps fund Silhouette School so I can keep buying new Silhouette-related products to show you how to get the most out of your machine!
Get Silhouette School lessons delivered to your email inbox! Select Once Daily or Weekly.


.png)


new in-sights into Registration Fails.
ReplyDeleteI just got my 2nd Cameo 4 - my 1st one is white my new one black (going to have one of the local teens do the cutting at her home as a side job so i bought the 2nd machine.)
I use these 85% of the time for making bag toppers for my Dog Treat Business...saves me a ton of $$$ using online labels legal sheets and print and cut. I print up front (50 at a time) and file away and then when i have an evening (i turn on a movie) i do all the cutting - 1 in 20 a registration might fail. I fine dose bust to delete the print file and start over.
Anyway got the new "Black" cameo 4 and one failed after another all evening long - was ready to box it up and send back. then i tried again during the day - works fine. tried at night not working tried white model worked fine...brought in an extra lamp both work....my TIP is buy the white model...ended up using an Old book clamp opened the storage drawer clamped it on and worked fine...