But what about if you need an etched glass or etched glass vinyl mock up? That's doable too!
It's actually very simple to created etched glass mock ups in Silhouette Studio. The harder part is actually etching glass..but I have a Silhouette tutorial for etching glass with vinyl stencils as well.
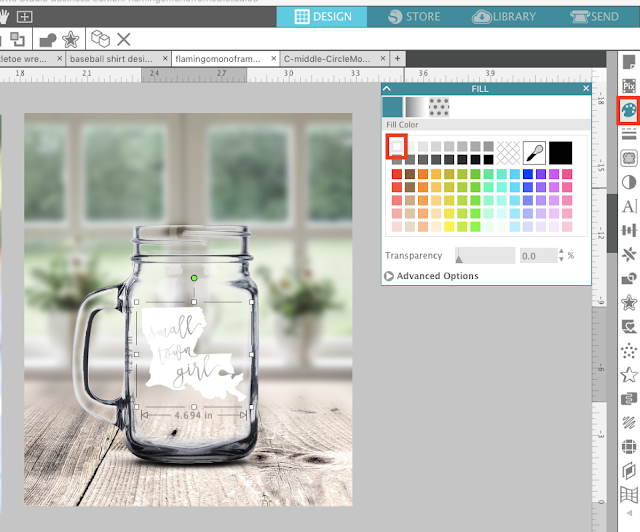
Start with the mock up photo in Studio (this one can be found here). Some mocks ups are already styled and ready to go. Others may require that you place the object on a style background, which is the case for this mason jar.
Move the design to overlay it over the mock up photo.
It's likely that your design is either filled with a solid color or completely transparent with only the red cut lines showing. Either way open the Fill Color panel.
With your design selected, fill the entire design with a solid white.
If you have a line color, change it to Transparent from the Quick Access Tool Bar.
Now with the design still selected, move the Transparency bar on the Fill Color panel to between 45 and 50%. This will give you the look for etched glass.
To export your mock up photo so you can share it with a customer or use it to list in your shop, select the photo and the design. From the File menu pick "Save Selection" > Hard Drive. A pop up box will open where you can select JPEG as the file type.
This will save the etched glass mock up photo to your computer as a JPEG.
Note: This post may contain affiliate links. By clicking on them and purchasing products through my links, I receive a small commission. That's what helps fund Silhouette School so I can keep buying new Silhouette-related products to show you how to get the most out of your machine!
Get Silhouette School lessons delivered to your email inbox! Select Once Daily or Weekly.


.png)


No comments
Thanks for leaving a comment! We get several hundred comments a day. While we appreciate every single one of them it's nearly impossible to respond back to all of them, all the time. So... if you could help me by treating these comments like a forum where readers help readers.
In addition, don't forget to look for specific answers by using the Search Box on the blog. If you're still not having any luck, feel free to email me with your question.