The problem is if you rearrange the design elements to save vinyl and limit waste, it can be a challenge to get the design layout exactly right. But...I have a trick for you!
Trick to Saving HTV with on Multi-Colored Heat Transfer Vinyl Designs
This Silhouette hack works best if you're applying the HTV design to a light colored shirt.Open your design in Silhouette Studio and size it to fit the area where you are going to apply it. This Hello I'm New Here design is going to go on a baby outfit so I have sized it to fit.
The design looks adorable in various colors, but if I cut this design in the actual layout I end up with a lot of wasted material as you can see when the colored layers are separated.
If I ungroup each layer and rearrange the pieces to (significantly) reduce the amount of HTV used (as seen on the bottom row below), how do I correctly layout the cut HTV on the shirt? The struggle is real!!!
This is where the Silhouette hack comes in!
Layer Heat Transfer Vinyl Without Waste
Once you have your design in Silhouette Studio and you've sized it - make a copy of it by right clicking the design > duplicate.
Select the duplicate copy and from the Quick Access tool bar, change the fill color and the line color to black.
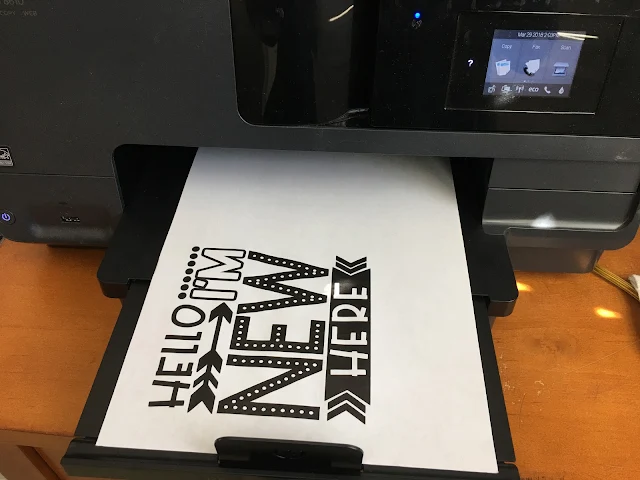
Pull the black copy onto your virtual cutting area and using the Print tool from the top tool bar, print it to your home printer.
Keep the printed copy to the side for a few minutes while you work with the HTV version.
Working with the full color version of the design in Silhouette Studio ungroup and/or release the compound path so you can re-arrange the like-colored design elements into a smaller area - therefore allowing you to use a smaller amount of HTV.
Don't forget to mirror before you send each layer to cut. (You can even send them all at the same time if you use the grid lines to line up where each piece of HTV goes on the cutting mat.)
I changed up the colors a bit and went with a couple of pastel Siser HTV colors: Lilac, Coral, and Sea Glass.
After the design is cut, weed away the excess HTV.
Use scissors to cut apart the pieces.
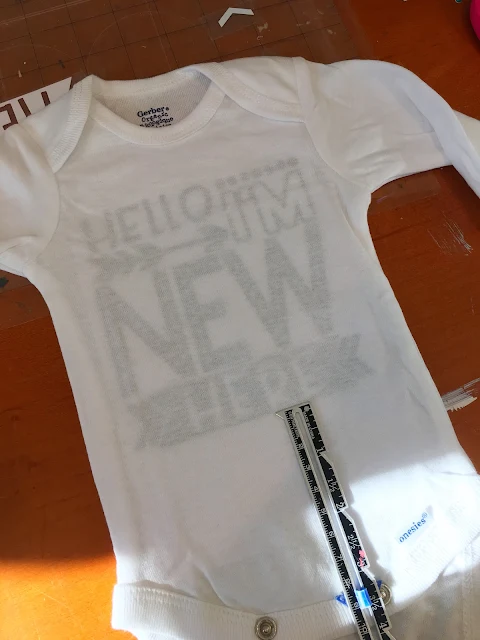
Grab your printed sheet and slide it inside your shirt.
Make sure it's centered and straight.
Now grab your cut HTV pieces and position them using the printed sheet as your guide. This is why this works best on white and light colored shirts. You wouldn't be able to see the print out on dark shirts. You can leave the paper inside the shirt while you press.
Depending on the design, you'll most likely need to add the HTV a few pieces at a time to make sure nothing overlaps. You definitely don't want a carrier sheet getting stuck under HTV.
Just tack the all layers, except the last for 1-3 seconds...just enough that you can peel away the carrier sheets.
Continue adding HTV pieces...and tacking with the heat press.
When you add the final layer of HTV, press the full design for the full 20 seconds.
Once all the HTV is added you can remove the paper guide.
Note: This post may contain affiliate links. By clicking on them and purchasing products through my links, I receive a small commission. That's what helps fund Silhouette School so I can keep buying new Silhouette-related products to show you how to get the most out of your machine!
Get Silhouette School lessons delivered to your email inbox! Select Once Daily or Weekly.


.png)


Wow, this is such a clever idea, thank you so much, I'll certainly use it.
ReplyDeleteMSB
Love this hack. I would like to know what the font is for the word NEW .
ReplyDeleteThis looks great, but how does the ink from the paper not transfer to the shirt under heat and pressure?
ReplyDeleteBrilliant idea!! I would want to put an old, clear transfer sheet on top of the b/w printout just in case the ink wants to transfer to the fabric. My first thought was don't use a laser printer because that will definitely transfer. :)
ReplyDeleteThanks always, Christina in SW FL
I loved this tips. Have a nice Week!!! Kisses.
ReplyDeleteIs there a chance the black printed ink will adhere to the back of the shirt??
ReplyDeleteI've used this same technique when putting multiple colors of adhesive vinyl on glass for a floating frame design. No need for registration marks and wasting vinyl!
ReplyDeleteyay! Thank you!!!
ReplyDeleteThis tip is brilliant! But to add a kink (isn't there always one?), what do I do if the fabric I'm using isn't transparent?
ReplyDeleteSo clever! I'll definitely try this for my next onesie! Thanks much!
ReplyDeleteWow this is such a great idea! I have wasted so much HTv before but Now I wait have to! Thanks
ReplyDelete