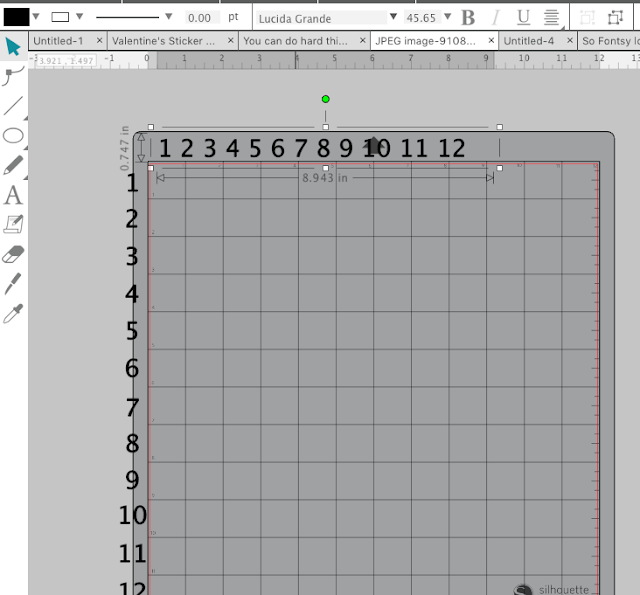
There's a way to make the numbers darker, but there's no way to make them significantly larger. There is a hack though and it's along the same lines as the Silhouette Studio trick I showed previously on changing the mat color in Silhouette Studio.
Start by opening a work area in Silhouette Studio.
Click the text tool on the left sidebar.
Start by typing "1" along the left side. Do not type the rest of the numbers. You need to replicate the first text box 11 more times down the left side.
You can do this a number of ways including copy/paste but I prefer to select the number hold down CONTROL and click the down arrow key...repeat, repeat, repeat :)
Once you have 12 "1"s going down the left sidebar you'll have to go back and change them to the correct number.
Then select all of the numbers and fill them with a color by using the Color Fill tool along the Quick Access toolbar. You can change the line color as well.
Select one number at a time now and move it next to the correct box down the left side. Be careful not to position the number in the actual work area or it will cut on your material.
When all the numbers are in position you can then select them of the numbers and from the Quick Access toolbar all and align them center so they line up evenly.
To type out the numbers for the top toolbar, you can click the Text tool and simply start typing all in the same text box.
When you're finished, line up the numbers along the top and slide the Character Spacing bar on the Text Style panel to the right until the numbers are correctly lined up over their respective grid boxes.
Now group both lines of numbers together by selecting them both > right click > group.
From the File menu click "Save" > Save to Library. Name the file and keep it in your library for the when you need it....
When you want to open it in a work area where you're working, go to your Silhouette Studio library and find the grid numbers designs. Right click it and select Merge.
This will open it in the same work area where you're current working. It should help you more easily see where your design needs to be placed on the virtual mat so that it matches up with where the material is placed on the cutting mat.
Note: This post may contain affiliate links. By clicking on them and purchasing products through my links, I receive a small commission. That's what helps fund Silhouette School so I can keep buying new Silhouette-related products to show you how to get the most out of your machine!
Get Silhouette School lessons delivered to your email inbox! Select Once Daily or Weekly.


.png)


Try to up grade my silhouette it want let me how can I get help no number to call or anything
ReplyDeleteWOW, this was just what i needed, Thank you so much
ReplyDeleteThank-you this will hep xx
ReplyDeleteThis is fantastic. Another item to add to the "template" would be a sticky note that you can add your font choices on.
ReplyDeleteYessssss
DeleteSticky notes are great! I sometimes will duplicate something written and set off the side, because once you weld something, you can not fix, unless it is quick & you can undo,undo many times!!
DeleteThank you Melissa for this tip, I remembered seeing it before but this time I went through all the steps & love it!!
ReplyDeleteThank for all your tips on how to use my silhouette.
ReplyDelete