The process to add fonts to Silhouette Studio, from outside sources, is actually super easy.
If you download or purchase a new font or a font bundle from somewhere outside of Silhouette Studio, those fonts won't show up in your Text Style list automatically like the fonts from the Silhouette Design Store.
Instead there are a few easy steps you need to take to get the fonts to show up in Silhouette Studio.
I'm working with a bunch of fonts that are part of the Fontsiest Font bundle. Once purchased, download the fonts onto your computer. Locate the zip folder on your computer (likely in the Downloads folder).
Fonts typically download as a zip file which will need to be unzipped.
How to Download New Fonts on a Mac
Double click the zip file to unzip it. A new folder with be created.Inside you'll find the font file. This is what you need to install the font on your computer.
Click on the OTS or TTF version of the font, prompting Font Book to open up. You’ll have to confirm that you want to install the font by clicking “Install Font” to begin the installation process. (Sometimes you have to click "Install Font" twice to get the font installation process to actually begin.)
You'll then get a screen that looks like this...
Font Book will ask you if you want to install and warn you if there are any concerns with the file.
You can click to install all the fonts at once or do them individually.
Once the font is successfully installed on your MAC it will appear in your Font Book list.
How to Download New Fonts on a PC
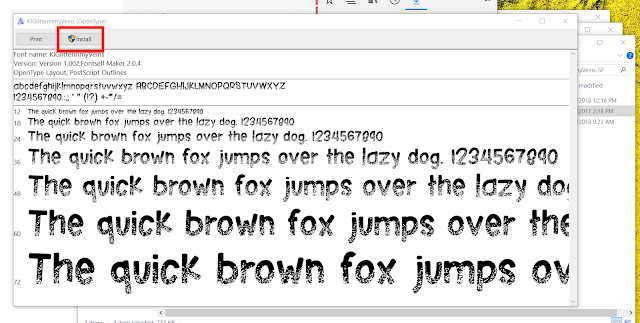
Unzip the file by double clicking it to access the font files.Find the OTS or TTS font file and open it. Then click "Install."
Follow the on-screen prompts if you get any (I didn't) and then re-start Silhouette Studio.
Your font will be listed in your font list.
Finding New Fonts in Silhouette Studio
If you are adding several new fonts to Silhouette Studio at the same time, I would suggest you download and install them all before moving to this next step.
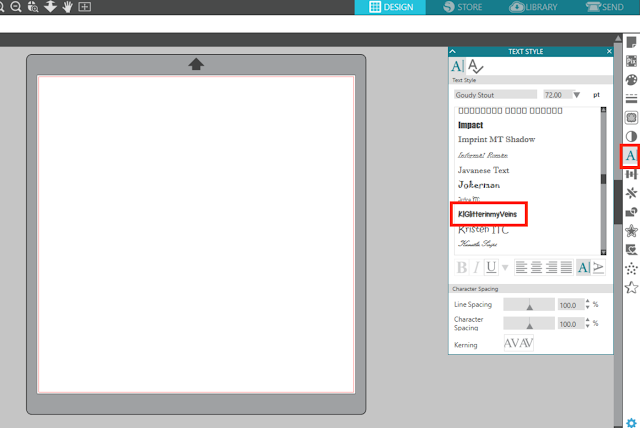
Once a font has been installed on the computer, you'll need to re-start Silhouette Studio. After that the newly installed fonts will appear in the Text Style list.
You can use these fonts in your Silhouette projects by opening a Text box through the Text tool on the left sidebar. Type out your text. The text will be in the default font style until you change it. Open the Text Style panel on the right sidebar. With your text selected in Silhouette Studio, scroll down your list of fonts or search for a font by name. Select it to change the font style.
It really is that easy!
The Fontsiest Font Bundle from So Fontsy is a great way to grab a bunch of cut-friendly fonts all at once and at a huge savings.
Note: This post may contain affiliate links. By clicking on them and purchasing products through my links, I receive a small commission. That's what helps fund Silhouette School so I can keep buying new Silhouette-related products to show you how to get the most out of your machine!
Get Silhouette School lessons delivered to your email inbox! Select Once Daily or Weekly.


.png)


Nice post. This post is very useful and informative for us. Thanks for sharing this good post.
ReplyDelete