While it's not technically possible to save custom colors, I have figured out a Silhouette Studio hack.
It's a little work up front, but if you need certain colors for a logo design, or a mock up or you want to try to get as close to a color match on vinyl as possible -you can use this method. Let's say for example you sell vinyl decals and you always use Oracal 651. If you're making mock ups for customers you want the colors in those mock ups to be as close to realistic as possible. You could use the Oracal color sheet - with HEX codes included - and create a swatch list right in Studio. You'll see what I mean as work through this.
The first thing you want to do is open a new work area in Silhouette Studio.
I am going to provide you with the free template, but I want you to know how I did it just in case you want to make your own!
With the Draw an Ellipse or Draw a Rectangle tool draw out a small shape in the work area.
Open the Replicate panel from the right sidebar and with the shape selected in your work area click "Fill Page."
Select all of the shapes on the page and then scale them wayyyyy down. I would also suggest moving it off the mat so that eventually you can merge this into other Silhouette Studio design spaces and it's in a convenient area.
If you're going to use the Custom Color Chart Template I created - download it here and from Silhouette Studio go to File > Open.
Select one of the squares you want to fill with a custom color.
Now open the Fill Color tool from along the right sidebar and click on Advanced Option.
There is an area there where you can enter a HEX code or the RGB value. Grab your HEX code or RGB code and enter it.
The square you have selected will now be filled with that color.
You can go one step further and type the HEX code or the color name (depending on how you plan to use your custom color template) near the color swatch.
After you have filled in the color, I would suggest grouping the color set so you can move it around Studio as needed.
The last step is to save your template to your Silhouette Studio library. Select the entire set and from the File menu click Save Selection > Save to Library. Name your HEX color set.
The next time you need to color match based on a HEX color find the color template in your library > right click > Merge.
It will open in the same work area where you are working AND it will even open in the same position - off the mat - where it was when you originally saved it.
Okay real life example....
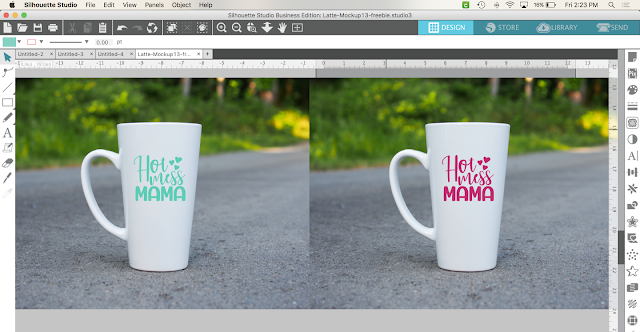
I'm an Etsy seller and I sell mugs with vinyl decals. I use Oracal 651 for my mugs. I want to show a potential customer what her vinyl decal will look like in two different color options because she can decide if she wants teal vinyl or pink.
I grab the HEX codes from the Oracal master RGB and HEX color sheet.
I create my mug mock up in Silhouette Studio and then merge in the custom color sheet. Then I use the color picker on the Fill Color tool to fill the mock up decal with the same color of the vinyl that she's considering.
I can do this as many times as needed to give my customer a few different options. To make the mock ups look more realistic, turn the line color from red to transparent through the Line Color tool.
Now I'm ready to screen grab to Save Selection to show my customer what her options would be using realistic color swatches based on the color of vinyl that could be used.
Note: This post may contain affiliate links. By clicking on them and purchasing products through my links, I receive a small commission. That's what helps fund Silhouette School so I can keep buying new Silhouette-related products to show you how to get the most out of your machine!
Get Silhouette School lessons delivered to your email inbox! Select Once Daily or Weekly.


.png)


Awesome! This would make it easy to make print and cut images or sentiments to go with cards I make with Stampin Up ink and paper...woo hoo! Thanks.
ReplyDelete