The warp tool is only available in Silhouette Studio Designer Edition in V4.1 or higher and it's not that difficult to use - especially with a few tricks.
The trick to using the warp tool to create word art is to have a guide shape. By that I mean a shape that you use to warp your text around or in.
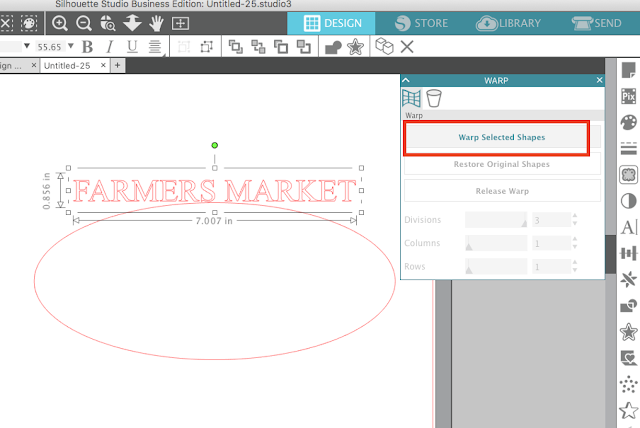
Let's say you want to make words look like a bridge, where the top is straight, but the bottom is curved. The easiest - and fastest - way to do this in Silhouette Studio is to use the Draw an Ellipse tool to draw out a long oval. That's your guide shape.
Open a text box and type out the line of text you want to make into the word art. Make your size and font style selections before you warp. In this example I am using Times New Roman.
 Position the text so it's centered over the oval by using the Align tool.
Open the Warp Panel.
With the text box selected click "Warp Selected Shapes."
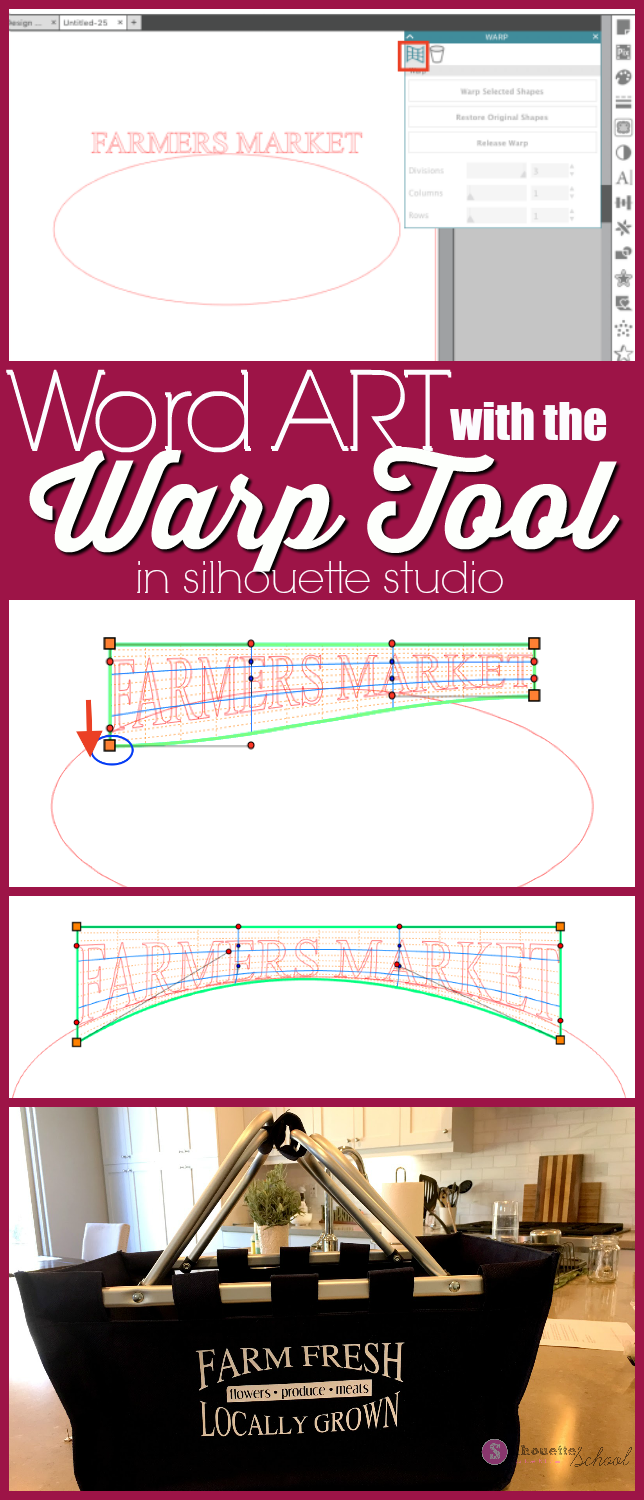
A box with a series of rows and columns will be put around your text.
Start by pulling down the orange box in the bottom left corner. Pull it (straight down) until the bottom edge of the first letter touches the edge of the oval.
Now use the red lever to pull up to bring the rest of the letters on that side of the shape up along the edge of the guide shape.
Repeat on the other side.
When the text has taken the shape and you're happy with it click "Release Warp". This will remove the selection box with all of the columns and rows, while also ungrouping all the letters. Pull the guide shape away before selecting all of your letters > group.
Once you get the hang of using the warp tool you can really start having some fun with it to create all kinds of word art using all kinds of shapes as your guides.
If you don't have Silhouette Studio Designer Edition you can use the more time consuming method of adjusting edit points to create word art shapes like this.
Note: This post may contain affiliate links. By clicking on them and purchasing products through my links, I receive a small commission. That's what helps fund Silhouette School so I can keep buying new Silhouette-related products to show you how to get the most out of your machine!
Get Silhouette School lessons delivered to your email inbox! Select Once Daily or Weekly.


.png)


Hi Melissa, thank you so much for your great tutorials, I just get to know my Cameo. But I have a Question. I do have the Designer Edition, but needed to downgrade th V3 because V4 always stuck and the Program was shut down, everyt time I tried to open a new Design or started to do anything. Do you or anyone else have an Idea for how to fix this Problem. I realy want to use V4. I use a PC running Windows 8.1 and the Grafic Card is already updated. Thank you so much for your help and everyone have a merry Christmas Time.
ReplyDeleteMany Greetings from Germany (because of my English ;>) )
Frederike
hope this works in the original version too.
ReplyDeleteThank you for this info post! I have been trying to figure it out without luck, so helpful. Thanks
ReplyDeleteThis is handy! Thank You!
ReplyDeleteThis is so helpful. Thank you so much!
ReplyDeleteSimple and thank you!
ReplyDeleteI just discovered my warp tool and I'm in love with it!!!! I really appreciate all of your blogs. :) Happy Crafting! -Lauren
ReplyDeleteI was working on a project over the weekend and was looking for my "warp" option. Couldn't find it. I can only get the Basic Edition when my license code cleary states I'm using my Designer Edition. Any clues on how I correct this?
ReplyDeleteShe has an in-depth tutorial on this if you search, but the gist is that you sign into silhouette online and your key is under your account, I believe. You can re-enter your key to get designer edition back. I've had to do it when changing laptops before.
Delete