Tracing in Silhouette Studio puts cut lines around images or shapes that do not already have cut lines so they can be cut with the Silhouette cutting machines.
Tracing is necessary when you import a file that is not specifically set up as a cut file. This could be a photo, a PNG file that you purchased from a design shop, your company's logo or jpeg image you downloaded. Please remember and respect copyrights - you can not legally take any ol' image and trace it.
But let's say you purchase a commercial use design and you don't have Silhouette Studio Designer Edition which means you need to use the PNG file that's offered. To use the PNG (or a JPEG) you need to trace it.
First open it in Silhouette Studio by going to File > Open.
Navigate to the file on your computer and then open it in a Silhouette Studio design area.
It opens in Silhouette Studio just fine, but if you go to the Send panel you will see that you have a cut line around the border of the image and not around the individual shapes, therefore tracing is required.
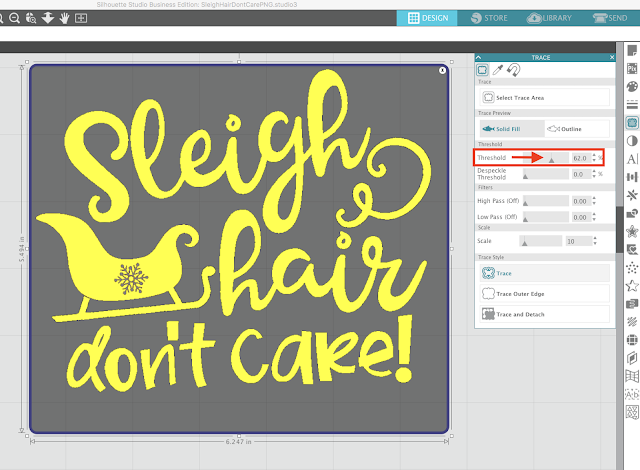
From the Design page, open the Trace panel from the right sidebar. Click "Select Trace Area" and then use your mouse to draw a box larger than the shape you want to trace.
You'll see that some yellow shading will appear.
If there are any areas that are not fully shaded, like the swirl under 'sleigh' here, adjust the Threshold bar slowly until the entire design fills with yellow.
NOTE: Tracing works based on the contrast of colors. So...if you adjust the threshold bar and you get too much yellow area in some areas while trying to get the yellow tracing shading in other areas, do not worry. You can always trace multiple times and merge elements from each of the traced designs.
If the edges of the design look jagged, pull the Scale bar down to "4".
Once you're happy with your trace, click "Trace" at the bottom of the Tracing panel. This will put red cut lines around all areas that had that yellow shading.
Now you can move the original design away.
And that's all there is to tracing! This design is now set up to be cut on a single color.
Modifying it to cut on multiple colors requires a few more steps and is a more advanced process that deserves it's own tracing tutorial.
Note: This post may contain affiliate links. By clicking on them and purchasing products through my links, I receive a small commission. That's what helps fund Silhouette School so I can keep buying new Silhouette-related products to show you how to get the most out of your machine!
Get Silhouette School lessons delivered to your email inbox! Select Once Daily or Weekly.


.png)


How do you cut multiple colored images.
ReplyDeleteThank you for the tutorial, but I have a problem. When I trace, I get red lines on the outside of the lineart and on the inside of the lineart, so on either side of the lines in the lineart there are red trace lines. I do not know how to fix it?
ReplyDeleteSorry if my explanation does not make sense ^_^;