Some designs are pretty cut and dry, but some come into Silhouette Studio not looking anything like the preview picture in the Silhouette Design Store or the library.
Let's start from the beginning.
Designs purchased from the Silhouette Design Store (should) automatically save in the Cloud folder of your library.
To open a design in the work area of Silhouette Studio, so it can be cut, click the "Library" tab along the top of Silhouette Studio.
Scroll down to find your cloud - indicated by a folder with a cloud and your email address next to it. Click "Recent Downloads" and pick a design to open.
Double click the design and it will open in a new work area.
You are now in the Design space.
Many times you'll open these designs and they won't look anything like the preview photo or the finished product. Let's take this set of baby items, for example.
When they open in Silhouette Studio the designs are all grouped together - indicated by one solid selection box around them. In order to access just one element in this group, you'll need to ungroup the design.
With the designs selected > right click > Ungroup. This puts individual selection boxes around the items. In some cases, depending on how the original design was put together by the designer, you may need to ungroup again.
Now let's say you want to work only with the baby onesie. Right now it is transparent and has no fill color. If you try to click on it, nothing will happen because you're clicking in a transparent area. But if you click right on the red line, you'll get a selection box and you can then move the design around the work area.
If you want to delete the other designs, because you do not want to cut them, hold down 'Shift' on your keyboard while selecting all of them then click "Delete" on your keyboard or right click > Delete.
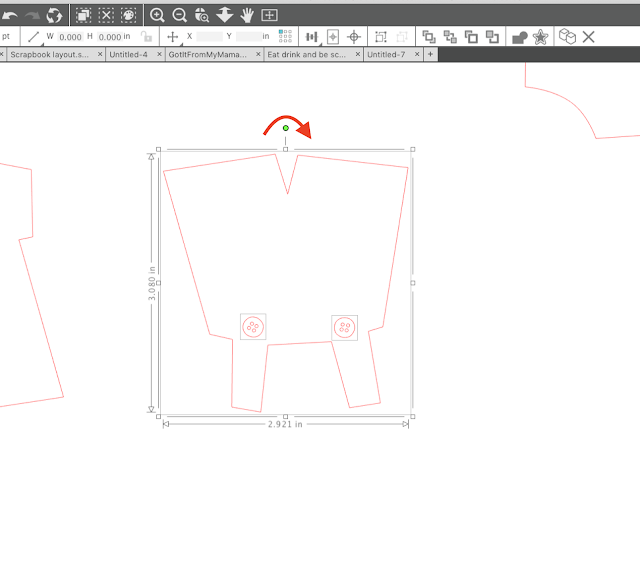
Let's say instead of deleting them, you wanted to cut the overalls. Right now they're upside down. They can be cut this way - but if you want to correctly orient them you can do that first. Select the overalls and grab the green circle at the top of the selection box with your mouse and rotate the design around.
 If you want to fill them with a color to get a better idea of how they'll look when cut (or for a Silhouette print and cut), open the Fill Color tool from the right sidebar. With the design selected, pick a color from the Fill Color tool.
If you leave the buttons where they are placed now, they will be cut out of the overall shape when it's cut leaving you with a circle in the overalls and two detached buttons. (below left)
If you want them cut in separately, so the overalls stay solid, select the buttons only and move them off the overalls. They will now be cut separately. (above right)
Now that you know the very basics of how to work with Silhouette Store Designs in Silhouette Studio, you can move forward with making your first cut with your Silhouette cutting machine. I would suggest you start with one of my beginner Silhouette tutorials.
Note: This post may contain affiliate links. By clicking on them and purchasing products through my links, I receive a small commission. That's what helps fund Silhouette School so I can keep buying new Silhouette-related products to show you how to get the most out of your machine!
Get Silhouette School lessons delivered to your email inbox! Select Once Daily or Weekly.


.png)


No comments
Thanks for leaving a comment! We get several hundred comments a day. While we appreciate every single one of them it's nearly impossible to respond back to all of them, all the time. So... if you could help me by treating these comments like a forum where readers help readers.
In addition, don't forget to look for specific answers by using the Search Box on the blog. If you're still not having any luck, feel free to email me with your question.