You can make some pretty cool pop up cards with your Silhouette cutting machine when you combine the power of print and cut with the new pop up tool!
The Silhouette Studio Pop Up tool is a feature that can be found in Silhouette Studio V4.1 and higher.
The Pop Up tool automatically turns any design or line of text into a pop up design – for a pop up card. You'll likely need to make some minor adjustments after the pop up effect is applied. These will vary depending on the design.
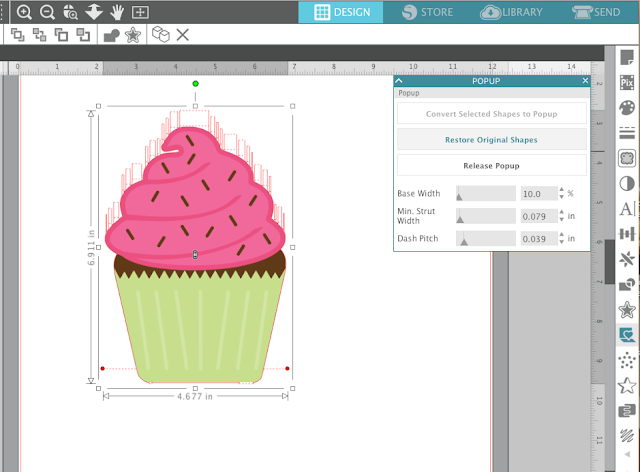
You want to start in Silhouette Studio by opening up your design or text. For this example I'm going to show you how to make a pop up card with a cupcake shape.
Open the Pop Up Tool from along the right sidebar. With the design selected click “Convert Selected Shapes to Pop Up.”
This will put a series of bases and structures on each part of the design.
From the pop up tool, adjust the “Base Width” if necessary. TIP: If you're working with text, I would suggest you make the base width at least the width of any letters that have a horizontal.
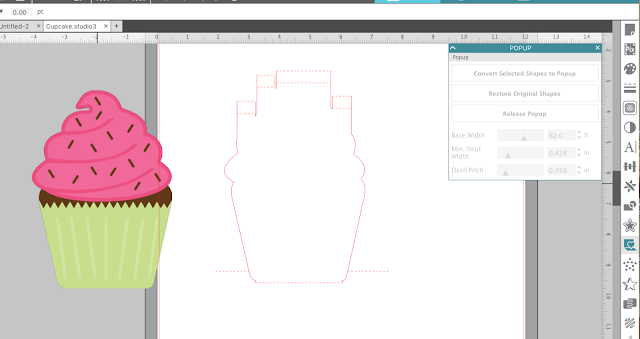
The “Min Structure Width” is the smallest width of any single tab. If you increase it, it will weld or merge any tabs that are smaller than the minimum width. For example, when the Minimum Structure Width is increased here, you can see the tabs along the top merge into several wider tabs.
Dash Pitch is the length of each perforation.
After you have adjusted all of the pop up options, you want to extend the perforated line that's cutting a cross the middle of the pop up. This line should go on the fold line of your card and should extend completely across the base.
Before you extend it, draw out your card shape using the Draw a Rectangle tool. Position the pop up, and then grab the red circles on each end of the middle line and extend them to meet the edge of the card's base. (Use the grid lines on the mat to make sure the card shape is centered on the fold line.)
With the pop up selected, click “Release Pop Up” from the Pop Up window.
This will now allow you to pull away your original design - if necessary. You can leave it where it is if you are doing a print and cut or you can move it and cut it separately from the pop up base.
For a print and cut pop up card, add registration marks and then print.
After the printing is done, open the Send panel and be sure to turn OFF the cut lines around the printed part of the design. You only want the pop up-generated lines and the base of the card to have cut lines.
Place the printed sheet on the cutting mat and send the pop up card to cut.
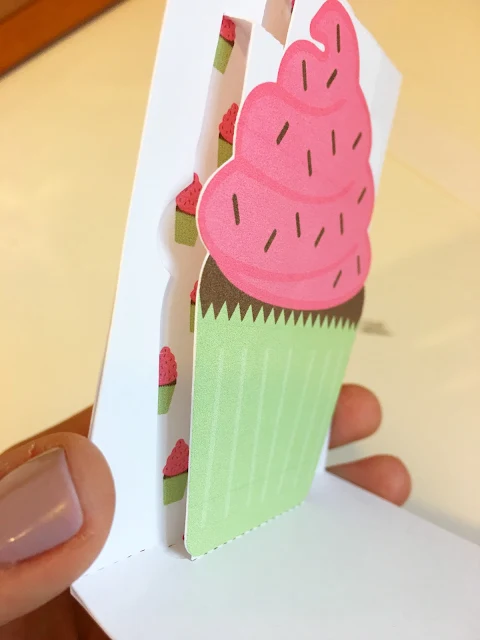
TIP: It's a good idea to cut a duplicate of the base shape sans the pop up so you can glue it to the back of the card for stability and to make the back of the card solid.
Carefully crease the fold lines to create the pop up card.
If you cut a second backing piece, use your preferred adhesive to glue it to the back of the pop up card.
And that's it!
Play around with the Silhouette Studio pop up tool. It takes some practice, but you can make some pretty cool paper crafts with it.
Note: This post may contain affiliate links. By clicking on them and purchasing products through my links, I receive a small commission. That's what helps fund Silhouette School so I can keep buying new Silhouette-related products to show you how to get the most out of your machine!
Get Silhouette School lessons delivered to your email inbox! Select Once Daily or Weekly.


.png)


Very interesting. It's beautiful. Thank you.
ReplyDeleteThis is great! But is it possible to cut the pop up shape/shapes on contrasting paper and assemble rather than print ? Printed just images don't appeal to me.
ReplyDeleteLove this tutorial. May get "brave enough" to try it too!
ReplyDeletePop up tutorial is fabulous. Easy to understand and all the little tps are great. I especially like the printed paper idea for the back of the card. It looks professional and catches the eye. gotta enroll in your school.
ReplyDeleteWhat a fun tool! Thanks for the great tutorial, Melissa.
ReplyDeleteThank you
ReplyDeleteIs this option in the design edition or basic free edition of the software? I love the cupcake card!
ReplyDeleteThis comment has been removed by the author.
ReplyDeleteI can't help but giggle when I read this post because for my 3rd Christmas (I was only 2 yrs and 3 weeks old. Go December princesses) my mother bought me a bunch of very nice pop up books which before she could setup me I tore so the pages would lie flat. We still laugh about it 38 years later. I think I will make her a pop up card for Christmas.
ReplyDeleteMy pop up lines have gone to the right of the image not above? How do I change that? Please help!
ReplyDeleteHello! Your tutorials are very useful and easy to follow. But I have a question,how can I pop up a downloaded png/jpeg image?
ReplyDelete