 |
| This is a sponsored post, but all opinions are my own. |
The tool works to warp text and graphic designs to account for a curved surface.
I'm working with a set of arrows from Craft Bundle's October Craft bundle.
The October bundle includes a whole lot more than this arrow set, as you can see above, but
it's a perfect way to show you exactly how the conical warp tool works
since arrows are straight.
In previous version of the Silhouette design software it was only possible to curve text - not shapes. Even when text was curved using Text to Path, the degree of the curve was pretty much a guessing game and could not be customized based on the exact size and shape of the surface.
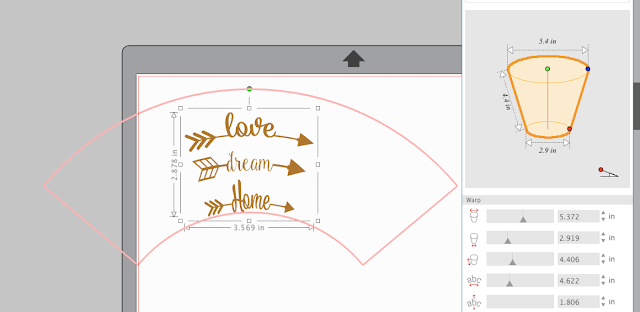
By using the Conical Warp tool, Silhouette Studio allows you to warp designs - in this case the arrows - based on the size and shape of the conical surface where the design will be applied.
To add a conical warp to a design, open the Warp tool from along the right tool bar. Click the Conical Warp tab.
Select the shape, text or design in the
work area and click “Conical Warp Selected Shapes”. This will put
a curved template around the selected object.
From the panel, enter the dimensions of the conical object where the decal will be placed. You can manually type in the dimensions or you can adjust the size of the surface by moving the blue, green and red nodules.
The design will automatically warp to account for the shape of the surface. The severity of the surface shape and the size of the shape will determine how dramatically the shape is warped. Now when you cut the design on vinyl and then put the vinyl on a tumbler, mug, or other conical surface it will appear to be straight because you have slightly warped the design to counter-act the curve.
By the way, if you have multiple designs that need to be warped and they're all going on the same size and shape surface, you can select them all at the same time....
Click "Conical Warp Selected Shapes" and apply the same warp simultaneously.
Once you click 'Apply' the designs take on the warp. Designs closer to the bottom of the warp will take on a more severe curve, while those along the top will be the least affected.
Now that you know how to curve designs - and text - using the Silhouette Studio Conical Warp tool you can take full advantage of all of these awesome designs and fonts in the October Craft Bundle. But hurry because it will only stick around for a few weeks!
Note: This post may contain affiliate links. By clicking on them and purchasing products through my links, I receive a small commission. That's what helps fund Silhouette School so I can keep buying new Silhouette-related products to show you how to get the most out of your machine!
Get Silhouette School lessons delivered to your email inbox! Select Once Daily or Weekly.


.png)


Good evening, sorry for my English, I am French!😆 Can you tell me what is the font of your example please? Thank you!
ReplyDeleteI hadn't found that tool yet. Many thanks!
ReplyDeleteWhen is this version going to be available?
ReplyDeleteThis is a game changer! WOOHOO!
ReplyDeleteIs there a way to use this for something that just needs a tiny curve like a disc ornament? I put in the dimensions following the steps given above and it did not warp the design at all
ReplyDeleteI purchased the business edition just for this feature. But I can't find it in my Design Studio. HELP!!
ReplyDeleteTo the right of your monitor you have a ruler, (under the send to cutter) it should show all the different 1's the warp tool is 3rd from the bottom about the cog for settings hope that makes sense x
ReplyDeleteI just upgraded to business edition the other day. My screen looks nothing like yours. It still looks like the designer edition, but with very few changes and absolutely no warp screen on it. Kind of curious why the upgrade really didn’t change very much on mine?
ReplyDeleteI'm having an issue with the conical warp creating a duplicate design over my original. Couldn't figure out why it wasn't correctly until I accidentally went to move a letter and saw a duplicate underneath. What am I doing wrong? It's happened on more than just one design.
ReplyDeleteHow do you get a full cup warp to connect correctly.
ReplyDeleteI have the business edition but my warp only shows text no cups there. How do I add the cups?
ReplyDeletePlease send us an email with some screen shots so we can take a look. Thanks
DeleteIt would be helpful to see how this looks/works on an actual glass/tumbler
ReplyDeleteI am trying to cut one inch strips for a megaphone and when I put the dimensions in and move the shape up or down (needing one for the top and one for the bottom, it resizes the length and then is either too small or too big. Help
ReplyDelete