 |
| This is a sponsored post but all opinions are my own. |
And because we have that whole 'school' thing going on, I want to make sure you know exactly how to use these awesome printables so I'm sharing a quick Silhouette print and cut tutorial with you too!
The Thanksgiving Photo Prop set is actually really easy to use and the kids, especially, will love them.
First you need to head over and download the Thanksgiving print and cut files for Silhouette from the Apex Cuttable Designs site. The download will save on your computer as a zip file. In order to open the files in Silhouette Studio you must first unzip the file.
Now that you have extracted the files you can bulk import the designs into Silhouette Studio.
To do so, open Silhouette Studio and click on the library tab. Determine which library folder you want to the files to go to and, with all of the files selected at the same time (hold down shift to select multiple files), drag and drop the Silhouette designs into the folder.
Here's a quick video on how to unzip and bulk import into Silhouette Studio if you need it. (Please excuse the awkward freeze frame!)
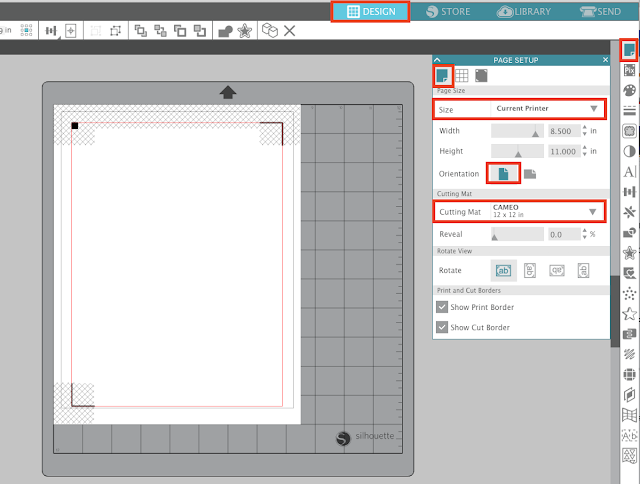
Return to the Design page to set up your work area before you start adding designs to it. Open the Page SetUp tab. Because this is a Silhouette print and cut project, you want to change the Material size to "Current Printer." Be sure the orientation is on Portrait and the cutting mat is selected.
Still on the Page SetUp panel, click the tab for Registration Marks. Turn the print and cut registration marks on by selecting "Type 1" from the drop down menu. You can give yourself more printable space by moving the lever bars for all but the Bottom Inset to the left.
With the page setup, return to the Library and find the first of the Thanksgiving photo prop designs you want to print and cut. Right click and select "Merge (file name)". This will put the design in the same work area that you were working in rather than opening a new work area.
Size the printable photo prop design as you wish by pulling the corner of the selection box in or out. Place the design as close to the edge of the print and cut borders and hashed areas as possible so you can fit more designs on the same sheet.
Return to the library > locate design > right click > Merge design.
To maximize space in the work area, rotate designs as necessary either using the green circle control at the top of each selection box or by using the Rotate tool in the Transform panel. (Blue)
If you need just a little more space to fit a design, you can adjust the Length of the actual registration marks from the Page SetUp Panel > Registration Marks tab. (Red)
When you're ready to print, place a piece of coverstock card stock (110 lb) in your printer. You want to use heavy card stock for photo props so they're not flimsy!
In Silhouette Studio click the Print icon from along the top tool bar and the page will print with both the registration marks and the Thanksgiving designs.
Place the printed sheet on your cutting mat, load it into your cutting machine, and return to Silhouette Studio.
 Without moving the designs in the work space at all, open the Send panel. If the cut lines are not on, which they likely won't be if you're using SVG files, click "Cut Edge". ("Cut" will add internal cut lines which you don't want for these Silhouette print and cut designs.)
Select "Coverstock, Heavy" as the Material type and check the recommended cut settings. Adjust the blade depth manually if you are not using an Autoblade.
Click "Send" and the machine will begin cutting the print and cut photo booth props!
When the cut is finished, remove the mat and material. You're almost done.
You just need to add sticks to each of your Thanksgiving photo props. I typically use wood skewers (careful with the pokey end), wood nail tools, or 1/8" wooden dowels. A generous line of hot glue will keep them in place.
How fun are these?! I love that they're literally all ready to print and cut as soon as you download the full free set from Apex Cuttable Designs!
Note: This post may contain affiliate links. By clicking on them and purchasing products through my links, I receive a small commission. That's what helps fund Silhouette School so I can keep buying new Silhouette-related products to show you how to get the most out of your machine!
Get Silhouette School lessons delivered to your email inbox! Select Once Daily or Weekly.


.png)


No comments
Thanks for leaving a comment! We get several hundred comments a day. While we appreciate every single one of them it's nearly impossible to respond back to all of them, all the time. So... if you could help me by treating these comments like a forum where readers help readers.
In addition, don't forget to look for specific answers by using the Search Box on the blog. If you're still not having any luck, feel free to email me with your question.